> ## Documentation Index
> Fetch the complete documentation index at: https://docs.portkey.ai/docs/llms.txt
> Use this file to discover all available pages before exploring further.
# Build a chatbot using Portkey's Prompt Templates
> Portkey's prompt templates offer a powerful solution for testing and building chatbots.
Building production-grade chatbots comes with its share of challenges. From managing conversation context and engineering prompts to ensuring consistent responses across different scenarios – the development process can quickly become complex. Add in the need for version control, testing different configurations, and maintaining production stability, and you've got quite a puzzle to solve.
This is where Portkey's prompt templates come in. More than just a development tool, Portkey provides a complete ecosystem for building, testing, and deploying chatbots with confidence. You'll be able to:
* Experiment with different prompt configurations while maintaining version control
* Test your chatbot's responses in real-time with an interactive playground
* Portkey's robust **versioning system** ensures that you can experiment freely with your prompts, allowing for easy rollback.
* Experiment with different models and configurations to find the best fit for your use case
In this guide, we'll walk through the process of building a production-ready chatbot using Portkey's prompt templates. Whether you're creating a customer service bot, a knowledge assistant, or any other conversational AI application, you'll learn how to leverage Portkey's features to build a robust solution that scales.
Here's the link to the collab notebook of the chatbot-
[ ](https://colab.research.google.com/drive/1BZGkDisia%5FbeCibB3eaep0n87cIcqShR?usp=sharing)
## Setting Up Your Chatbot
Go to [Portkey's Prompts dashboard](https://app.portkey.ai/prompts). Click on the **Create** button. You are now on Prompt Playground.
### Step 1: Define Your System Prompt
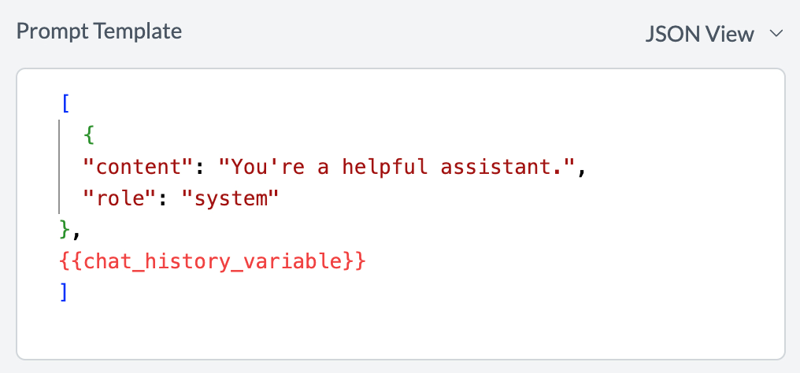
Start by defining your system prompt. This sets the initial context and behavior for your chatbot. You can set this up in your Portkey's Prompt Library using the **JSON View**
](https://colab.research.google.com/drive/1BZGkDisia%5FbeCibB3eaep0n87cIcqShR?usp=sharing)
## Setting Up Your Chatbot
Go to [Portkey's Prompts dashboard](https://app.portkey.ai/prompts). Click on the **Create** button. You are now on Prompt Playground.
### Step 1: Define Your System Prompt
Start by defining your system prompt. This sets the initial context and behavior for your chatbot. You can set this up in your Portkey's Prompt Library using the **JSON View**
 ```json theme={"system"}
[
{"content": "You're a helpful assistant.", "role": "system"},
{{chat_history}}
]
```
### Step 2: Create a Variable for Conversation History
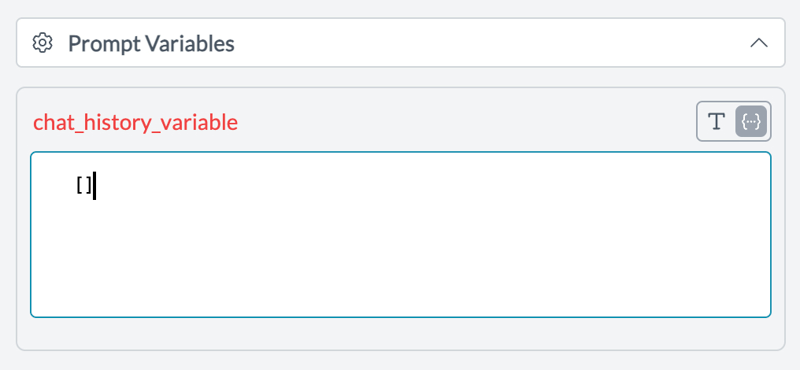
In the Portkey UI, create a variable for the conversation. Look for two icons next to the variable name: "T" and "\{..}". Click the "\{...}" icon to switch to **JSON** **mode** if you need to set a default.
**Variable name must match your code:** Use **`chat_history`** as the variable name so it matches the placeholder `{{chat_history}}` in your prompt (Step 1). In your application code, you will pass `chat_history` as a **plain-text string** (e.g. `"Assistant: Hello...\n\nUser: Hi\n\n"`), not as a raw JSON array. Formatting the history as text avoids JSON embedding issues and keeps the API request valid.
As your chatbot interacts with users, append each turn to the conversation in memory, then format the full history as a single string and pass it in `variables.chat_history` on each request. The model will see the full thread and respond in context.
```json theme={"system"}
[
{"content": "You're a helpful assistant.", "role": "system"},
{{chat_history}}
]
```
### Step 2: Create a Variable for Conversation History
In the Portkey UI, create a variable for the conversation. Look for two icons next to the variable name: "T" and "\{..}". Click the "\{...}" icon to switch to **JSON** **mode** if you need to set a default.
**Variable name must match your code:** Use **`chat_history`** as the variable name so it matches the placeholder `{{chat_history}}` in your prompt (Step 1). In your application code, you will pass `chat_history` as a **plain-text string** (e.g. `"Assistant: Hello...\n\nUser: Hi\n\n"`), not as a raw JSON array. Formatting the history as text avoids JSON embedding issues and keeps the API request valid.
As your chatbot interacts with users, append each turn to the conversation in memory, then format the full history as a single string and pass it in `variables.chat_history` on each request. The model will see the full thread and respond in context.
 ### Step 3: Implementing the Chatbot
Use Portkey's API to generate responses based on your prompt template. Pass the variable **`chat_history`** (not `variable`) so it matches the placeholder in your prompt. Format the conversation as a **plain-text string** before sending to avoid JSON parsing errors when the value is embedded in the request.
```python theme={"system"}
from portkey_ai import Portkey
client = Portkey(api_key="YOUR_PORTKEY_API_KEY") # or use env
def format_chat_history(conversation_history):
"""Format conversation for the prompt (plain text)."""
lines = []
for m in conversation_history:
role = "User" if m["role"] == "user" else "Assistant"
lines.append(f"{role}: {m['content']}")
return "\n\n".join(lines)
def generate_response(conversation_history):
chat_history_str = format_chat_history(conversation_history)
prompt_completion = client.prompts.completions.create(
prompt_id="YOUR_PROMPT_ID",
variables={"chat_history": chat_history_str},
)
return prompt_completion.choices[0].message.content
# Example usage
conversation_history = [
{"content": "Hello, how can I assist you today?", "role": "assistant"},
{"content": "What's the weather like?", "role": "user"},
]
response = generate_response(conversation_history)
print(response)
```
```javascript theme={"system"}
import { Portkey } from 'portkey-ai';
const portkey = new Portkey({
apiKey: 'YOUR_PORTKEY_API_KEY',
baseURL: 'https://api.portkey.ai/v1',
});
const PROMPT_ID = 'YOUR_PROMPT_ID';
function formatChatHistory(conversationHistory) {
return conversationHistory
.map((m) => `${m.role === 'user' ? 'User' : 'Assistant'}: ${m.content}`)
.join('\n\n');
}
async function generateResponse(conversationHistory) {
const chatHistoryStr = formatChatHistory(conversationHistory);
const completion = await portkey.prompts.completions.create({
promptID: PROMPT_ID,
variables: { chat_history: chatHistoryStr },
});
return completion.choices[0].message.content;
}
// Example usage
const conversationHistory = [
{ content: 'Hello, how can I assist you today?', role: 'assistant' },
{ content: "What's the weather like?", role: 'user' },
];
const response = await generateResponse(conversationHistory);
console.log(response);
```
### Step 4: Append the Response
After generating a response, append it to your conversation history:
```python theme={"system"}
def append_response(conversation_history, response):
conversation_history.append({"content": response, "role": "assistant"})
return conversation_history
# Continuing from the previous example
conversation_history = append_response(conversation_history, response)
```
```javascript theme={"system"}
function appendResponse(conversationHistory, response) {
conversationHistory.push({ content: response, role: 'assistant' });
return conversationHistory;
}
// Continuing from the previous example
conversationHistory = appendResponse(conversationHistory, response);
```
### Step 5: Take User Input to Continue the Conversation
Implement a loop to continuously take user input and generate responses:
```python theme={"system"}
# Continue the conversation
while True:
user_input = input("You: ")
if user_input.lower() == 'exit':
break
conversation_history.append({
"content": user_input,
"role": "user"
})
response = generate_response(conversation_history)
conversation_history = append_response(conversation_history, response)
print("Bot:", response)
print("Conversation ended.")
```
```javascript theme={"system"}
import * as readline from 'readline';
function ask(rl, prompt) {
return new Promise((resolve) => rl.question(prompt, resolve));
}
// Continue the conversation (run inside async function)
const rl = readline.createInterface({ input: process.stdin, output: process.stdout });
while (true) {
const userInput = await ask(rl, 'You: ');
if (!userInput || userInput.toLowerCase().trim() === 'exit') break;
conversationHistory.push({ content: userInput.trim(), role: 'user' });
const response = await generateResponse(conversationHistory);
conversationHistory = appendResponse(conversationHistory, response);
console.log('Bot:', response);
}
rl.close();
console.log('Conversation ended.');
```
### Complete Example
Here's a complete example that puts all these steps together. Use the variable **`chat_history`**, format the conversation as **plain text**, and pass it in `variables.chat_history` so the model sees the full thread and responds in context. For the Node.js SDK use **`promptID`** (capital "ID"); see the [Prompt API reference](https://portkey.ai/docs/product/prompt-engineering-studio/prompt-api).
```python theme={"system"}
from portkey_ai import Portkey
client = Portkey(api_key="YOUR_PORTKEY_API_KEY")
def format_chat_history(conversation_history):
"""Format conversation for the prompt template (plain text, no nested JSON)."""
lines = []
for m in conversation_history:
role = "User" if m["role"] == "user" else "Assistant"
lines.append(f"{role}: {m['content']}")
return "\n\n".join(lines)
def generate_response(conversation_history):
chat_history_str = format_chat_history(conversation_history)
prompt_completion = client.prompts.completions.create(
prompt_id="YOUR_PROMPT_ID",
variables={"chat_history": chat_history_str},
)
return prompt_completion.choices[0].message.content
def append_response(conversation_history, response):
conversation_history.append({"content": response, "role": "assistant"})
return conversation_history
# Initial conversation
conversation_history = [{"content": "Hello, how can I assist you today?", "role": "assistant"}]
response = generate_response(conversation_history)
conversation_history = append_response(conversation_history, response)
print("Bot:", response)
while True:
user_input = input("You: ")
if user_input.lower() == "exit":
break
conversation_history.append({"content": user_input, "role": "user"})
response = generate_response(conversation_history)
conversation_history = append_response(conversation_history, response)
print("Bot:", response)
print("Conversation ended.")
```
Use **`promptID`** (capital "ID") and **`chat_history`** as a formatted string. Requires Node 18+, `"type": "module"` in `package.json`, and `npm install portkey-ai`.
```javascript theme={"system"}
import { Portkey } from 'portkey-ai';
import * as readline from 'readline';
const portkey = new Portkey({
apiKey: process.env.PORTKEY_API_KEY || 'YOUR_PORTKEY_API_KEY',
baseURL: 'https://api.portkey.ai/v1',
});
const PROMPT_ID = process.env.PORTKEY_PROMPT_ID || 'YOUR_PROMPT_ID';
function formatChatHistory(conversationHistory) {
return conversationHistory
.map((m) => `${m.role === 'user' ? 'User' : 'Assistant'}: ${m.content}`)
.join('\n\n');
}
async function generateResponse(conversationHistory) {
const chatHistoryStr = formatChatHistory(conversationHistory);
const completion = await portkey.prompts.completions.create({
promptID: PROMPT_ID,
variables: { chat_history: chatHistoryStr },
});
return completion.choices[0].message.content;
}
function appendResponse(conversationHistory, response) {
conversationHistory.push({ content: response, role: 'assistant' });
return conversationHistory;
}
function ask(rl, prompt) {
return new Promise((resolve) => rl.question(prompt, resolve));
}
async function main() {
let conversationHistory = [
{ content: 'Hello, how can I assist you today?', role: 'assistant' },
];
try {
const response = await generateResponse(conversationHistory);
conversationHistory = appendResponse(conversationHistory, response);
console.log('Bot:', response);
} catch (err) {
console.error('Initial generation failed:', err.message);
}
const rl = readline.createInterface({ input: process.stdin, output: process.stdout });
while (true) {
const userInput = await ask(rl, 'You: ');
if (!userInput || userInput.toLowerCase().trim() === 'exit') break;
conversationHistory.push({ content: userInput.trim(), role: 'user' });
try {
const response = await generateResponse(conversationHistory);
conversationHistory = appendResponse(conversationHistory, response);
console.log('Bot:', response);
} catch (err) {
console.error('Error:', err.message);
}
}
rl.close();
console.log('Conversation ended.');
}
main();
```
* **Python:** Use `prompt_id` and `variables={"chat_history": chat_history_str}`.
* **Node.js:** Use `promptID` (capital "ID") and `variables: { chat_history: chatHistoryStr }`. Pass a string for `chat_history` in both.
## Conclusion
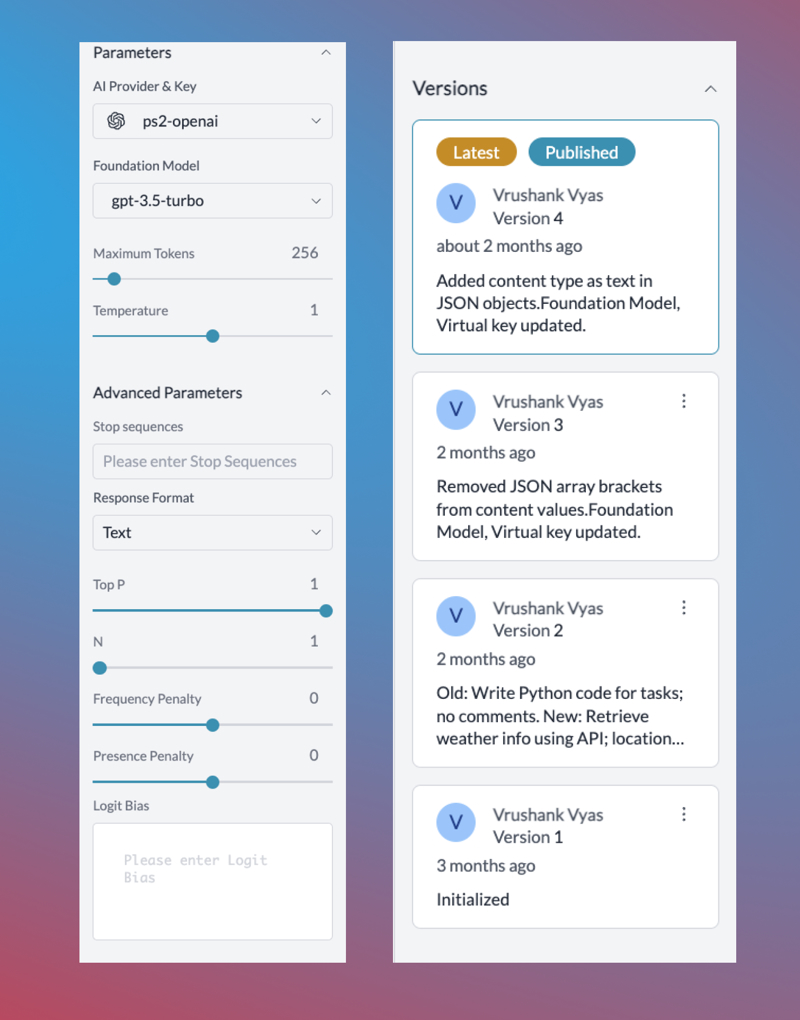
Voilà! You've successfully set up your chatbot using Portkey's prompt templates. Portkey enables you to experiment with various LLM providers. It acts as a definitive source of truth for your team, and it versions each snapshot of model parameters, allowing for easy rollback. Here's a snapshot of the Prompt Management UI. To learn more about Prompt Management [**click here**](/product/prompt-library).
### Step 3: Implementing the Chatbot
Use Portkey's API to generate responses based on your prompt template. Pass the variable **`chat_history`** (not `variable`) so it matches the placeholder in your prompt. Format the conversation as a **plain-text string** before sending to avoid JSON parsing errors when the value is embedded in the request.
```python theme={"system"}
from portkey_ai import Portkey
client = Portkey(api_key="YOUR_PORTKEY_API_KEY") # or use env
def format_chat_history(conversation_history):
"""Format conversation for the prompt (plain text)."""
lines = []
for m in conversation_history:
role = "User" if m["role"] == "user" else "Assistant"
lines.append(f"{role}: {m['content']}")
return "\n\n".join(lines)
def generate_response(conversation_history):
chat_history_str = format_chat_history(conversation_history)
prompt_completion = client.prompts.completions.create(
prompt_id="YOUR_PROMPT_ID",
variables={"chat_history": chat_history_str},
)
return prompt_completion.choices[0].message.content
# Example usage
conversation_history = [
{"content": "Hello, how can I assist you today?", "role": "assistant"},
{"content": "What's the weather like?", "role": "user"},
]
response = generate_response(conversation_history)
print(response)
```
```javascript theme={"system"}
import { Portkey } from 'portkey-ai';
const portkey = new Portkey({
apiKey: 'YOUR_PORTKEY_API_KEY',
baseURL: 'https://api.portkey.ai/v1',
});
const PROMPT_ID = 'YOUR_PROMPT_ID';
function formatChatHistory(conversationHistory) {
return conversationHistory
.map((m) => `${m.role === 'user' ? 'User' : 'Assistant'}: ${m.content}`)
.join('\n\n');
}
async function generateResponse(conversationHistory) {
const chatHistoryStr = formatChatHistory(conversationHistory);
const completion = await portkey.prompts.completions.create({
promptID: PROMPT_ID,
variables: { chat_history: chatHistoryStr },
});
return completion.choices[0].message.content;
}
// Example usage
const conversationHistory = [
{ content: 'Hello, how can I assist you today?', role: 'assistant' },
{ content: "What's the weather like?", role: 'user' },
];
const response = await generateResponse(conversationHistory);
console.log(response);
```
### Step 4: Append the Response
After generating a response, append it to your conversation history:
```python theme={"system"}
def append_response(conversation_history, response):
conversation_history.append({"content": response, "role": "assistant"})
return conversation_history
# Continuing from the previous example
conversation_history = append_response(conversation_history, response)
```
```javascript theme={"system"}
function appendResponse(conversationHistory, response) {
conversationHistory.push({ content: response, role: 'assistant' });
return conversationHistory;
}
// Continuing from the previous example
conversationHistory = appendResponse(conversationHistory, response);
```
### Step 5: Take User Input to Continue the Conversation
Implement a loop to continuously take user input and generate responses:
```python theme={"system"}
# Continue the conversation
while True:
user_input = input("You: ")
if user_input.lower() == 'exit':
break
conversation_history.append({
"content": user_input,
"role": "user"
})
response = generate_response(conversation_history)
conversation_history = append_response(conversation_history, response)
print("Bot:", response)
print("Conversation ended.")
```
```javascript theme={"system"}
import * as readline from 'readline';
function ask(rl, prompt) {
return new Promise((resolve) => rl.question(prompt, resolve));
}
// Continue the conversation (run inside async function)
const rl = readline.createInterface({ input: process.stdin, output: process.stdout });
while (true) {
const userInput = await ask(rl, 'You: ');
if (!userInput || userInput.toLowerCase().trim() === 'exit') break;
conversationHistory.push({ content: userInput.trim(), role: 'user' });
const response = await generateResponse(conversationHistory);
conversationHistory = appendResponse(conversationHistory, response);
console.log('Bot:', response);
}
rl.close();
console.log('Conversation ended.');
```
### Complete Example
Here's a complete example that puts all these steps together. Use the variable **`chat_history`**, format the conversation as **plain text**, and pass it in `variables.chat_history` so the model sees the full thread and responds in context. For the Node.js SDK use **`promptID`** (capital "ID"); see the [Prompt API reference](https://portkey.ai/docs/product/prompt-engineering-studio/prompt-api).
```python theme={"system"}
from portkey_ai import Portkey
client = Portkey(api_key="YOUR_PORTKEY_API_KEY")
def format_chat_history(conversation_history):
"""Format conversation for the prompt template (plain text, no nested JSON)."""
lines = []
for m in conversation_history:
role = "User" if m["role"] == "user" else "Assistant"
lines.append(f"{role}: {m['content']}")
return "\n\n".join(lines)
def generate_response(conversation_history):
chat_history_str = format_chat_history(conversation_history)
prompt_completion = client.prompts.completions.create(
prompt_id="YOUR_PROMPT_ID",
variables={"chat_history": chat_history_str},
)
return prompt_completion.choices[0].message.content
def append_response(conversation_history, response):
conversation_history.append({"content": response, "role": "assistant"})
return conversation_history
# Initial conversation
conversation_history = [{"content": "Hello, how can I assist you today?", "role": "assistant"}]
response = generate_response(conversation_history)
conversation_history = append_response(conversation_history, response)
print("Bot:", response)
while True:
user_input = input("You: ")
if user_input.lower() == "exit":
break
conversation_history.append({"content": user_input, "role": "user"})
response = generate_response(conversation_history)
conversation_history = append_response(conversation_history, response)
print("Bot:", response)
print("Conversation ended.")
```
Use **`promptID`** (capital "ID") and **`chat_history`** as a formatted string. Requires Node 18+, `"type": "module"` in `package.json`, and `npm install portkey-ai`.
```javascript theme={"system"}
import { Portkey } from 'portkey-ai';
import * as readline from 'readline';
const portkey = new Portkey({
apiKey: process.env.PORTKEY_API_KEY || 'YOUR_PORTKEY_API_KEY',
baseURL: 'https://api.portkey.ai/v1',
});
const PROMPT_ID = process.env.PORTKEY_PROMPT_ID || 'YOUR_PROMPT_ID';
function formatChatHistory(conversationHistory) {
return conversationHistory
.map((m) => `${m.role === 'user' ? 'User' : 'Assistant'}: ${m.content}`)
.join('\n\n');
}
async function generateResponse(conversationHistory) {
const chatHistoryStr = formatChatHistory(conversationHistory);
const completion = await portkey.prompts.completions.create({
promptID: PROMPT_ID,
variables: { chat_history: chatHistoryStr },
});
return completion.choices[0].message.content;
}
function appendResponse(conversationHistory, response) {
conversationHistory.push({ content: response, role: 'assistant' });
return conversationHistory;
}
function ask(rl, prompt) {
return new Promise((resolve) => rl.question(prompt, resolve));
}
async function main() {
let conversationHistory = [
{ content: 'Hello, how can I assist you today?', role: 'assistant' },
];
try {
const response = await generateResponse(conversationHistory);
conversationHistory = appendResponse(conversationHistory, response);
console.log('Bot:', response);
} catch (err) {
console.error('Initial generation failed:', err.message);
}
const rl = readline.createInterface({ input: process.stdin, output: process.stdout });
while (true) {
const userInput = await ask(rl, 'You: ');
if (!userInput || userInput.toLowerCase().trim() === 'exit') break;
conversationHistory.push({ content: userInput.trim(), role: 'user' });
try {
const response = await generateResponse(conversationHistory);
conversationHistory = appendResponse(conversationHistory, response);
console.log('Bot:', response);
} catch (err) {
console.error('Error:', err.message);
}
}
rl.close();
console.log('Conversation ended.');
}
main();
```
* **Python:** Use `prompt_id` and `variables={"chat_history": chat_history_str}`.
* **Node.js:** Use `promptID` (capital "ID") and `variables: { chat_history: chatHistoryStr }`. Pass a string for `chat_history` in both.
## Conclusion
Voilà! You've successfully set up your chatbot using Portkey's prompt templates. Portkey enables you to experiment with various LLM providers. It acts as a definitive source of truth for your team, and it versions each snapshot of model parameters, allowing for easy rollback. Here's a snapshot of the Prompt Management UI. To learn more about Prompt Management [**click here**](/product/prompt-library).