> ## Documentation Index
> Fetch the complete documentation index at: https://docs.portkey.ai/docs/llms.txt
> Use this file to discover all available pages before exploring further.
# Portkey with OpenAI Computer Use
> Leverage Portkey with OpenAI's Computer Use tool for automated browser interactions with enterprise-grade observability and controls
OpenAI's Computer Use tool enables AI to interact with computer interfaces through a continuous loop of actions and screenshots, allowing for automated web browsing, form filling, data extraction, and other complex UI-based tasks. However, deploying this capability in production environments comes with challenges around monitoring, cost control, and reliability.
This cookbook demonstrates how to integrate Portkey with OpenAI's Computer Use to build production-ready automation solutions with enterprise-grade controls. You'll learn how to:
* Set up a Portkey client to handle Computer Use API calls
* Build a complete Playwright-based browser automation solution
* Implement the continuous action-screenshot loop required by Computer Use
* Enhance your application with Portkey's enterprise features
## Why Use Portkey with Computer Use?
Portkey adds several critical capabilities when working with OpenAI's Computer Use:
* **Unified API Gateway**: Seamlessly switch between models or providers while maintaining the same implementation
* **Cost Tracking & Budget Controls**: Monitor usage costs in real-time and set spending limits to prevent unexpected bills
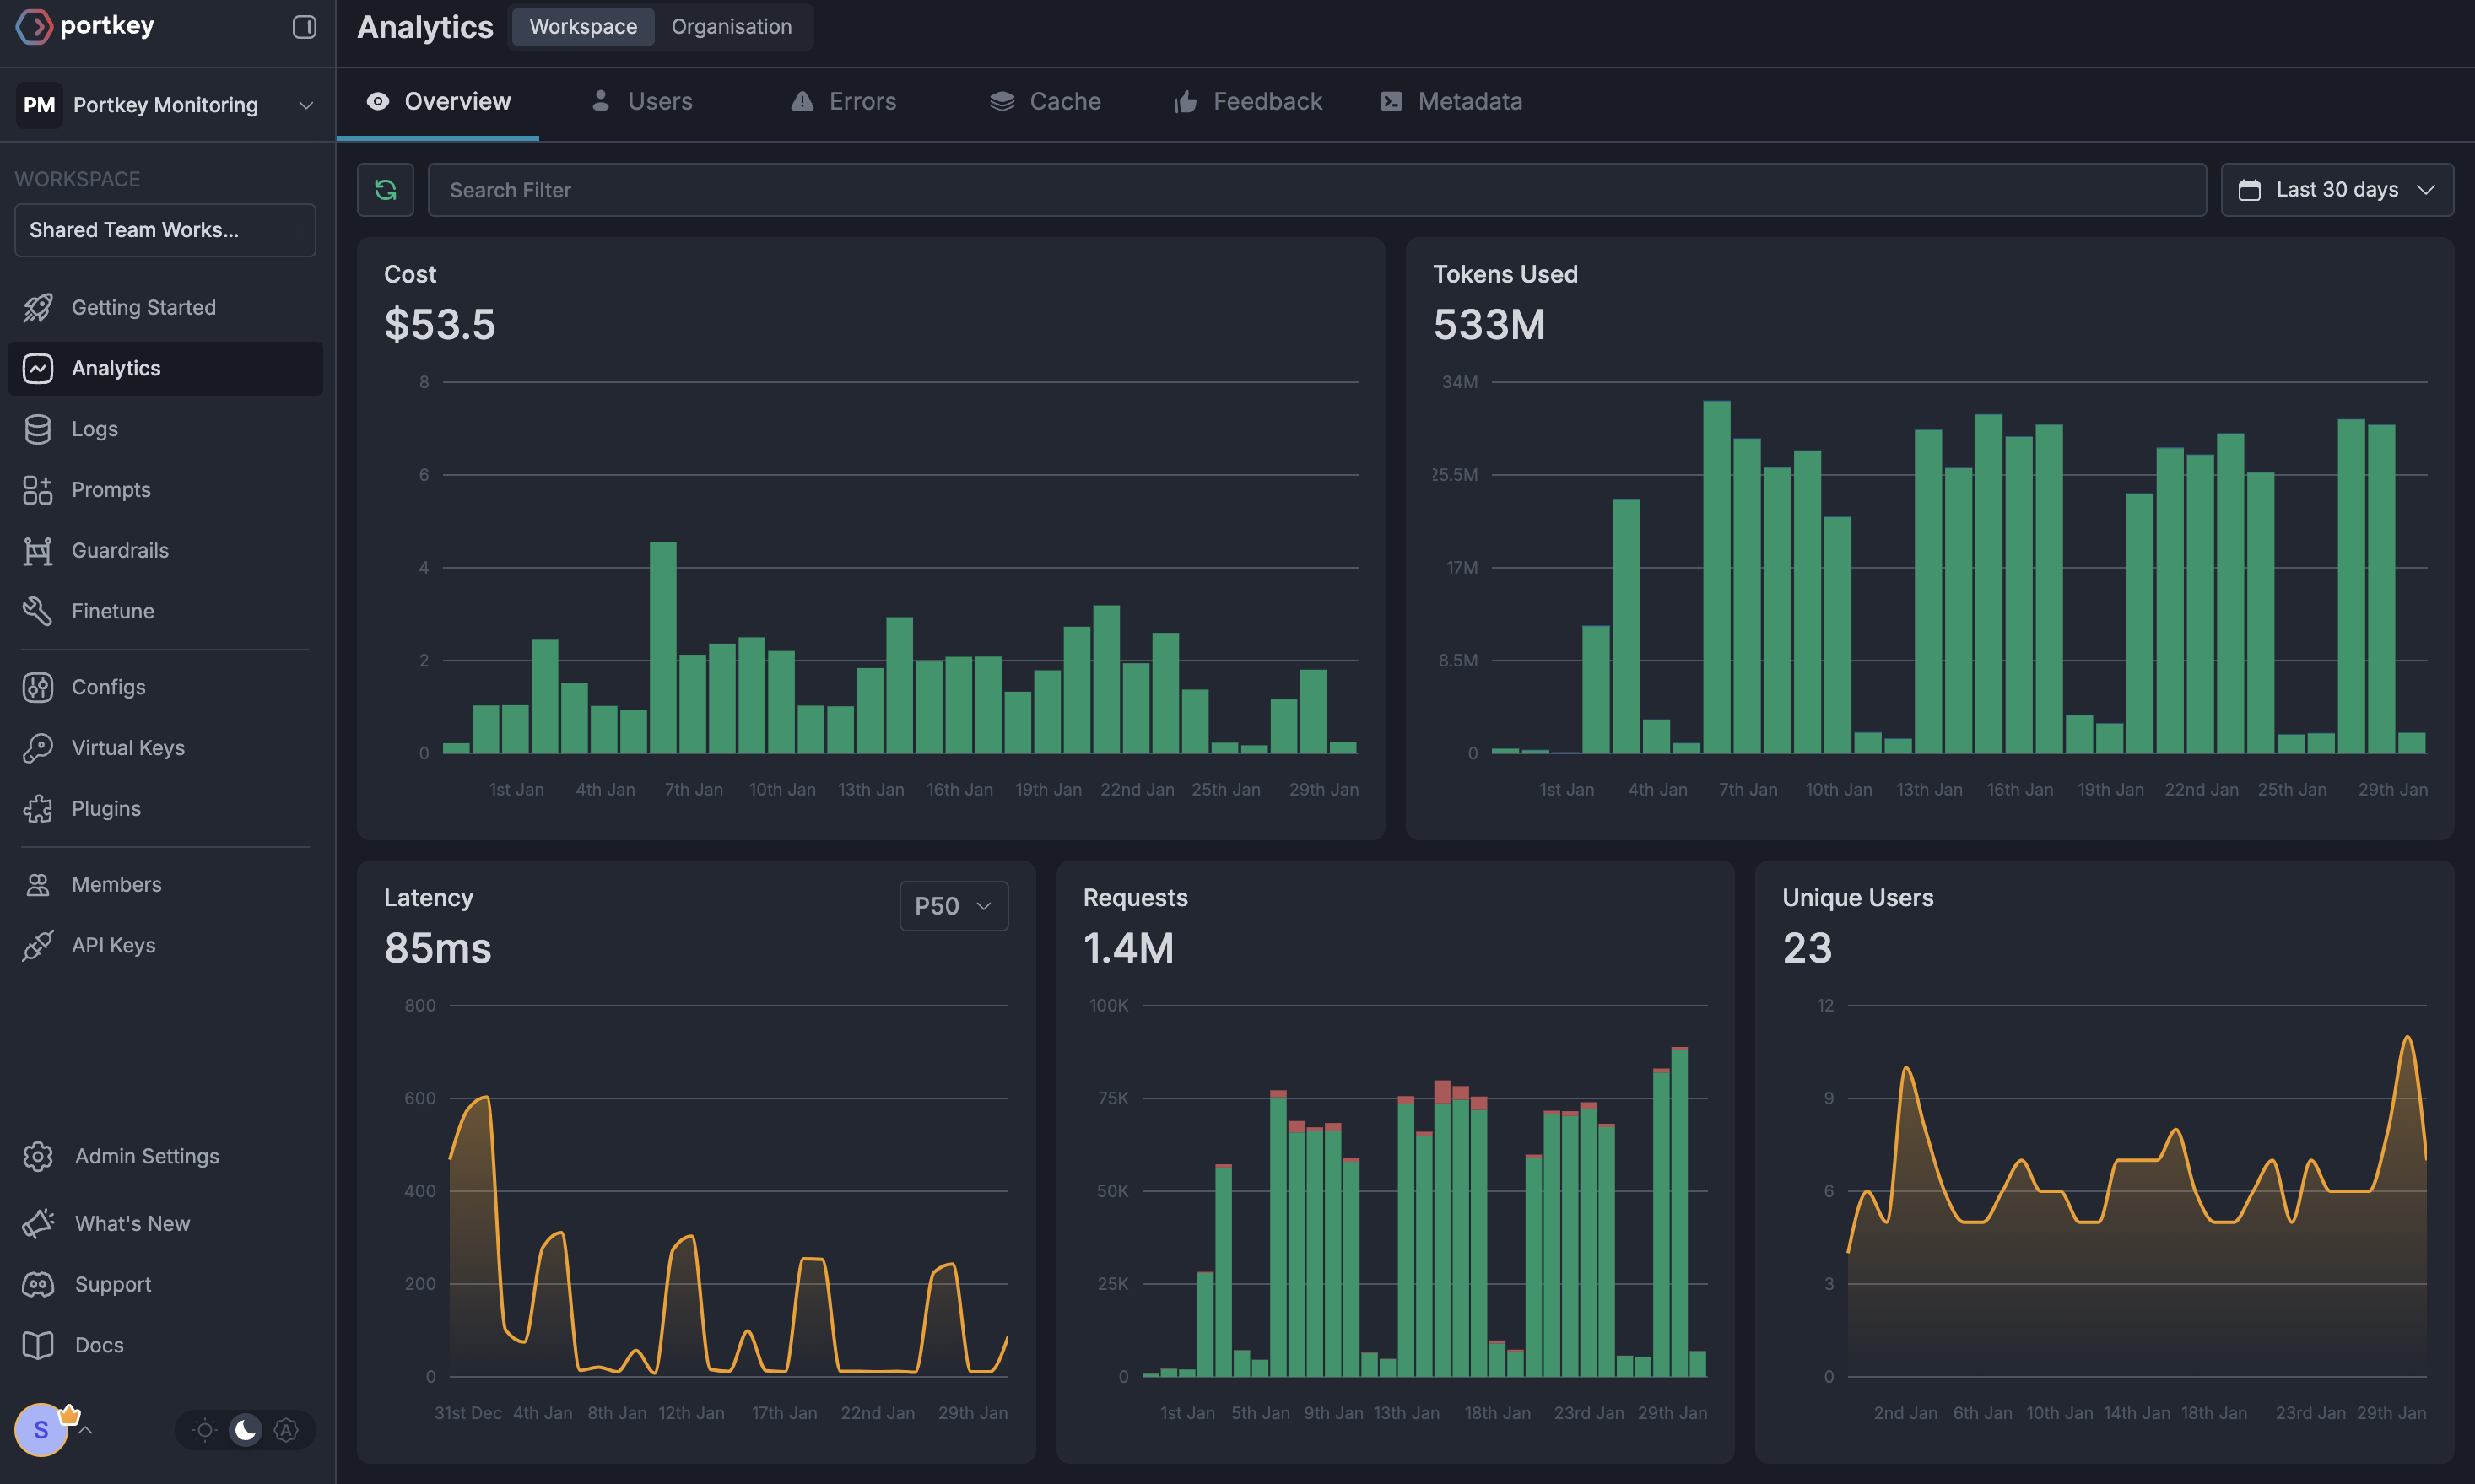
* **Detailed Analytics**: View 40+ metrics for each interaction including token usage, response times, and error rates
* **Enhanced Reliability**: Implement retries, fallbacks, and timeouts to make your automation more resilient
* **Secure API Key Management**: Store API credentials securely using Portkey's Model Catalog
* **Usage Attribution**: Track usage across teams, departments, or projects for proper cost allocation
OpenAI's Computer Use tool enables AI to interact with computer interfaces through a continuous loop of actions and screenshots. Portkey's integration with this capability makes it production-ready with enterprise features like observability, reliability, and governance controls.
## Prerequisites
* Portkey account with API key ([sign up here](https://app.portkey.ai))
* OpenAI credentials added in [Model Catalog](https://app.portkey.ai/model-catalog) (e.g., named `openai-prod`)
* Playwright for browser automation
This guide focuses on Playwright integration, but Portkey works equally well with other environments supported by Computer Use, such as Docker-based VMs or other automation frameworks.
## Integration Steps
### 1. Install & Import Required Libraries
```bash icon="square-terminal" theme={"system"}
pip install portkey-ai playwright
```
```python Python icon="python" theme={"system"}
import time
import base64
from portkey_ai import Portkey # Import Portkey instead of OpenAI
from playwright.sync_api import sync_playwright
```
The first time you run this, if you haven't used Playwright before, you will be prompted to install dependencies. Execute the command suggested, which will depend on your OS.
### 2. Initialize Portkey Client
Replace the standard OpenAI client with Portkey's client, configuring it with your Portkey API key and provider slug:
```python Python icon="python" theme={"system"}
client = Portkey(
api_key="YOUR_PORTKEY_API_KEY",
provider="@openai-prod" # Your provider slug from Model Catalog
)
```
### 3. Set Up Your Browser Environment
```python Python icon="python" theme={"system"}
with sync_playwright() as p:
browser = p.chromium.launch(
headless=False,
chromium_sandbox=True,
env={},
args=[
"--disable-extensions",
"--disable-file-system"
]
)
page = browser.new_page()
page.set_viewport_size({"width": 1024, "height": 768})
page.goto("https://bing.com") # Starting URL
page.wait_for_timeout(2000) # Wait for page to load
```
### 4. Create Helper Functions for Actions and Screenshots
```python Python icon="python" theme={"system"}
def handle_model_action(page, action):
"""Execute computer actions on the Playwright page."""
action_type = action.type
try:
match action_type:
case "click":
x, y = action.x, action.y
button = action.button
print(f"Action: click at ({x}, {y}) with button '{button}'")
if button != "left" and button != "right":
button = "left"
page.mouse.click(x, y, button=button)
case "scroll":
x, y = action.x, action.y
scroll_x, scroll_y = action.scroll_x, action.scroll_y
print(f"Action: scroll at ({x}, {y}) with offsets ({scroll_x}, {scroll_y})")
page.mouse.move(x, y)
page.evaluate(f"window.scrollBy({scroll_x}, {scroll_y})")
case "keypress":
keys = action.keys
for k in keys:
print(f"Action: keypress '{k}'")
if k.lower() == "enter":
page.keyboard.press("Enter")
elif k.lower() == "space":
page.keyboard.press(" ")
else:
page.keyboard.press(k)
case "type":
text = action.text
print(f"Action: type text: {text}")
page.keyboard.type(text)
case "wait":
print(f"Action: wait")
time.sleep(2)
case "screenshot":
print(f"Action: screenshot")
# Nothing to do as screenshot is taken at each turn
case _:
print(f"Unrecognized action: {action}")
except Exception as e:
print(f"Error handling action {action}: {e}")
def get_screenshot(page):
"""Take a screenshot using Playwright."""
return page.screenshot()
```
### 5. Implement the Computer Use Loop
```python Python icon="python" theme={"system"}
def computer_use_loop(instance, response):
"""Run the loop that executes computer actions until no more 'computer_call' is found."""
while True:
computer_calls = [item for item in response.output if item.type == "computer_call"]
if not computer_calls:
print("No computer call found. Output from model:")
for item in response.output:
print(item)
break # Exit when no computer calls are issued.
# We expect at most one computer call per response.
computer_call = computer_calls[0]
last_call_id = computer_call.call_id
action = computer_call.action
# Execute the action
handle_model_action(instance, action)
time.sleep(1) # Allow time for changes to take effect.
# Take a screenshot after the action
screenshot_bytes = get_screenshot(instance)
screenshot_base64 = base64.b64encode(screenshot_bytes).decode("utf-8")
# Send the screenshot back as a computer_call_output
response = client.responses.create(
model="computer-use-preview",
previous_response_id=response.id,
tools=[
{
"type": "computer_use_preview",
"display_width": 1024,
"display_height": 768,
"environment": "browser"
}
],
input=[
{
"call_id": last_call_id,
"type": "computer_call_output",
"output": {
"type": "input_image",
"image_url": f"data:image/png;base64,{screenshot_base64}"
}
}
],
truncation="auto"
)
return response
```
### 6. Start the Computer Use Session
```python Python icon="python" theme={"system"}
# Initialize the first request
initial_response = client.responses.create(
model="computer-use-preview",
tools=[{
"type": "computer_use_preview",
"display_width": 1024,
"display_height": 768,
"environment": "browser"
}],
input=[
{
"role": "user",
"content": [
{
"type": "input_text",
"text": "Check the latest OpenAI news on bing.com."
}
]
}
],
reasoning={
"summary": "concise",
},
truncation="auto"
)
# Start the computer use loop
final_response = computer_use_loop(page, initial_response)
```
## Complete Example
Here's the complete code that combines all the pieces:
```python Python icon="python" theme={"system"}
import time
import base64
from portkey_ai import Portkey
from playwright.sync_api import sync_playwright
# Initialize Portkey client
client = Portkey(
api_key="YOUR_PORTKEY_API_KEY",
provider="@openai-prod" # Your provider slug from Model Catalog
)
def handle_model_action(page, action):
"""Execute computer actions on the Playwright page."""
action_type = action.type
try:
match action_type:
case "click":
x, y = action.x, action.y
button = action.button
print(f"Action: click at ({x}, {y}) with button '{button}'")
if button != "left" and button != "right":
button = "left"
page.mouse.click(x, y, button=button)
case "scroll":
x, y = action.x, action.y
scroll_x, scroll_y = action.scroll_x, action.scroll_y
print(f"Action: scroll at ({x}, {y}) with offsets ({scroll_x}, {scroll_y})")
page.mouse.move(x, y)
page.evaluate(f"window.scrollBy({scroll_x}, {scroll_y})")
case "keypress":
keys = action.keys
for k in keys:
print(f"Action: keypress '{k}'")
if k.lower() == "enter":
page.keyboard.press("Enter")
elif k.lower() == "space":
page.keyboard.press(" ")
else:
page.keyboard.press(k)
case "type":
text = action.text
print(f"Action: type text: {text}")
page.keyboard.type(text)
case "wait":
print(f"Action: wait")
time.sleep(2)
case "screenshot":
print(f"Action: screenshot")
# Nothing to do as screenshot is taken at each turn
case _:
print(f"Unrecognized action: {action}")
except Exception as e:
print(f"Error handling action {action}: {e}")
def get_screenshot(page):
"""Take a screenshot using Playwright."""
return page.screenshot()
def computer_use_loop(instance, response):
"""Run the loop that executes computer actions until no more 'computer_call' is found."""
while True:
computer_calls = [item for item in response.output if item.type == "computer_call"]
if not computer_calls:
print("No computer call found. Output from model:")
for item in response.output:
print(item)
break # Exit when no computer calls are issued.
# We expect at most one computer call per response.
computer_call = computer_calls[0]
last_call_id = computer_call.call_id
action = computer_call.action
# Execute the action
handle_model_action(instance, action)
time.sleep(1) # Allow time for changes to take effect.
# Take a screenshot after the action
screenshot_bytes = get_screenshot(instance)
screenshot_base64 = base64.b64encode(screenshot_bytes).decode("utf-8")
# Send the screenshot back as a computer_call_output
response = client.responses.create(
model="computer-use-preview",
previous_response_id=response.id,
tools=[
{
"type": "computer_use_preview",
"display_width": 1024,
"display_height": 768,
"environment": "browser"
}
],
input=[
{
"call_id": last_call_id,
"type": "computer_call_output",
"output": {
"type": "input_image",
"image_url": f"data:image/png;base64,{screenshot_base64}"
}
}
],
truncation="auto"
)
return response
# Main execution
with sync_playwright() as p:
browser = p.chromium.launch(
headless=False,
chromium_sandbox=True,
env={},
args=[
"--disable-extensions",
"--disable-file-system"
]
)
page = browser.new_page()
page.set_viewport_size({"width": 1024, "height": 768})
page.goto("https://bing.com")
page.wait_for_timeout(2000) # Wait for page to load
# Initialize the first request
initial_response = client.responses.create(
model="computer-use-preview",
tools=[{
"type": "computer_use_preview",
"display_width": 1024,
"display_height": 768,
"environment": "browser"
}],
input=[
{
"role": "user",
"content": [
{
"type": "input_text",
"text": "Check the latest OpenAI news on bing.com."
}
]
}
],
reasoning={
"summary": "concise",
},
truncation="auto"
)
# Start the computer use loop
final_response = computer_use_loop(page, initial_response)
```
## Benefits of Using Portkey with Computer Use
Portkey enhances OpenAI's Computer Use tool with several enterprise-grade features:
### 1. Comprehensive Observability
Get detailed analytics on all your Computer Use interactions, including token usage, cost tracking, and performance metrics.
 ### 2. Budget Control & Governance
Set spending limits, track costs by department, and implement rate limiting to prevent unexpected usage spikes.
### 3. Reliability Features
Add fallbacks, automatic retries, and timeouts to make your Computer Use applications more robust in production environments.
### 4. Secure API Key Management
Store your OpenAI API keys securely using Portkey's Model Catalog instead of exposing them directly in your code.
## Next Steps
For more details on setting up Portkey for enterprise AI deployments, see these resources:
Set and manage spending limits across teams and departments.
Learn about fallbacks, load balancing, and retry mechanisms.
For enterprise support and custom features, contact our [enterprise team](https://calendly.com/portkey-ai).
**Join our Community**
* [Discord Community](https://portkey.sh/discord-report)
* [GitHub Repository](https://github.com/Portkey-AI)
### 2. Budget Control & Governance
Set spending limits, track costs by department, and implement rate limiting to prevent unexpected usage spikes.
### 3. Reliability Features
Add fallbacks, automatic retries, and timeouts to make your Computer Use applications more robust in production environments.
### 4. Secure API Key Management
Store your OpenAI API keys securely using Portkey's Model Catalog instead of exposing them directly in your code.
## Next Steps
For more details on setting up Portkey for enterprise AI deployments, see these resources:
Set and manage spending limits across teams and departments.
Learn about fallbacks, load balancing, and retry mechanisms.
For enterprise support and custom features, contact our [enterprise team](https://calendly.com/portkey-ai).
**Join our Community**
* [Discord Community](https://portkey.sh/discord-report)
* [GitHub Repository](https://github.com/Portkey-AI)