> ## Documentation Index
> Fetch the complete documentation index at: https://docs.portkey.ai/docs/llms.txt
> Use this file to discover all available pages before exploring further.
# Azure OpenAI
> Azure OpenAI is a great alternative to accessing the best models including GPT-4 and more in your private environments. Portkey provides complete support for Azure OpenAI.
With Portkey, you can take advantage of features like fast AI gateway access, observability, prompt management, and more, all while ensuring the secure management of your LLM API keys through [Model Catalog](/product/model-catalog).
## Portkey SDK Integration with Azure OpenAI
Portkey provides a consistent API to interact with models from various providers. To integrate Azure OpenAI with Portkey:
# Creating Your Azure OpenAI Integration
This integration is for all OpenAI models deployed on either Azure OpenAI or Azure AI Foundry.
Integrate Azure OpenAI models with Portkey to centrally manage your AI models and deployments. This guide walks you through setting up the integration using API key authentication.
## Prerequisites
Before creating your integration, you'll need:
* An active [Azure account](https://ai.azure.com)
* Access to your Azure portal
* A model deployment on Azure (e.g., GPT-4, GPT-4o-mini)
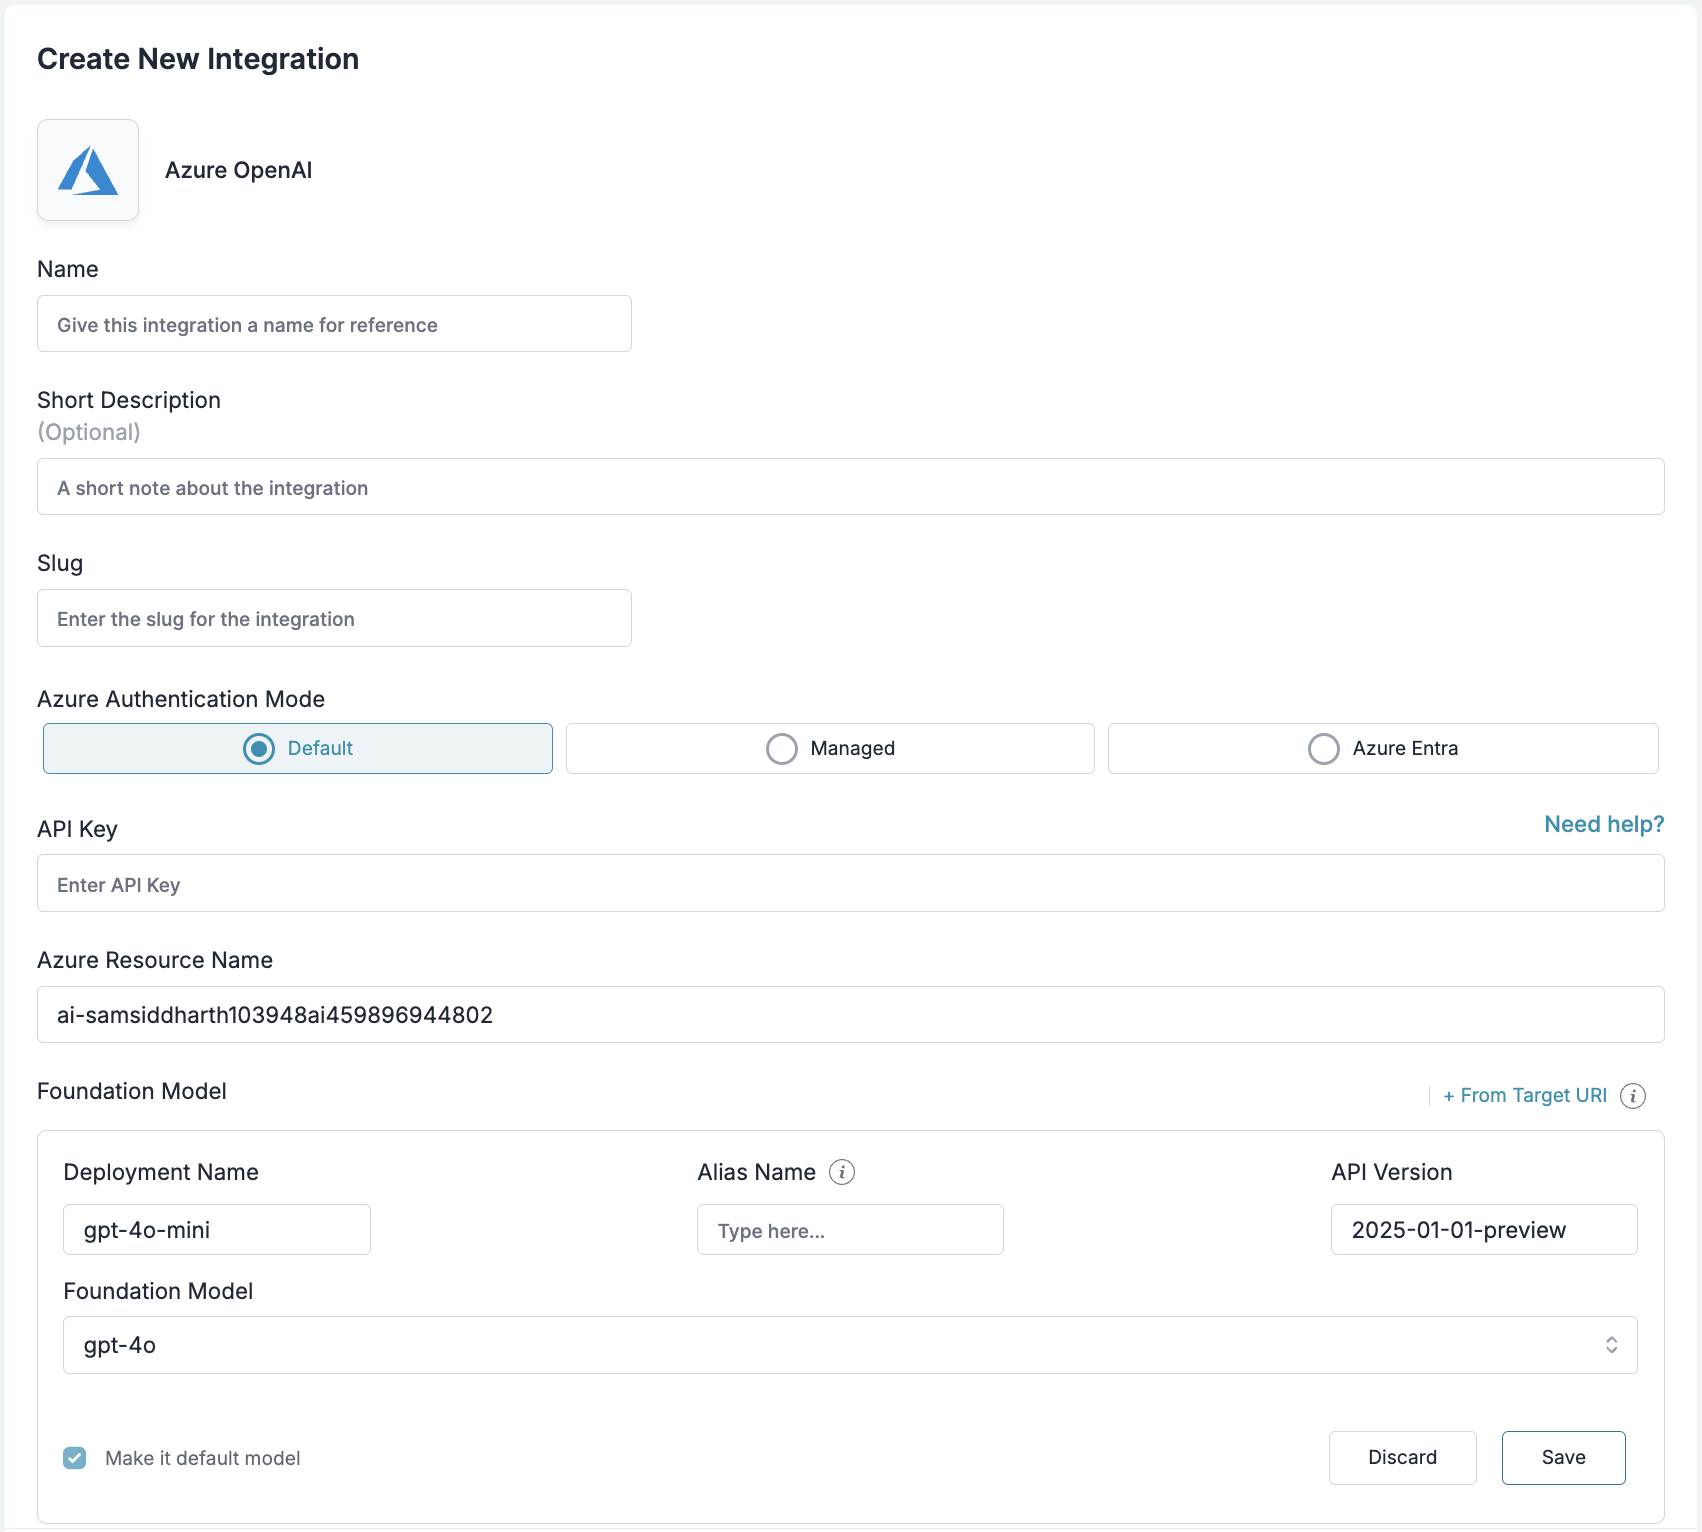
## Step 1: Start Creating Your Integration
Navigate to the Integrations page in your Portkey dashboard and select **Azure OpenAI** as your provider.
 ## Step 2: Configure Integration Details
Fill in the basic information for your integration:
* **Name**: A descriptive name for this integration (e.g., "Azure OpenAI Production")
* **Short Description**: Optional context about this integration's purpose
* **Slug**: A unique identifier used in API calls (e.g., "azure-openai-prod")
## Step 3: Set Up Authentication
Portkey supports three authentication methods for Azure OpenAI. For most use cases, we recommend using the **Default (API Key)** method.
## Step 2: Configure Integration Details
Fill in the basic information for your integration:
* **Name**: A descriptive name for this integration (e.g., "Azure OpenAI Production")
* **Short Description**: Optional context about this integration's purpose
* **Slug**: A unique identifier used in API calls (e.g., "azure-openai-prod")
## Step 3: Set Up Authentication
Portkey supports three authentication methods for Azure OpenAI. For most use cases, we recommend using the **Default (API Key)** method.
 ### Gather Your Azure Credentials
From your Azure portal, you'll need to collect:
### Gather Your Azure Credentials
From your Azure portal, you'll need to collect:
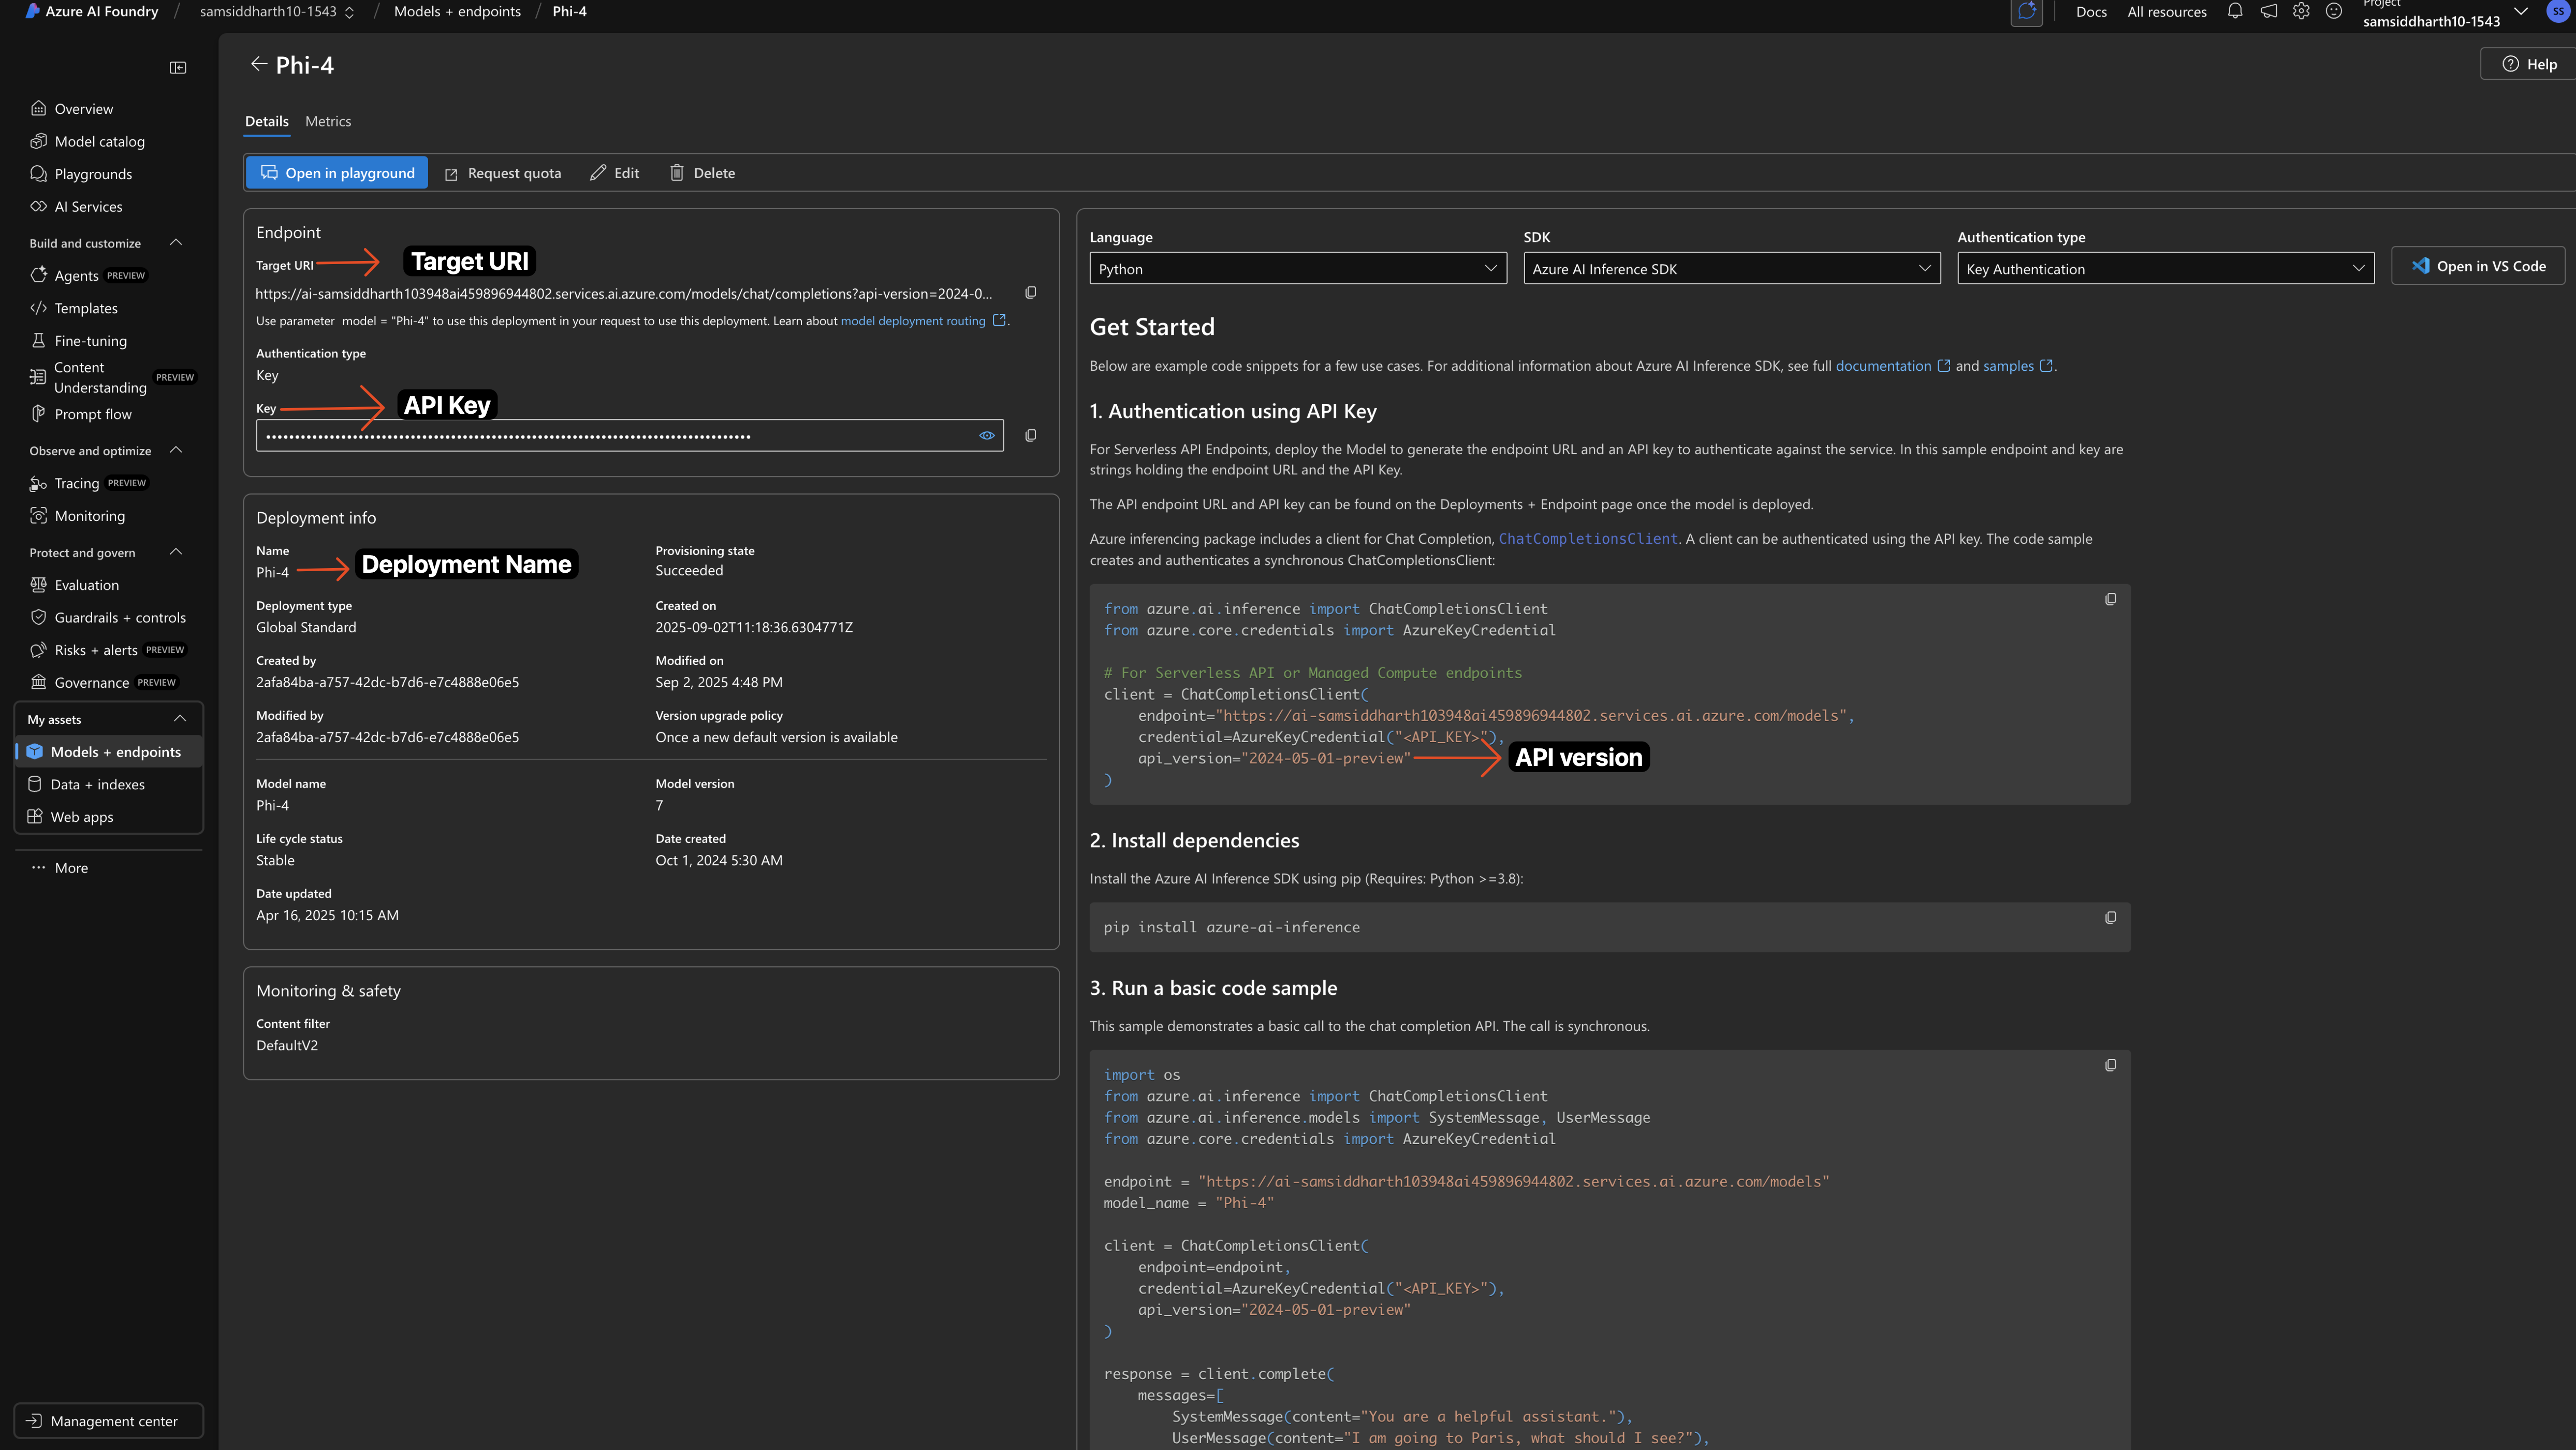 ### Enter Credentials in Portkey
1. Navigate to your model deployment in Azure
2. Click on the deployment to view details
3. Copy the **API Key** from the authentication section
We recommend importing your Azure details (resource name, deployment details, API version) directly from your Target URI. Simply copy the target URL and import it.
### Enter Credentials in Portkey
1. Navigate to your model deployment in Azure
2. Click on the deployment to view details
3. Copy the **API Key** from the authentication section
We recommend importing your Azure details (resource name, deployment details, API version) directly from your Target URI. Simply copy the target URL and import it.
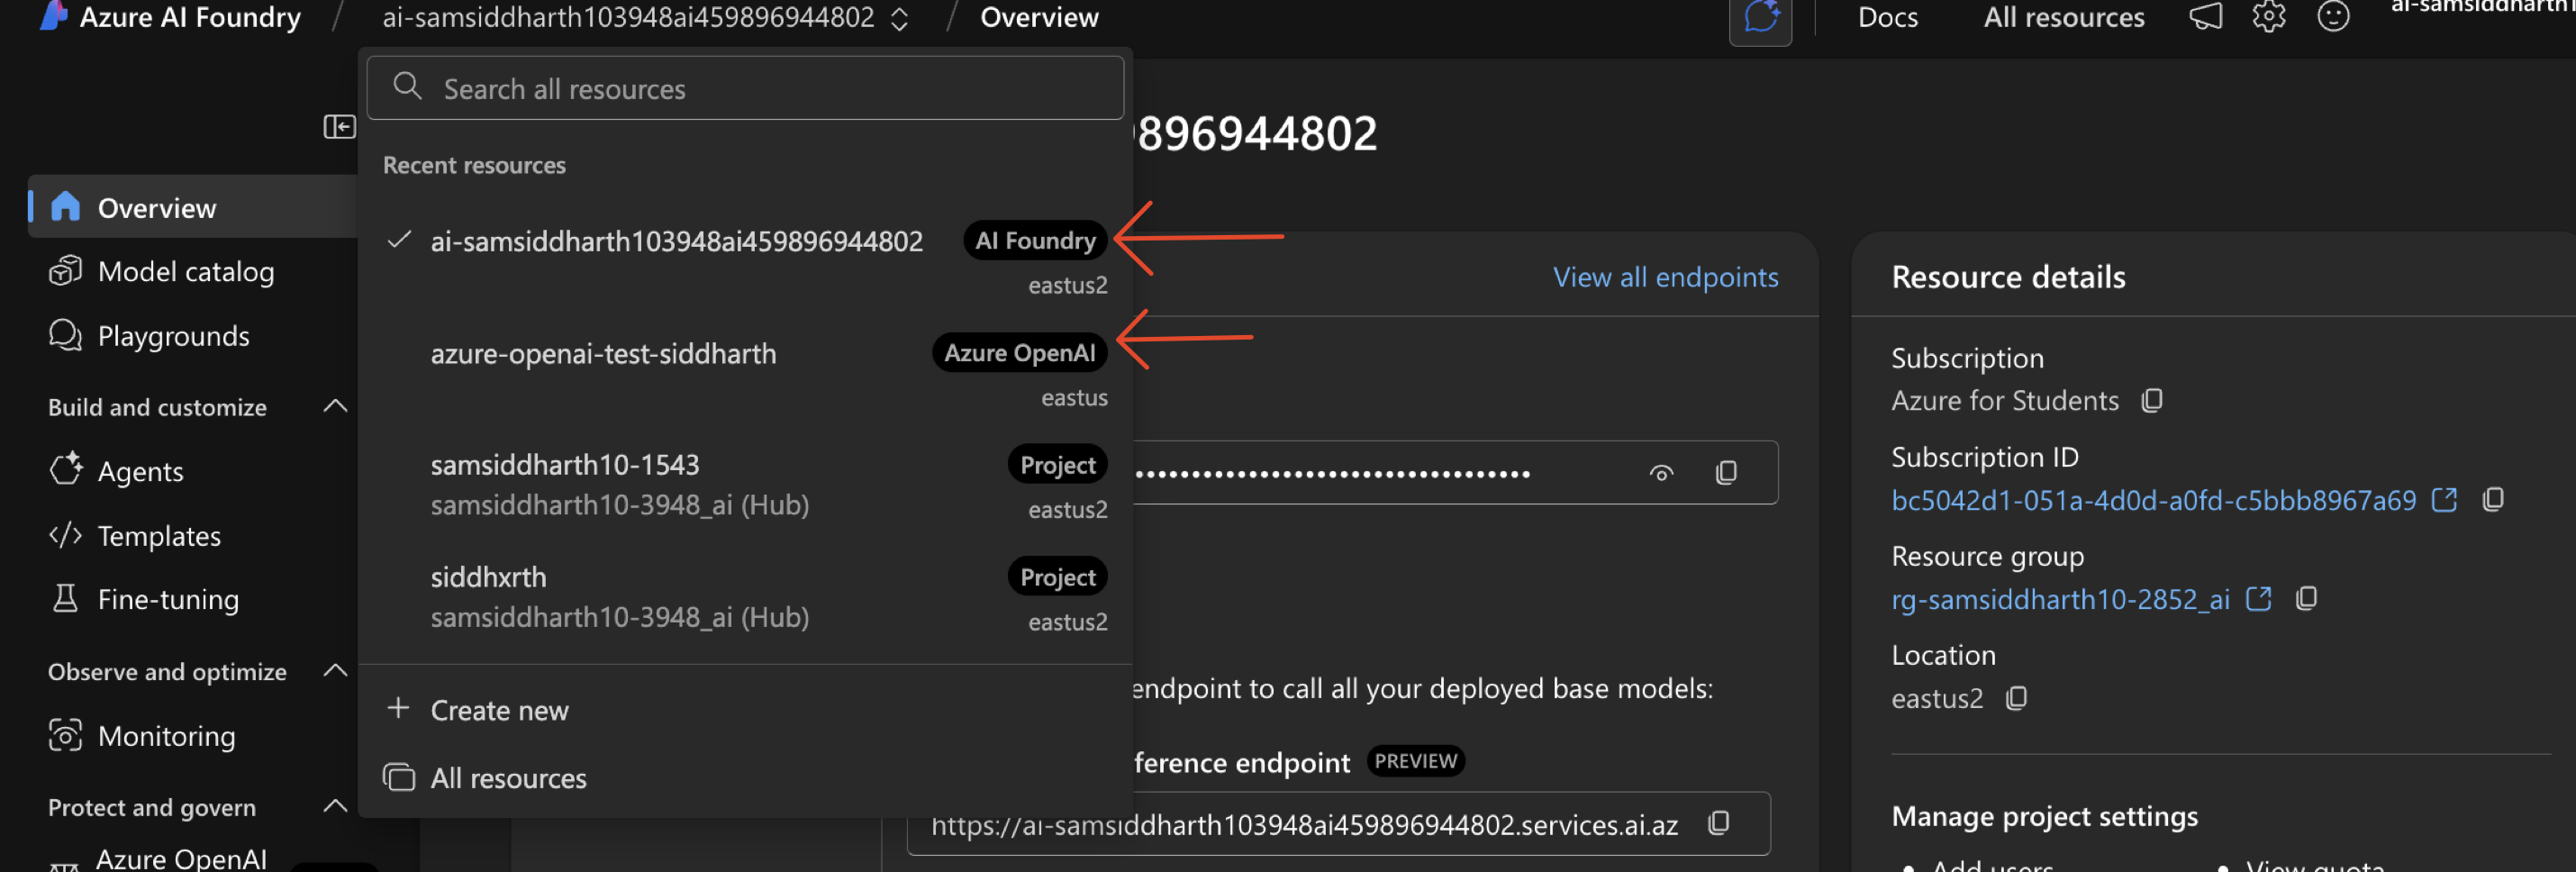
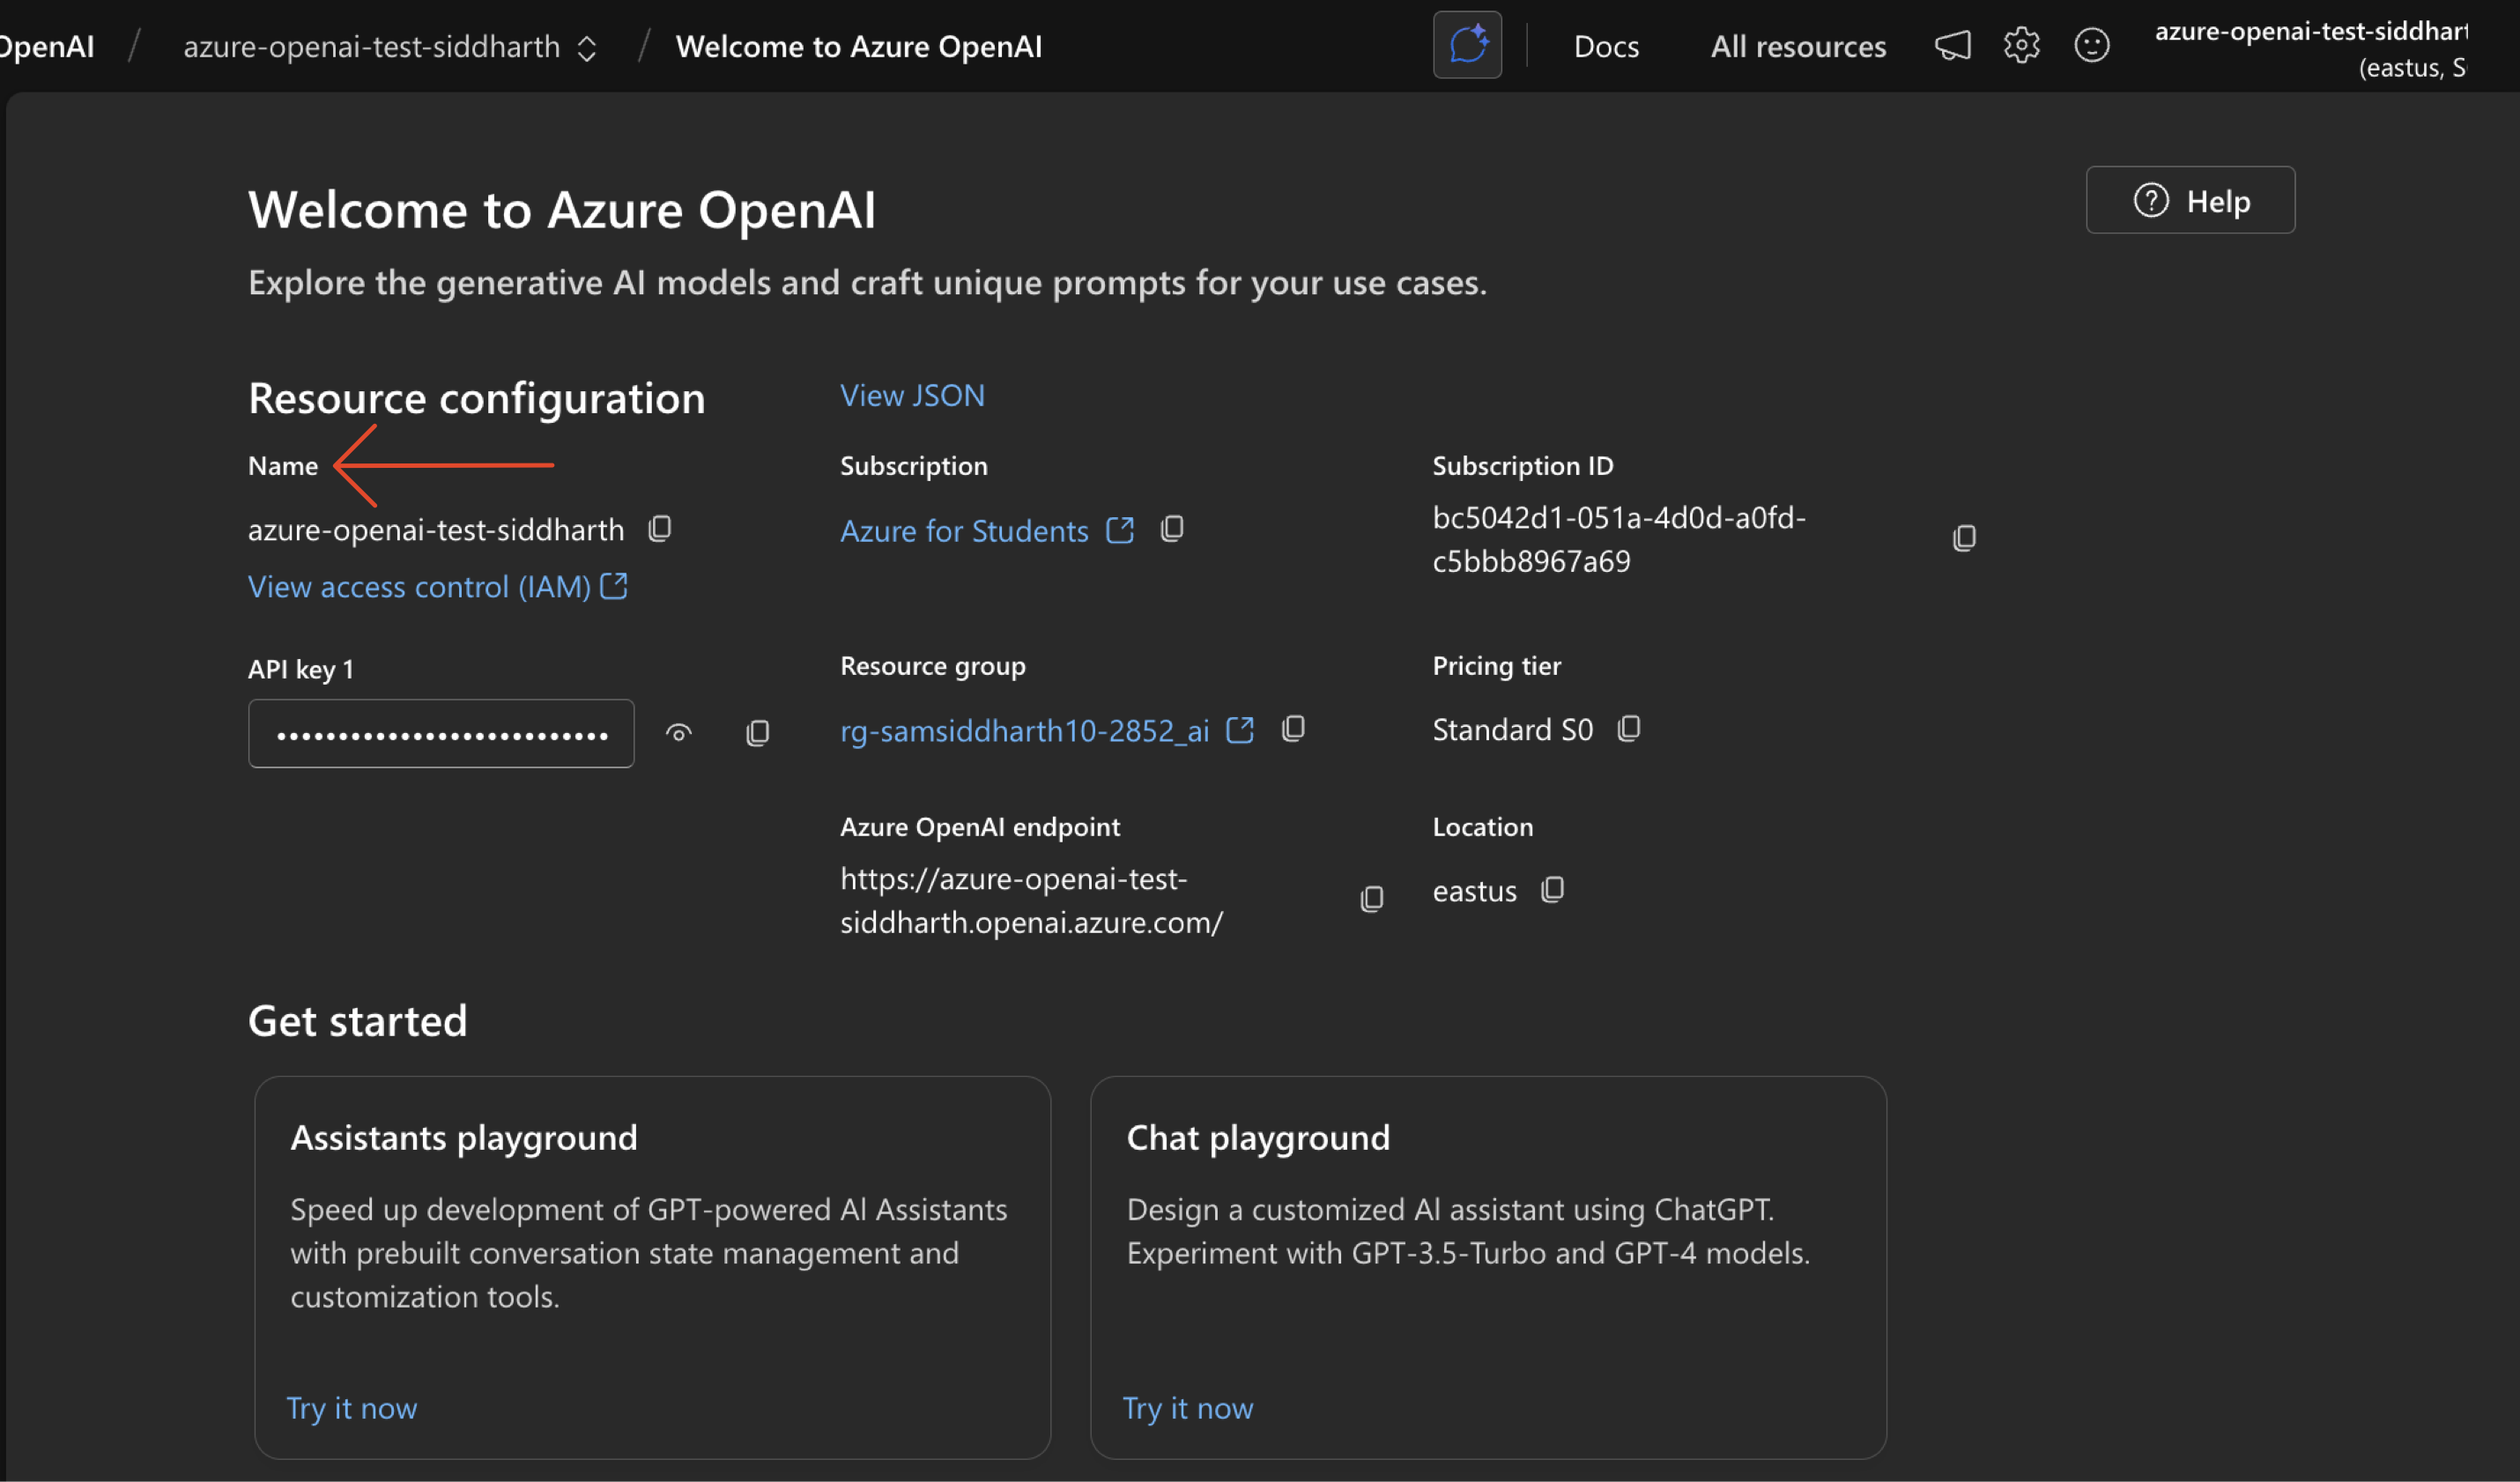
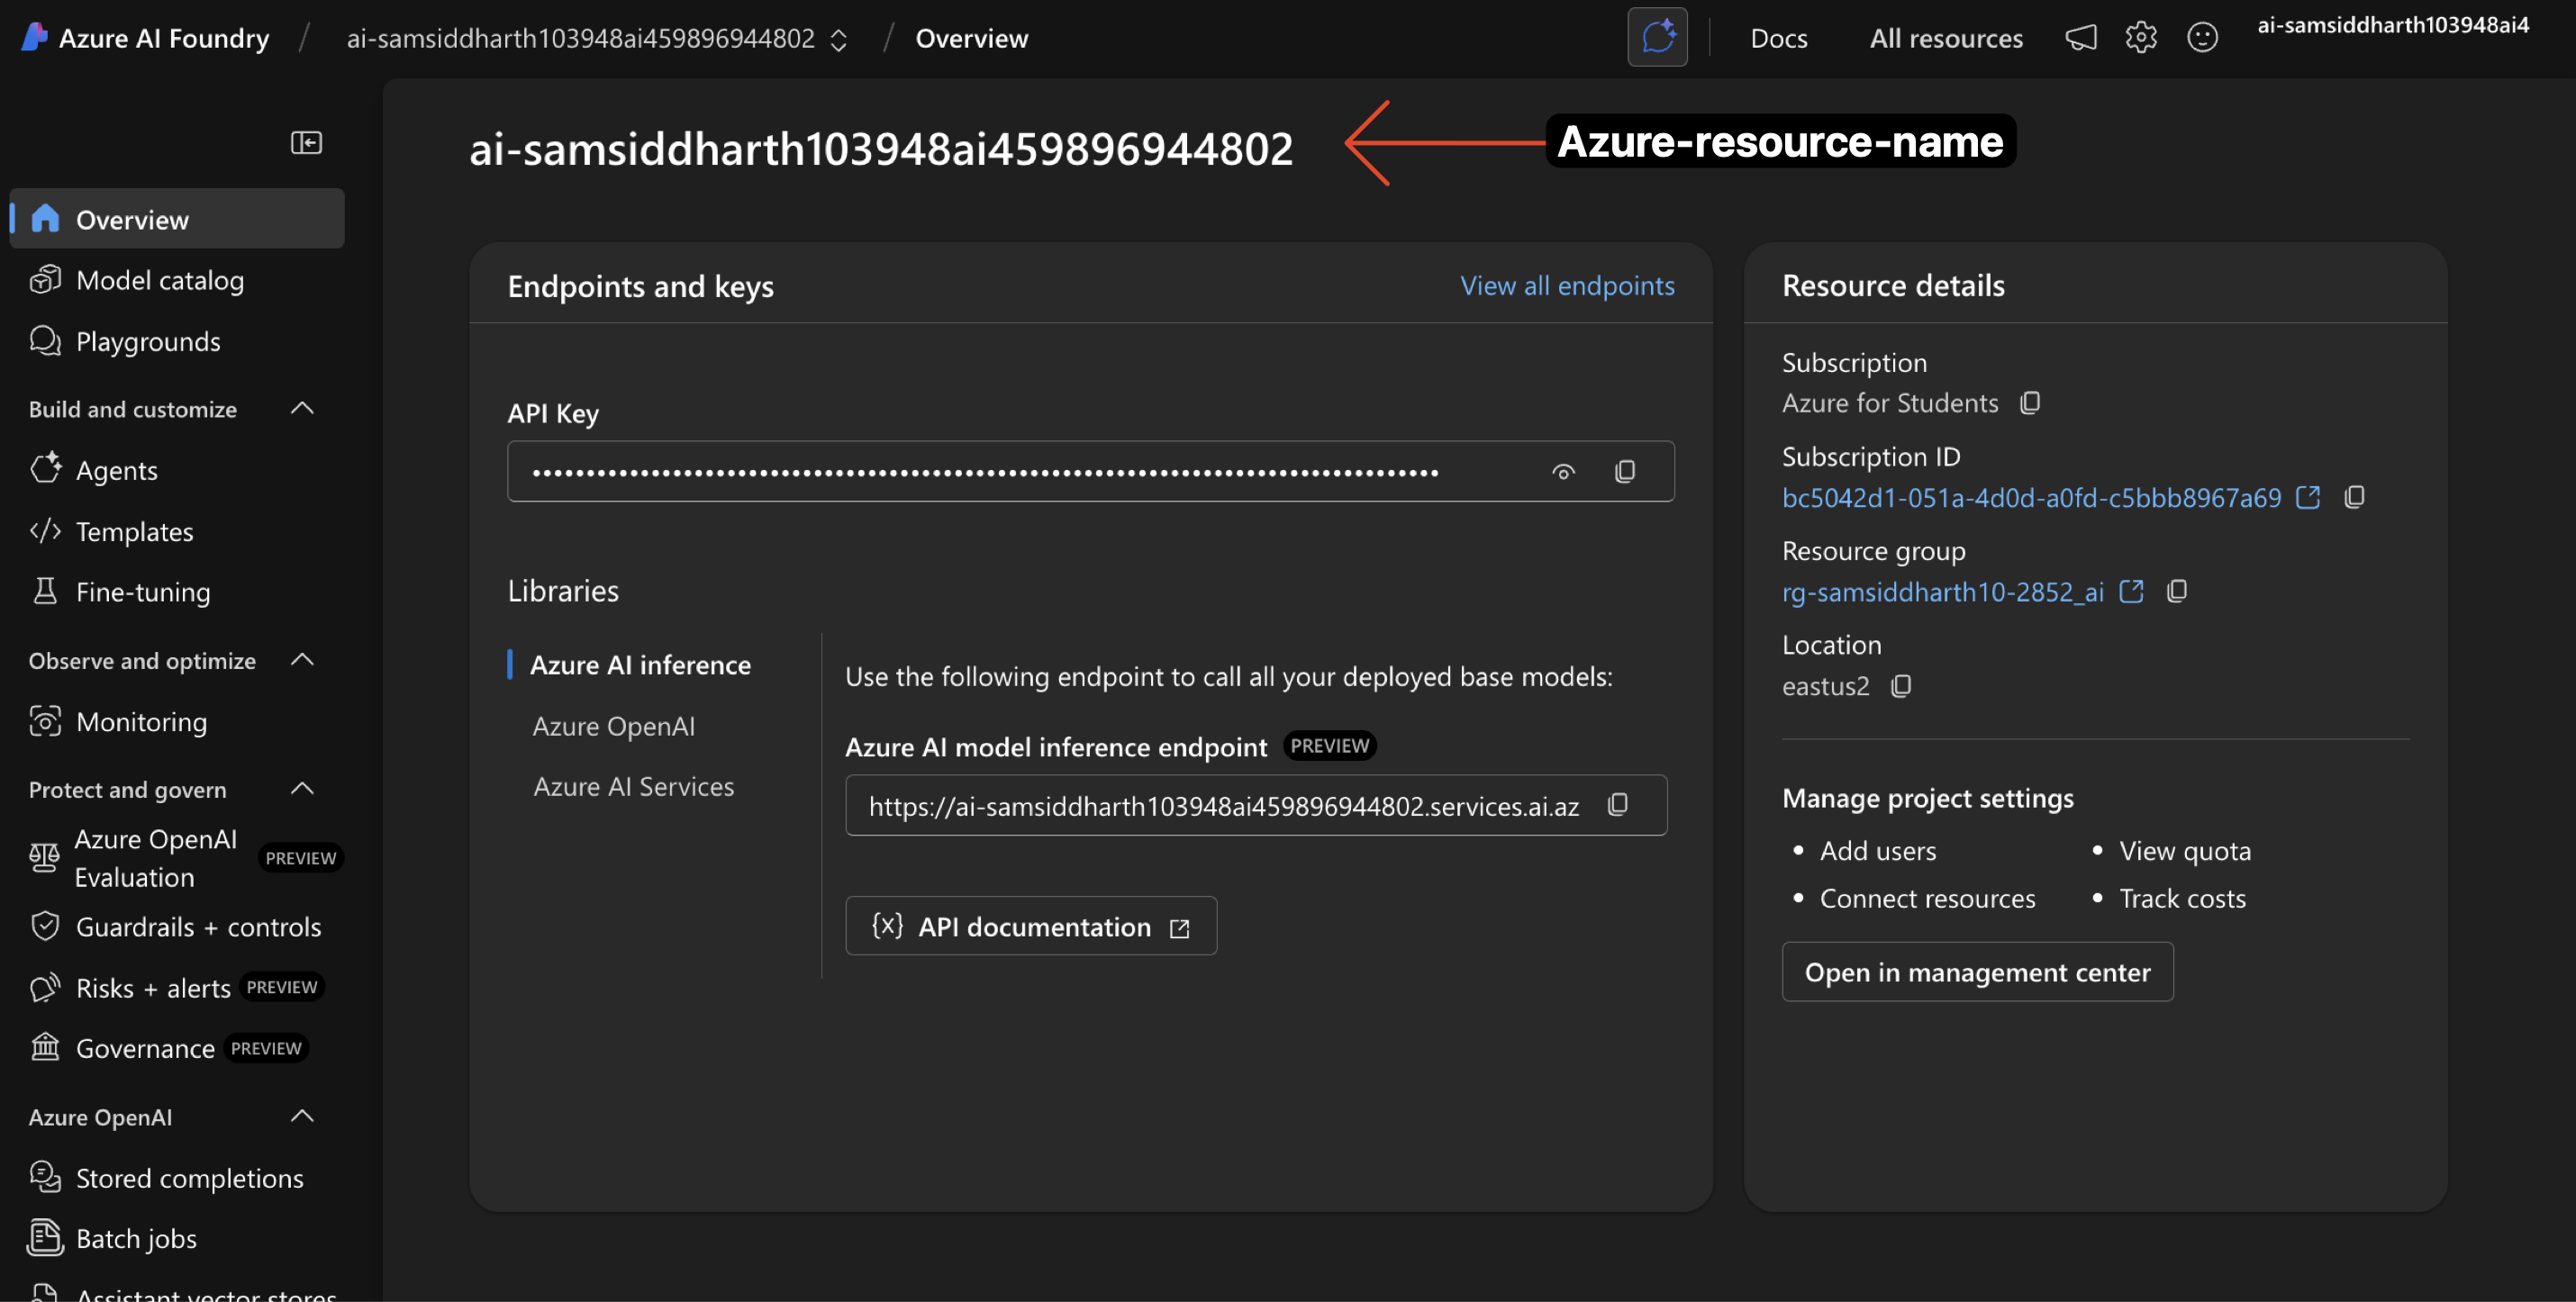
 4. **Azure Resource Name**: Get Your resource Name from Azure
Your Azure resource Name is different from your Project Name. Here's how you can find it:
4. **Azure Resource Name**: Get Your resource Name from Azure
Your Azure resource Name is different from your Project Name. Here's how you can find it:
 4. Note the **API Version** and enter it in the given field
5. **Alias Name**: A Portkey-specific field for accessing the model - name it as you prefer
6. **Foundation Model**: Select a foundation model from the list that matches your deployment. This helps Portkey track costs and metrics. If your model isn't listed, choose a similar model type to begin with.
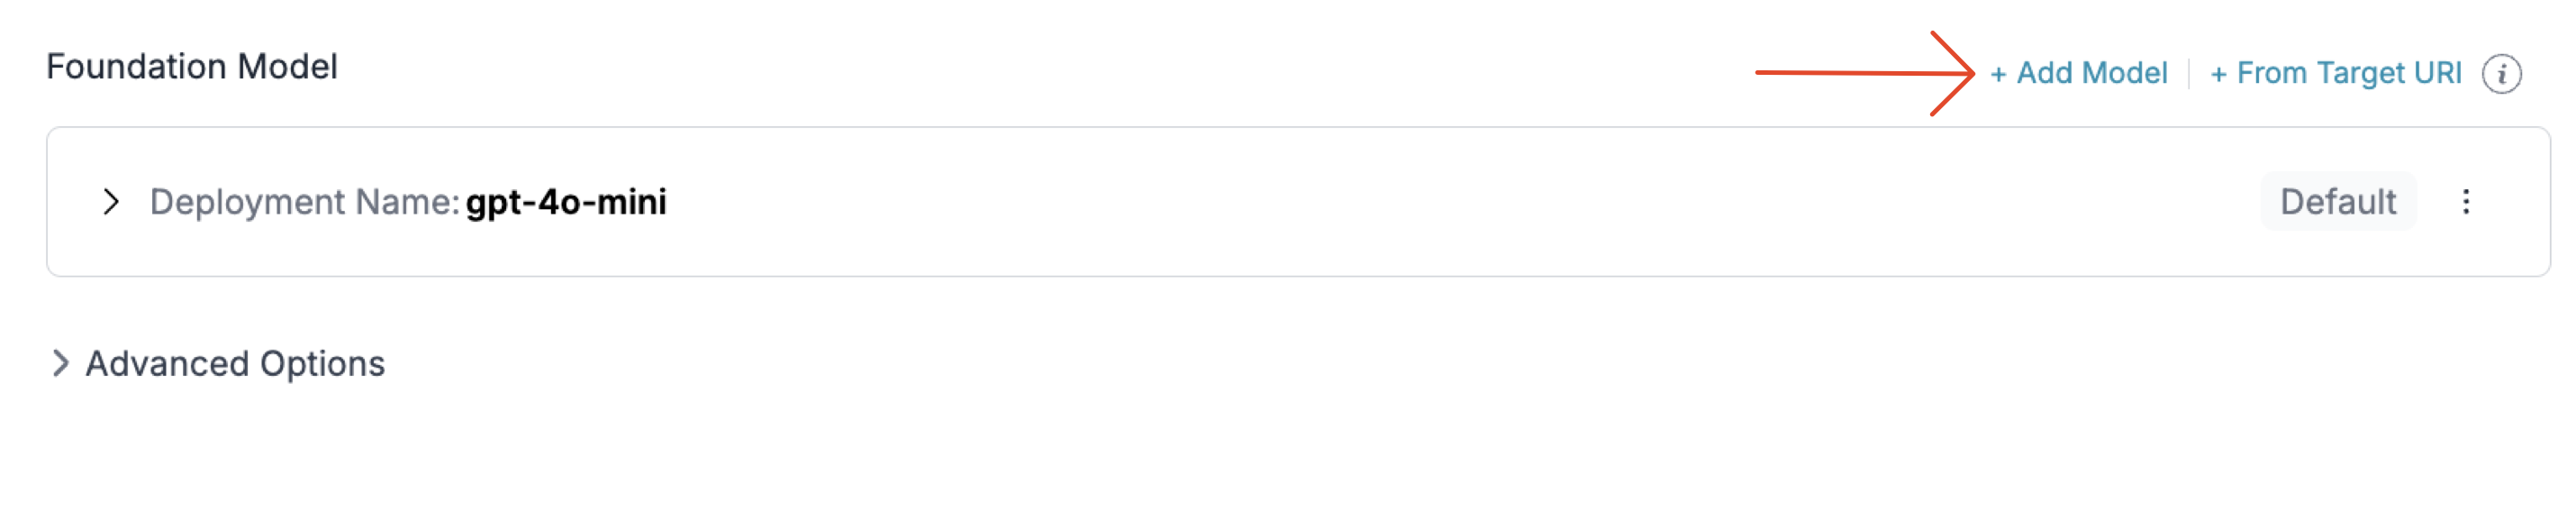
## Adding Multiple Models to Your Azure OpenAI Integration
You can deploy multiple models through a single Azure OpenAI integration by adding multiple deployments under the same integration.
Follow the same steps as above for each additional model deployment.
### 1. Install the Portkey SDK
Add the Portkey SDK to your application to interact with Azure OpenAI's API through Portkey's gateway.
```sh theme={"system"}
npm install --save portkey-ai
```
```sh theme={"system"}
pip install portkey-ai
```
### 2. Initialize Portkey with the Azure
Set up Portkey with your Azure Integration as part of the initialization configuration. You can create a [provider](/product/model-catalog) for Azure in the Portkey UI.
```js theme={"system"}
import Portkey from 'portkey-ai'
const portkey = new Portkey({
apiKey: "PORTKEY_API_KEY", // defaults to process.env["PORTKEY_API_KEY"]
provider:"@AZURE_PROVIDER" // Your Azure Provider Slug
})
```
```python theme={"system"}
from portkey_ai import Portkey
portkey = Portkey(
api_key="PORTKEY_API_KEY", # Replace with your Portkey API key
provider="@AZURE_PROVIDER" # Replace with your Provider slug for Azure
)
```
### **3. Invoke Chat Completions with Azure OpenAI**
Use the Portkey instance to send requests to your Azure deployments. You can also override the provider slug directly in the API call if needed.
```js theme={"system"}
const chatCompletion = await portkey.chat.completions.create({
messages: [{ role: 'user', content: 'Say this is a test' }],
model: 'gpt4', // This would be your deployment or model name
});
console.log(chatCompletion.choices);
```
```python theme={"system"}
completion = portkey.chat.completions.create(
messages= [{ "role": 'user', "content": 'Say this is a test' }],
model= 'custom_model_name'
)
print(completion.choices)
```
## Managing Azure OpenAI Prompts
You can manage all prompts to Azure OpenAI in the [Prompt Library](/product/prompt-library). All the current models of OpenAI are supported and you can easily start testing different prompts.
Once you're ready with your prompt, you can use the `portkey.prompts.completions.create` interface to use the prompt in your application.
## Image Generation
Portkey supports multiple modalities for Azure OpenAI and you can make image generation requests through Portkey's AI Gateway the same way as making completion calls.
```js theme={"system"}
import Portkey from 'portkey-ai'
const portkey = new Portkey({
apiKey: "PORTKEY_API_KEY",
provider:"@DALL-E_PROVIDER" // Referencing a Dall-E Azure deployment with Provider Slug
})
const image = await portkey.images.generate({
prompt:"Lucy in the sky with diamonds",
size:"1024x1024"
})
```
```python theme={"system"}
from portkey_ai import Portkey
portkey = Portkey(
api_key="PORTKEY_API_KEY",
provider="@DALL-E_PROVIDER" # Referencing a Dall-E Azure deployment with Provider Slug
)
image = portkey.images.generate(
prompt="Lucy in the sky with diamonds",
size="1024x1024"
)
```
Portkey's fast AI gateway captures the information about the request on your Portkey Dashboard. On your logs screen, you'd be able to see this request with the request and response.
4. Note the **API Version** and enter it in the given field
5. **Alias Name**: A Portkey-specific field for accessing the model - name it as you prefer
6. **Foundation Model**: Select a foundation model from the list that matches your deployment. This helps Portkey track costs and metrics. If your model isn't listed, choose a similar model type to begin with.
## Adding Multiple Models to Your Azure OpenAI Integration
You can deploy multiple models through a single Azure OpenAI integration by adding multiple deployments under the same integration.
Follow the same steps as above for each additional model deployment.
### 1. Install the Portkey SDK
Add the Portkey SDK to your application to interact with Azure OpenAI's API through Portkey's gateway.
```sh theme={"system"}
npm install --save portkey-ai
```
```sh theme={"system"}
pip install portkey-ai
```
### 2. Initialize Portkey with the Azure
Set up Portkey with your Azure Integration as part of the initialization configuration. You can create a [provider](/product/model-catalog) for Azure in the Portkey UI.
```js theme={"system"}
import Portkey from 'portkey-ai'
const portkey = new Portkey({
apiKey: "PORTKEY_API_KEY", // defaults to process.env["PORTKEY_API_KEY"]
provider:"@AZURE_PROVIDER" // Your Azure Provider Slug
})
```
```python theme={"system"}
from portkey_ai import Portkey
portkey = Portkey(
api_key="PORTKEY_API_KEY", # Replace with your Portkey API key
provider="@AZURE_PROVIDER" # Replace with your Provider slug for Azure
)
```
### **3. Invoke Chat Completions with Azure OpenAI**
Use the Portkey instance to send requests to your Azure deployments. You can also override the provider slug directly in the API call if needed.
```js theme={"system"}
const chatCompletion = await portkey.chat.completions.create({
messages: [{ role: 'user', content: 'Say this is a test' }],
model: 'gpt4', // This would be your deployment or model name
});
console.log(chatCompletion.choices);
```
```python theme={"system"}
completion = portkey.chat.completions.create(
messages= [{ "role": 'user', "content": 'Say this is a test' }],
model= 'custom_model_name'
)
print(completion.choices)
```
## Managing Azure OpenAI Prompts
You can manage all prompts to Azure OpenAI in the [Prompt Library](/product/prompt-library). All the current models of OpenAI are supported and you can easily start testing different prompts.
Once you're ready with your prompt, you can use the `portkey.prompts.completions.create` interface to use the prompt in your application.
## Image Generation
Portkey supports multiple modalities for Azure OpenAI and you can make image generation requests through Portkey's AI Gateway the same way as making completion calls.
```js theme={"system"}
import Portkey from 'portkey-ai'
const portkey = new Portkey({
apiKey: "PORTKEY_API_KEY",
provider:"@DALL-E_PROVIDER" // Referencing a Dall-E Azure deployment with Provider Slug
})
const image = await portkey.images.generate({
prompt:"Lucy in the sky with diamonds",
size:"1024x1024"
})
```
```python theme={"system"}
from portkey_ai import Portkey
portkey = Portkey(
api_key="PORTKEY_API_KEY",
provider="@DALL-E_PROVIDER" # Referencing a Dall-E Azure deployment with Provider Slug
)
image = portkey.images.generate(
prompt="Lucy in the sky with diamonds",
size="1024x1024"
)
```
Portkey's fast AI gateway captures the information about the request on your Portkey Dashboard. On your logs screen, you'd be able to see this request with the request and response.
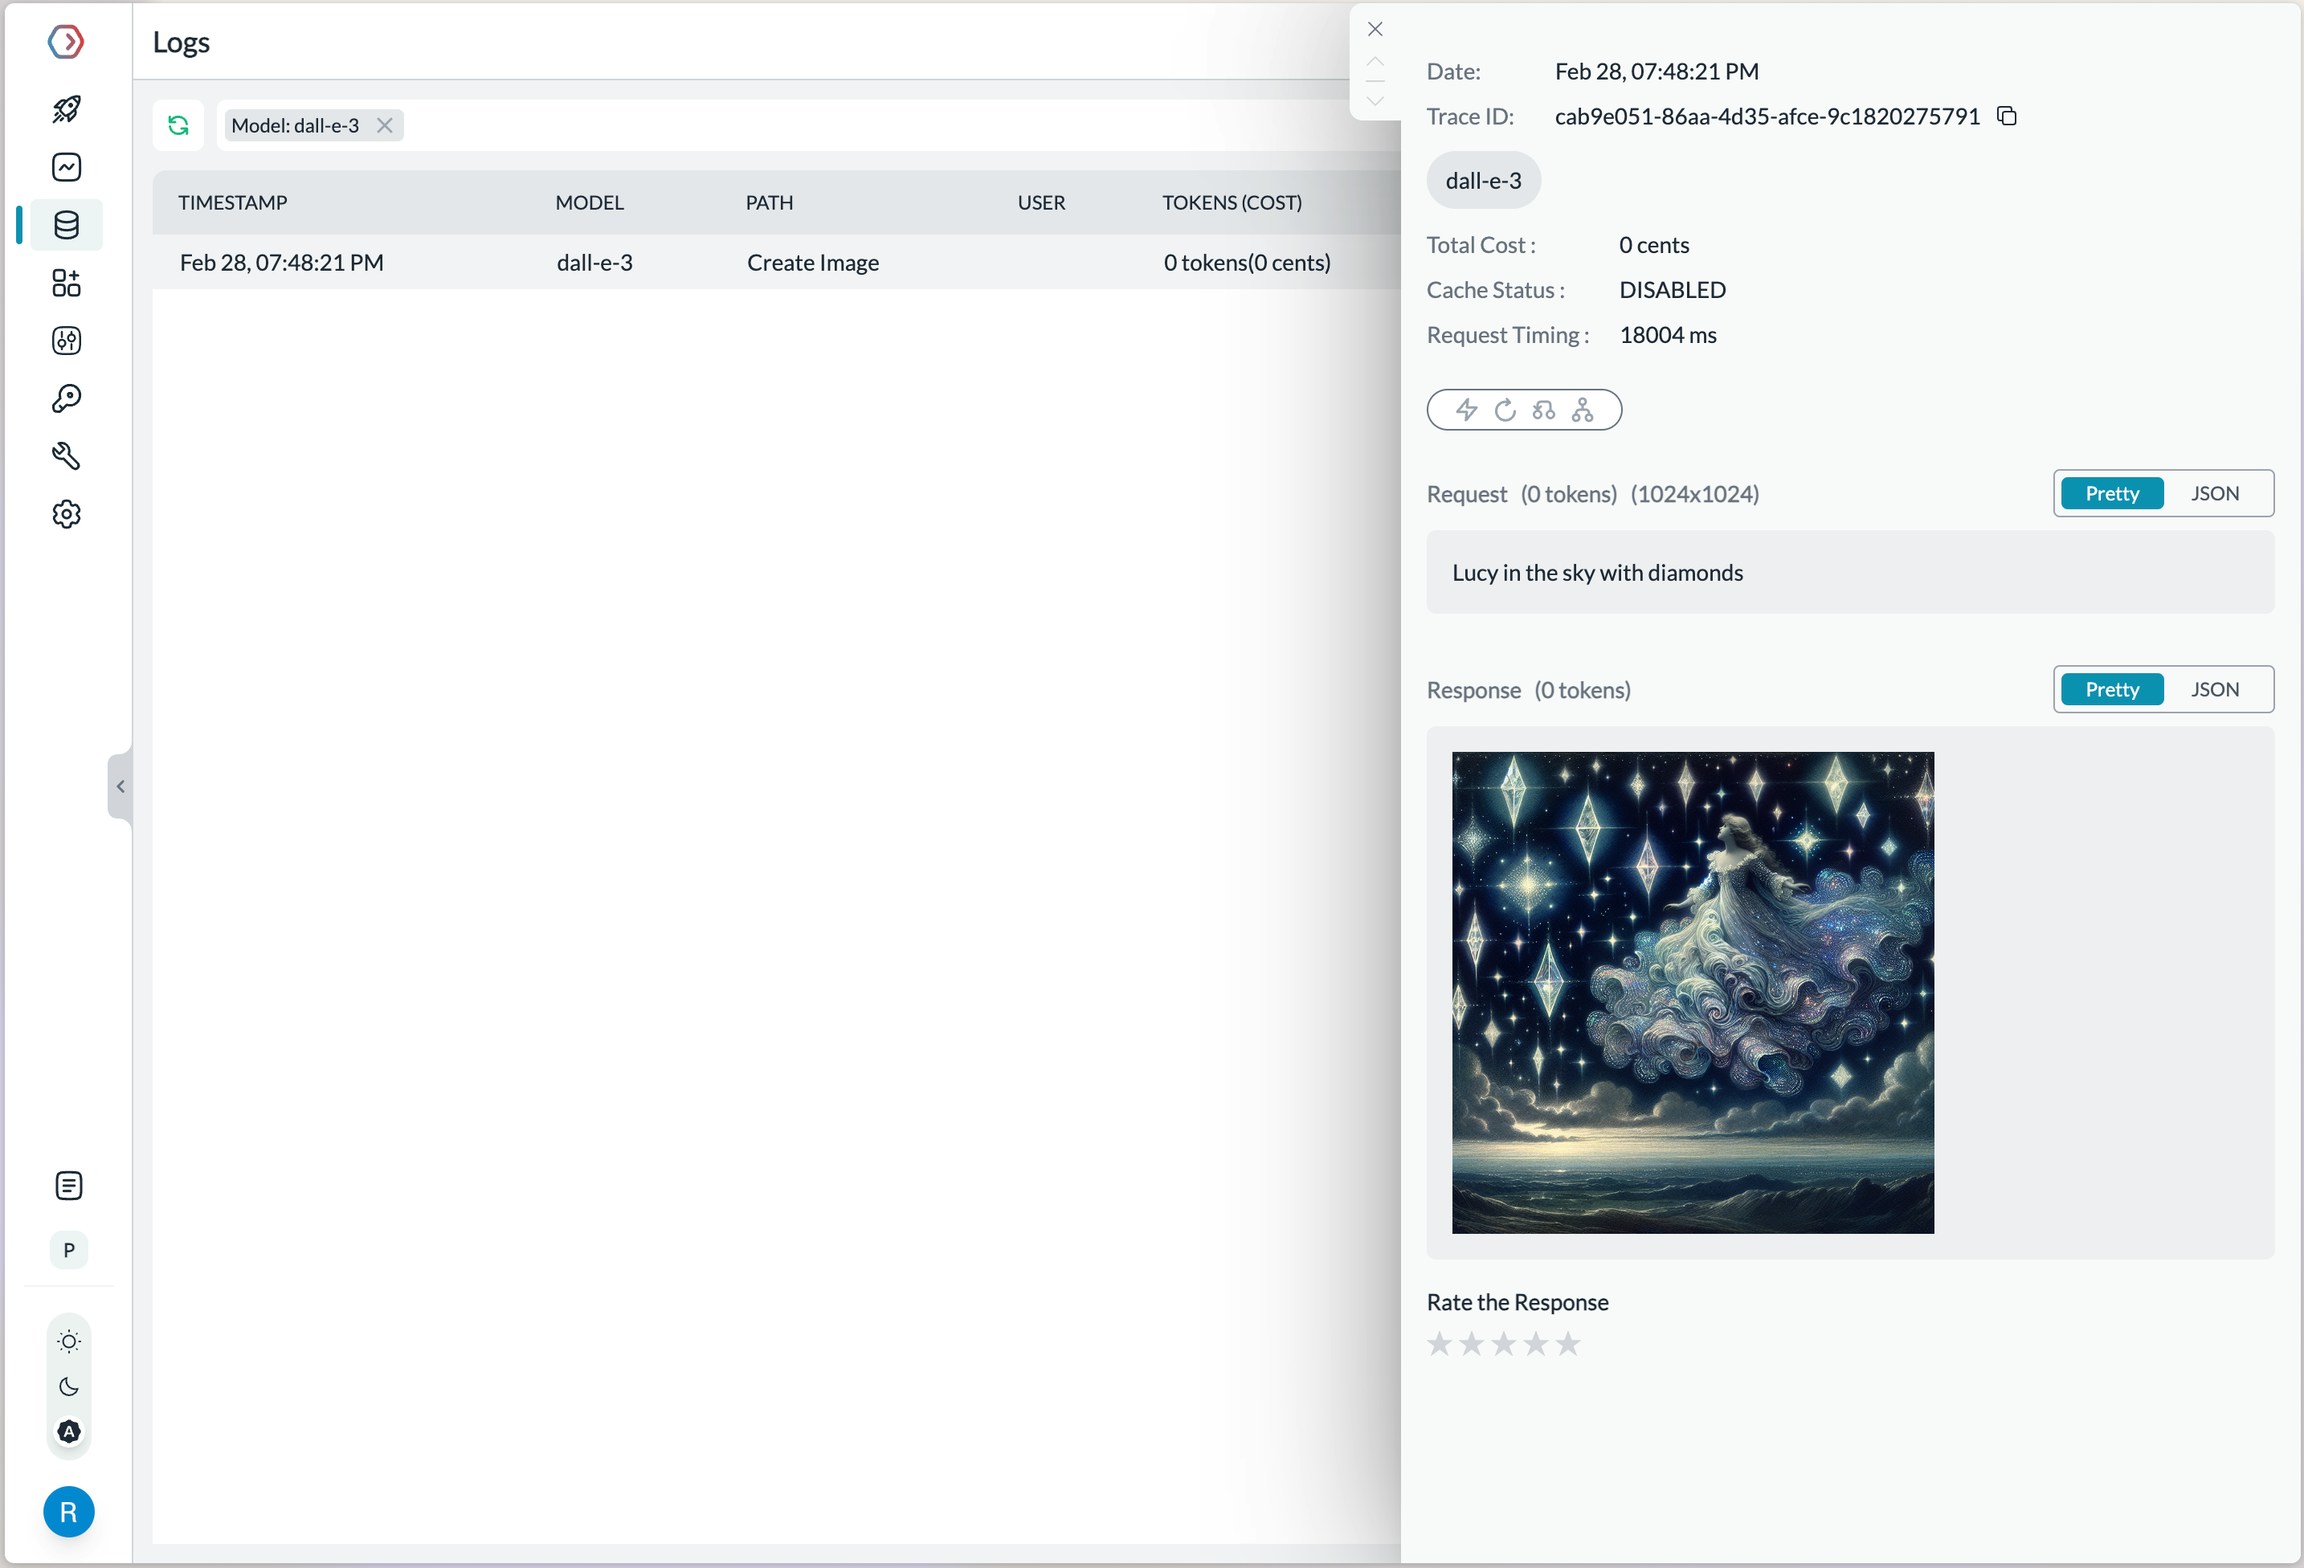 Log view for an image generation request on Azure OpenAI
More information on image generation is available in the [API Reference](https://portkey.ai/docs/api-reference/completions-1#create-image).
***
## Azure Government Cloud
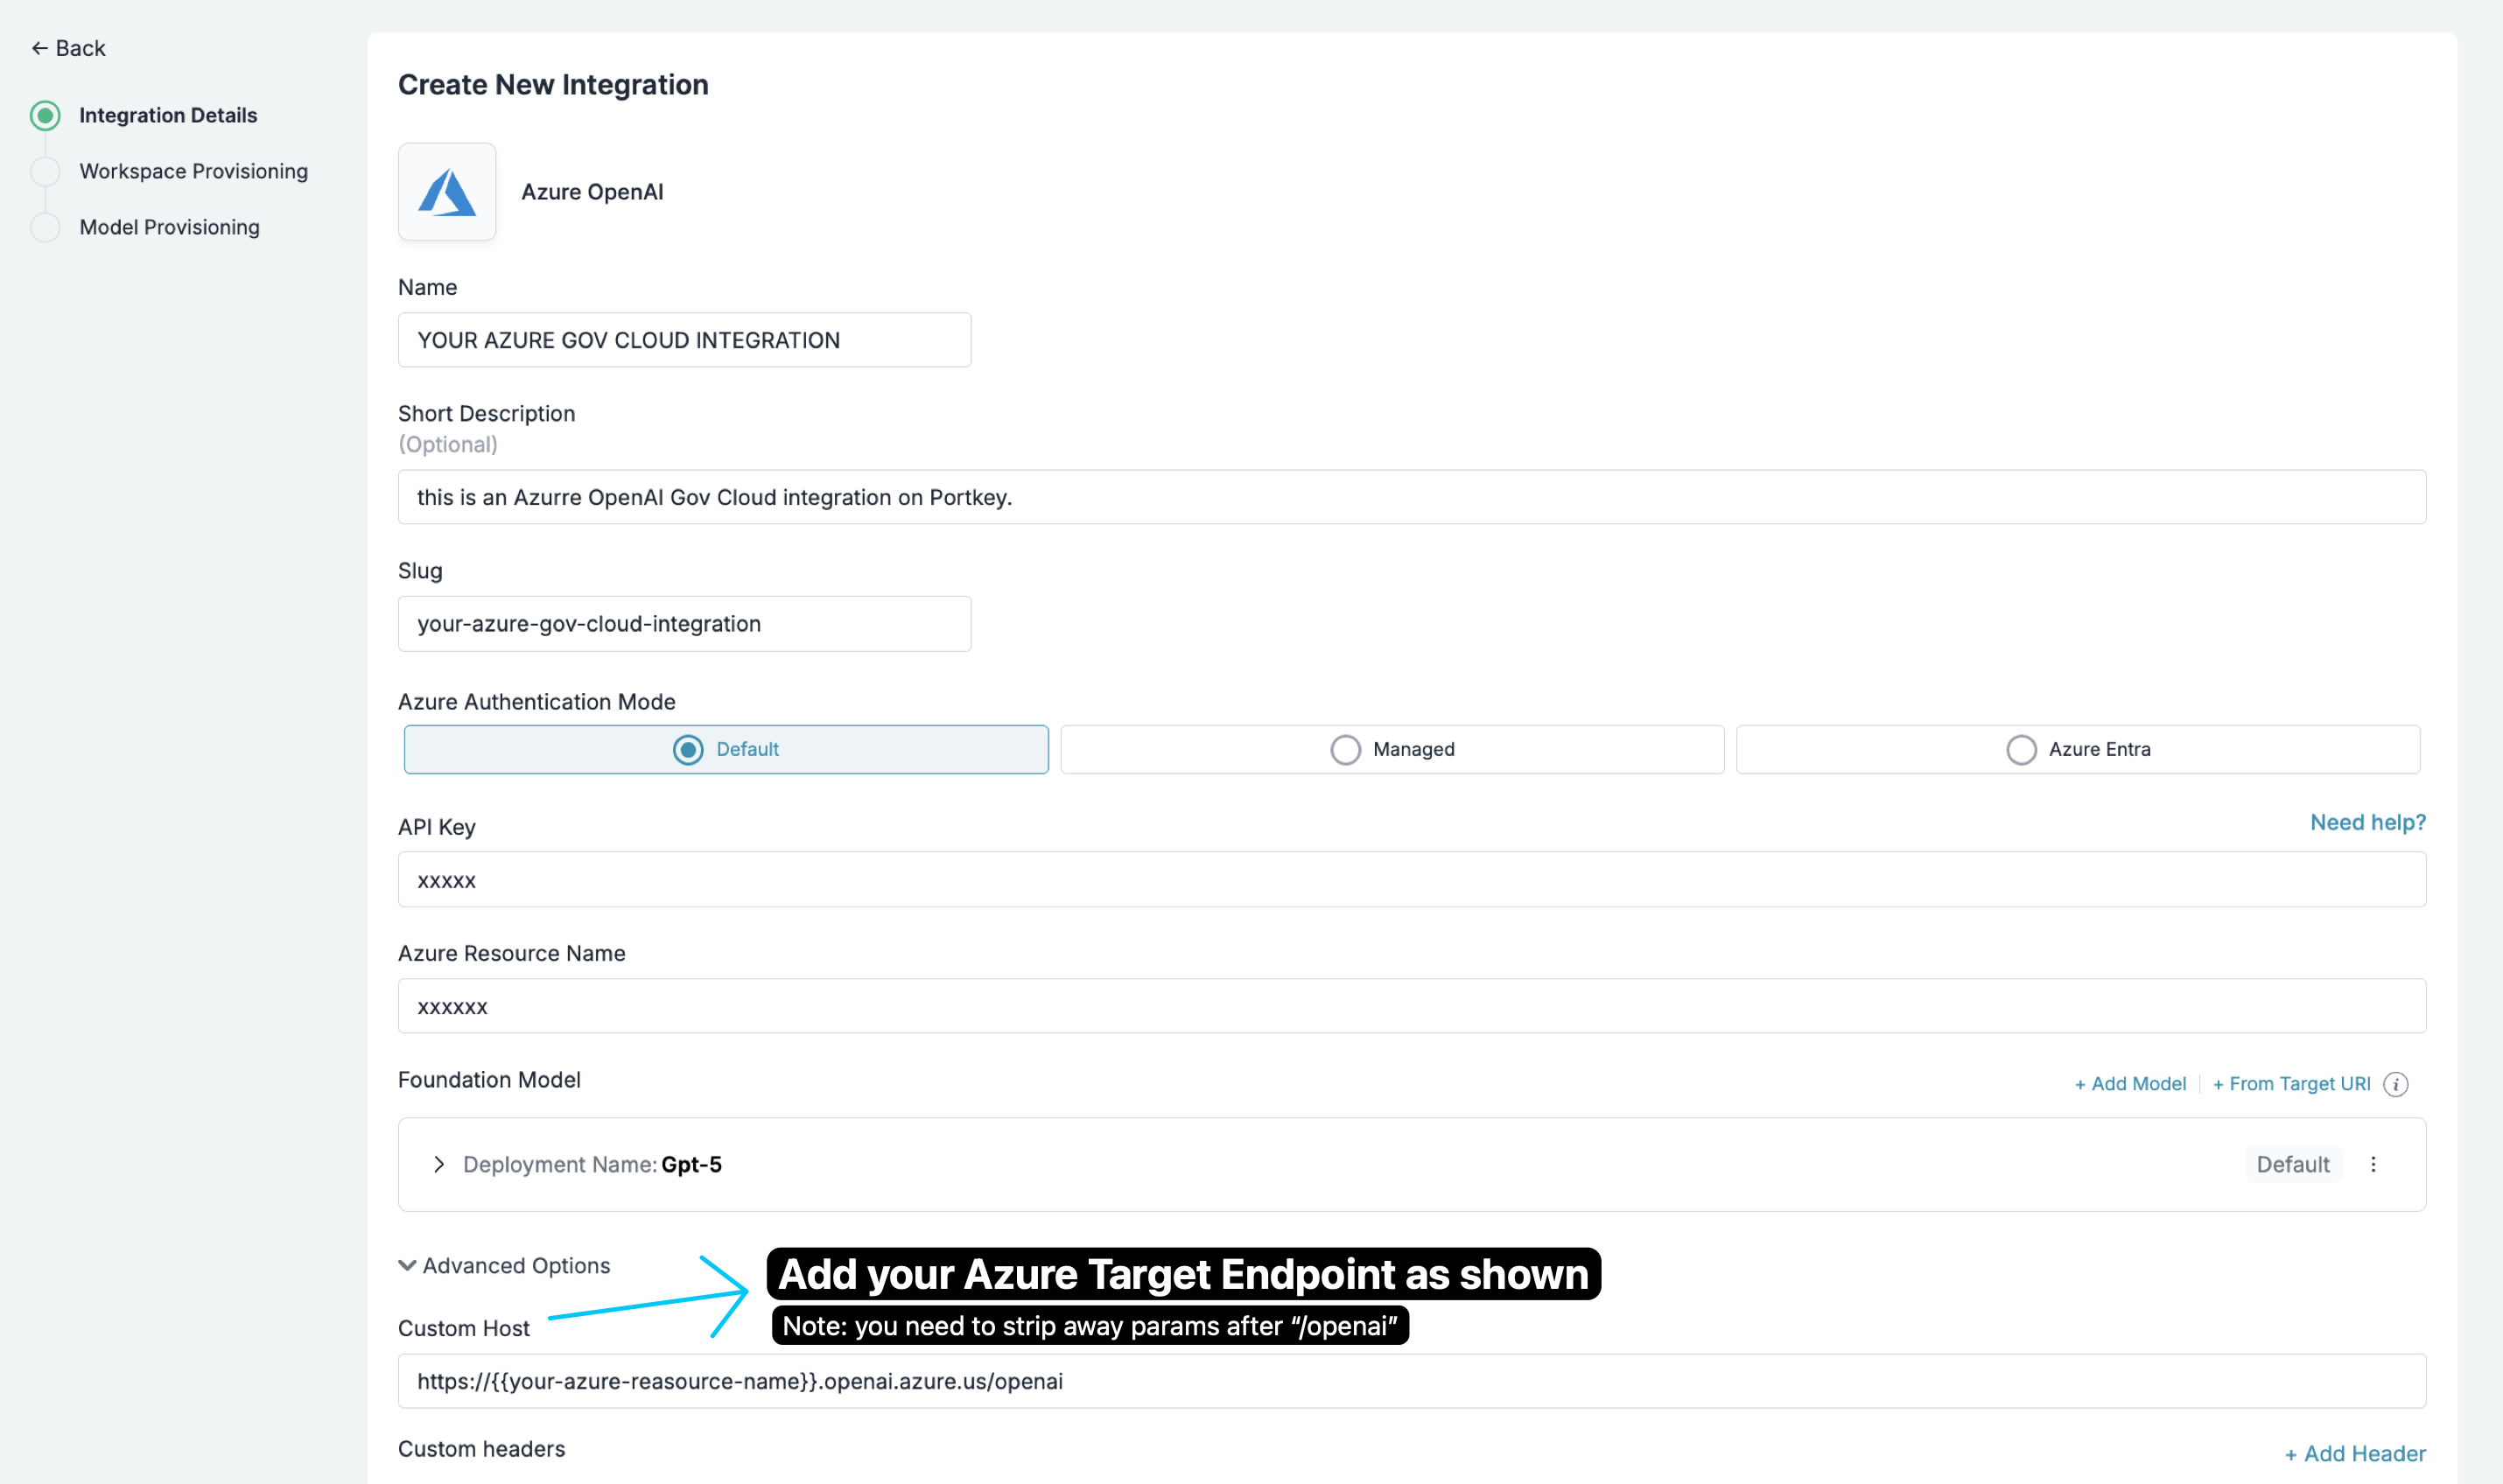
Integration is identical to global Azure OpenAI. Set a Custom Host that points to Azure Government and ensure the path ends with `/openai` (remove any params after `/openai`).
### Steps
1. In Portkey, create or edit your Azure OpenAI provider.
2. Open "Advanced Options".
3. Set "Custom Host" to:
```text theme={"system"}
https://{your-azure-resource-name}.openai.azure.us/openai
```
You need to set the Custom Host to the Azure Government endpoint and ensure the path ends with the first `/openai` (remove any params after `/openai`).
4. Save and use normally in SDKs and via the gateway.
Log view for an image generation request on Azure OpenAI
More information on image generation is available in the [API Reference](https://portkey.ai/docs/api-reference/completions-1#create-image).
***
## Azure Government Cloud
Integration is identical to global Azure OpenAI. Set a Custom Host that points to Azure Government and ensure the path ends with `/openai` (remove any params after `/openai`).
### Steps
1. In Portkey, create or edit your Azure OpenAI provider.
2. Open "Advanced Options".
3. Set "Custom Host" to:
```text theme={"system"}
https://{your-azure-resource-name}.openai.azure.us/openai
```
You need to set the Custom Host to the Azure Government endpoint and ensure the path ends with the first `/openai` (remove any params after `/openai`).
4. Save and use normally in SDKs and via the gateway.
 For Azure Government vs global differences and endpoints, see: [Compare Azure Government and global Azure](https://learn.microsoft.com/en-us/azure/azure-government/compare-azure-government-global-azure).
***
## Making Requests Without Model Catalog
Here's how you can pass your Azure OpenAI details & secrets directly without using the Model Catalog feature.
### Key Mapping
In a typical Azure OpenAI request,
```sh theme={"system"}
curl https://{YOUR_RESOURCE_NAME}.openai.azure.com/openai/deployments/{YOUR_DEPLOYMENT_NAME}/chat/completions?api-version={API_VERSION} \
-H "Content-Type: application/json" \
-H "api-key: {YOUR_API_KEY}" \
-d '{
"model": "gpt-4o",
"messages": [
{
"role": "system",
"content": "You are a helpful assistant"
},
{
"role": "user",
"content": "what is a portkey?"
}
]
}'
```
| Parameter | Node SDK | Python SDK | REST Headers |
| --------------------- | ----------------------------------- | ------------------------------------ | ----------------------------- |
| AZURE RESOURCE NAME | azureResourceName | azure\_resource\_name | x-portkey-azure-resource-name |
| AZURE DEPLOYMENT NAME | azureDeploymentId | azure\_deployment\_id | x-portkey-azure-deployment-id |
| API VERSION | azureApiVersion | azure\_api\_version | x-portkey-azure-api-version |
| AZURE API KEY | Authorization: "Bearer + {API_KEY}" | Authorization = "Bearer + {API_KEY}" | Authorization |
| AZURE MODEL NAME | azureModelName | azure\_model\_name | x-portkey-azure-model-name |
### Example
```js theme={"system"}
import Portkey from 'portkey-ai'
const portkey = new Portkey({
apiKey: "PORTKEY_API_KEY",
provider: "azure-openai",
azureResourceName: "AZURE_RESOURCE_NAME",
azureDeploymentId: "AZURE_DEPLOYMENT_NAME",
azureApiVersion: "AZURE_API_VERSION",
azureModelName: "AZURE_MODEL_NAME"
Authorization: "Bearer API_KEY"
})
```
```python theme={"system"}
from portkey_ai import Portkey
portkey = Portkey(
api_key = "PORTKEY_API_KEY",
provider = "azure-openai",
azure_resource_name = "AZURE_RESOURCE_NAME",
azure_deployment_id = "AZURE_DEPLOYMENT_NAME",
azure_api_version = "AZURE_API_VERSION",
azure_model_name = "AZURE_MODEL_NAME",
Authorization = "Bearer API_KEY"
)
```
```sh theme={"system"}
curl https://api.portkey.ai/v1/chat/completions \
-H "Content-Type: application/json" \
-H "Authorization: Bearer $AZURE_OPENAI_API_KEY" \
-H "x-portkey-api-key: $PORTKEY_API_KEY" \
-H "x-portkey-provider: azure-openai" \
-H "x-portkey-azure-resource-name: $AZURE_RESOURCE_NAME" \
-H "x-portkey-azure-deployment-id: $AZURE_DEPLOYMENY_ID" \
-H "x-portkey-azure-model-name: $AZURE_MODEL_NAME" \
-H "x-portkey-azure-api-version: $AZURE_API_VERSION" \
-d '{
"model": "gpt-4o",
"messages": [{"role": "user","content": "Hello!"}]
}'
```
### How to Pass JWT (JSON Web Tokens)
If you have configured fine-grained access for Azure OpenAI and need to use `JSON web token (JWT)` in the `Authorization` header instead of the regular `API Key`, you can use the `forwardHeaders` parameter to do this.
```js theme={"system"}
import Portkey from 'portkey-ai'
const portkey = new Portkey({
apiKey: "PORTKEY_API_KEY",
provider: "azure-openai",
azureResourceName: "AZURE_RESOURCE_NAME",
azureDeploymendId: "AZURE_DEPLOYMENT_NAME",
azureApiVersion: "AZURE_API_VERSION",
azureModelName: "AZURE_MODEL_NAME",
Authorization: "Bearer JWT_KEY", // Pass your JWT here
forwardHeaders: [ "Authorization" ]
})
```
```js theme={"system"}
import Portkey from 'portkey-ai'
const portkey = new Portkey({
api_key = "PORTKEY_API_KEY",
provider = "azure-openai",
azure_resource_name = "AZURE_RESOURCE_NAME",
azure_deploymend_id = "AZURE_DEPLOYMENT_NAME",
azure_api_version = "AZURE_API_VERSION",
azure_model_name = "AZURE_MODEL_NAME",
Authorization = "Bearer API_KEY", # Pass your JWT here
forward_headers= [ "Authorization" ]
)
```
For further questions on custom Azure deployments or fine-grained access tokens, reach out to us on [support@portkey.ai](mailto:support@portkey.ai)
## Next Steps
The complete list of features supported in the SDK are available on the link below.
You'll find more information in the relevant sections:
1. [Add metadata to your requests](/product/observability/metadata)
2. [Add gateway configs to your Azure OpenAI requests](/product/ai-gateway/configs)
3. [Tracing Azure OpenAI requests](/product/observability/traces)
4. [Setup a fallback from OpenAI to Azure OpenAI APIs](/product/ai-gateway/fallbacks)
For Azure Government vs global differences and endpoints, see: [Compare Azure Government and global Azure](https://learn.microsoft.com/en-us/azure/azure-government/compare-azure-government-global-azure).
***
## Making Requests Without Model Catalog
Here's how you can pass your Azure OpenAI details & secrets directly without using the Model Catalog feature.
### Key Mapping
In a typical Azure OpenAI request,
```sh theme={"system"}
curl https://{YOUR_RESOURCE_NAME}.openai.azure.com/openai/deployments/{YOUR_DEPLOYMENT_NAME}/chat/completions?api-version={API_VERSION} \
-H "Content-Type: application/json" \
-H "api-key: {YOUR_API_KEY}" \
-d '{
"model": "gpt-4o",
"messages": [
{
"role": "system",
"content": "You are a helpful assistant"
},
{
"role": "user",
"content": "what is a portkey?"
}
]
}'
```
| Parameter | Node SDK | Python SDK | REST Headers |
| --------------------- | ----------------------------------- | ------------------------------------ | ----------------------------- |
| AZURE RESOURCE NAME | azureResourceName | azure\_resource\_name | x-portkey-azure-resource-name |
| AZURE DEPLOYMENT NAME | azureDeploymentId | azure\_deployment\_id | x-portkey-azure-deployment-id |
| API VERSION | azureApiVersion | azure\_api\_version | x-portkey-azure-api-version |
| AZURE API KEY | Authorization: "Bearer + {API_KEY}" | Authorization = "Bearer + {API_KEY}" | Authorization |
| AZURE MODEL NAME | azureModelName | azure\_model\_name | x-portkey-azure-model-name |
### Example
```js theme={"system"}
import Portkey from 'portkey-ai'
const portkey = new Portkey({
apiKey: "PORTKEY_API_KEY",
provider: "azure-openai",
azureResourceName: "AZURE_RESOURCE_NAME",
azureDeploymentId: "AZURE_DEPLOYMENT_NAME",
azureApiVersion: "AZURE_API_VERSION",
azureModelName: "AZURE_MODEL_NAME"
Authorization: "Bearer API_KEY"
})
```
```python theme={"system"}
from portkey_ai import Portkey
portkey = Portkey(
api_key = "PORTKEY_API_KEY",
provider = "azure-openai",
azure_resource_name = "AZURE_RESOURCE_NAME",
azure_deployment_id = "AZURE_DEPLOYMENT_NAME",
azure_api_version = "AZURE_API_VERSION",
azure_model_name = "AZURE_MODEL_NAME",
Authorization = "Bearer API_KEY"
)
```
```sh theme={"system"}
curl https://api.portkey.ai/v1/chat/completions \
-H "Content-Type: application/json" \
-H "Authorization: Bearer $AZURE_OPENAI_API_KEY" \
-H "x-portkey-api-key: $PORTKEY_API_KEY" \
-H "x-portkey-provider: azure-openai" \
-H "x-portkey-azure-resource-name: $AZURE_RESOURCE_NAME" \
-H "x-portkey-azure-deployment-id: $AZURE_DEPLOYMENY_ID" \
-H "x-portkey-azure-model-name: $AZURE_MODEL_NAME" \
-H "x-portkey-azure-api-version: $AZURE_API_VERSION" \
-d '{
"model": "gpt-4o",
"messages": [{"role": "user","content": "Hello!"}]
}'
```
### How to Pass JWT (JSON Web Tokens)
If you have configured fine-grained access for Azure OpenAI and need to use `JSON web token (JWT)` in the `Authorization` header instead of the regular `API Key`, you can use the `forwardHeaders` parameter to do this.
```js theme={"system"}
import Portkey from 'portkey-ai'
const portkey = new Portkey({
apiKey: "PORTKEY_API_KEY",
provider: "azure-openai",
azureResourceName: "AZURE_RESOURCE_NAME",
azureDeploymendId: "AZURE_DEPLOYMENT_NAME",
azureApiVersion: "AZURE_API_VERSION",
azureModelName: "AZURE_MODEL_NAME",
Authorization: "Bearer JWT_KEY", // Pass your JWT here
forwardHeaders: [ "Authorization" ]
})
```
```js theme={"system"}
import Portkey from 'portkey-ai'
const portkey = new Portkey({
api_key = "PORTKEY_API_KEY",
provider = "azure-openai",
azure_resource_name = "AZURE_RESOURCE_NAME",
azure_deploymend_id = "AZURE_DEPLOYMENT_NAME",
azure_api_version = "AZURE_API_VERSION",
azure_model_name = "AZURE_MODEL_NAME",
Authorization = "Bearer API_KEY", # Pass your JWT here
forward_headers= [ "Authorization" ]
)
```
For further questions on custom Azure deployments or fine-grained access tokens, reach out to us on [support@portkey.ai](mailto:support@portkey.ai)
## Next Steps
The complete list of features supported in the SDK are available on the link below.
You'll find more information in the relevant sections:
1. [Add metadata to your requests](/product/observability/metadata)
2. [Add gateway configs to your Azure OpenAI requests](/product/ai-gateway/configs)
3. [Tracing Azure OpenAI requests](/product/observability/traces)
4. [Setup a fallback from OpenAI to Azure OpenAI APIs](/product/ai-gateway/fallbacks)