> ## Documentation Index
> Fetch the complete documentation index at: https://docs.portkey.ai/docs/llms.txt
> Use this file to discover all available pages before exploring further.
# Azure Entra
> Setup Azure Entra for SCIM provisioning with Portkey.
#### Azure Active Directory (Azure AD)
[Reference](https://learn.microsoft.com/en-us/azure/active-directory/app-provisioning/use-scim-to-provision-users-and-groups)
Setting up Azure Entra for SCIM provisioning consists of the following steps:
* **New Entra Application & SCIM Provisioning**
* **Application Roles**
* **SCIM Attribute Mapping Update**
***
##### New Entra Application
First, create a new Azure Entra application to set up SCIM provisioning with Portkey.
1. Navigate to the [Entra Applications Page](https://entra.microsoft.com/?culture=en-in\&country=in#view/Microsoft_AAD_IAM/AppGalleryBladeV2) and click **`Create your own application`**.
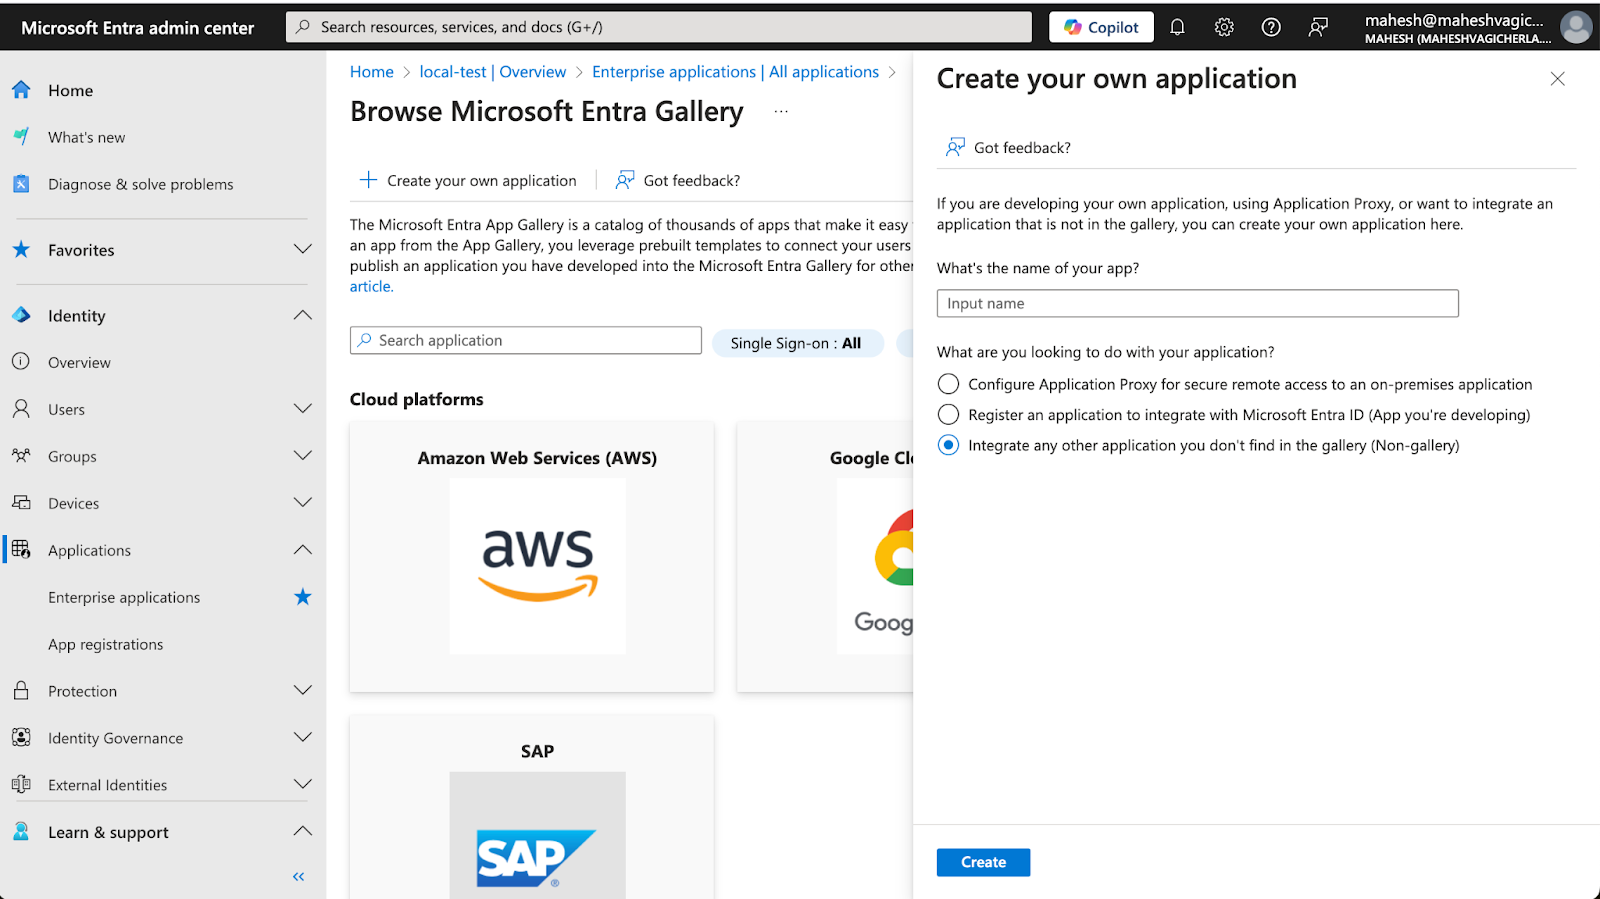 2. Complete the required fields to create a new application.
3. Once the application is created, navigate to the application's **Provisioning** page under the **Manage** section.
4. Click **`New Configuration`** to go to the provisioning settings page.
2. Complete the required fields to create a new application.
3. Once the application is created, navigate to the application's **Provisioning** page under the **Manage** section.
4. Click **`New Configuration`** to go to the provisioning settings page.
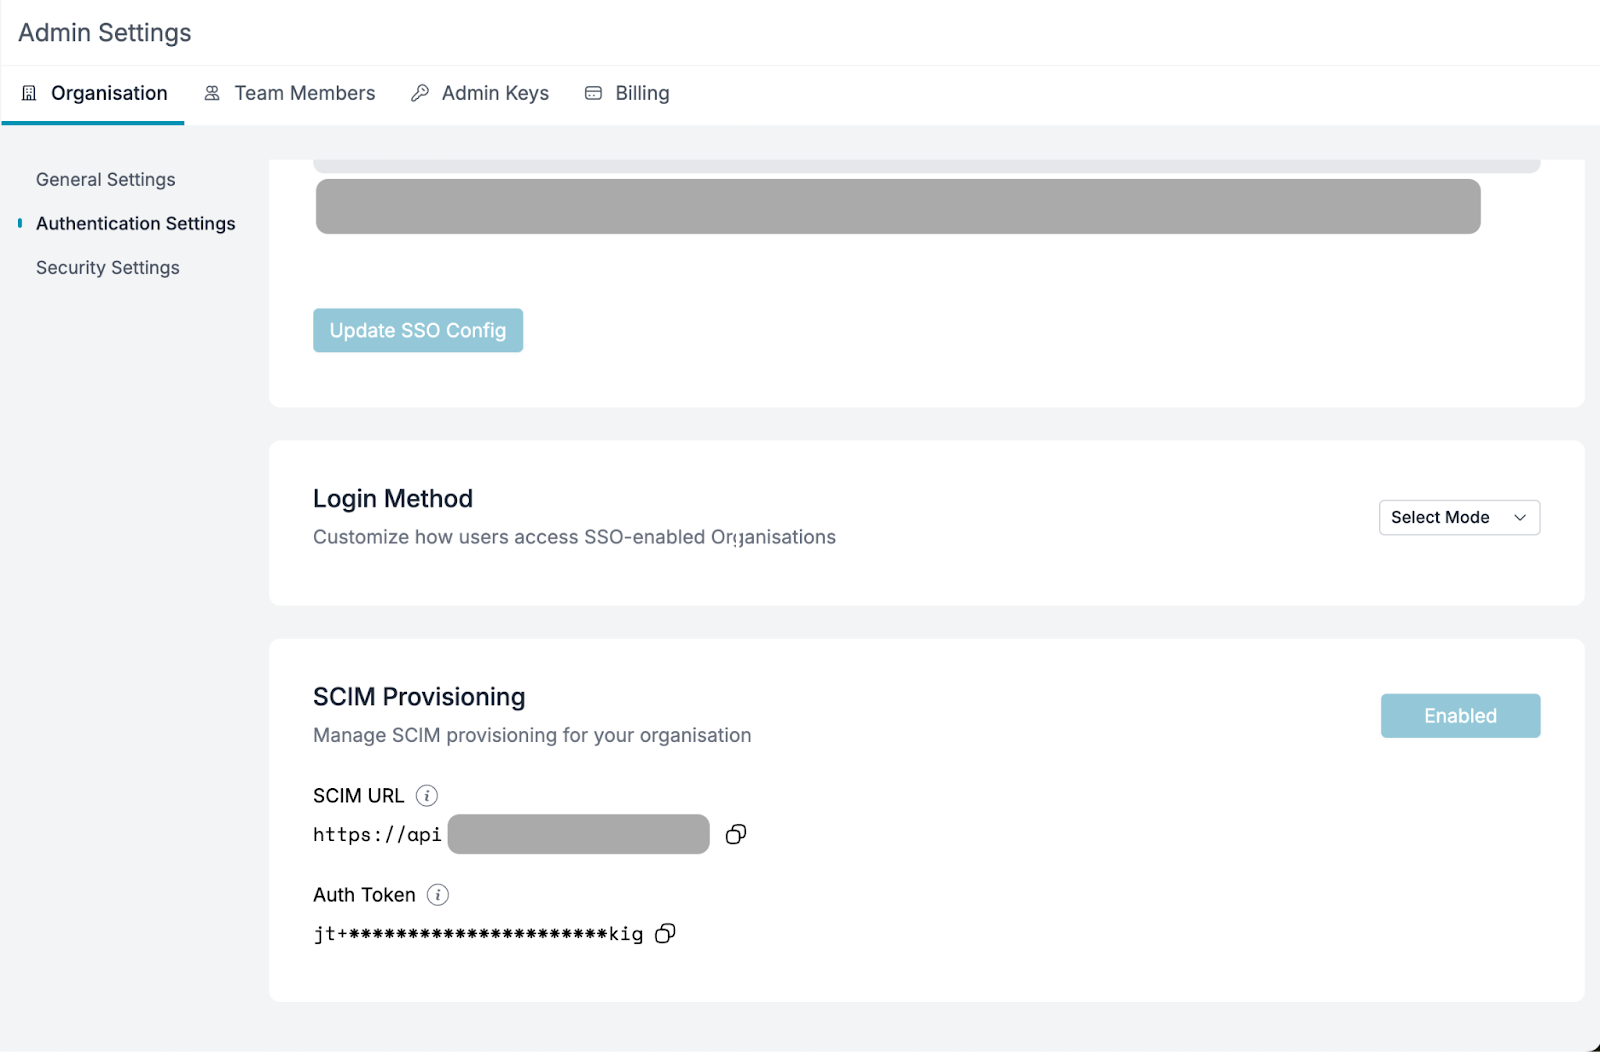
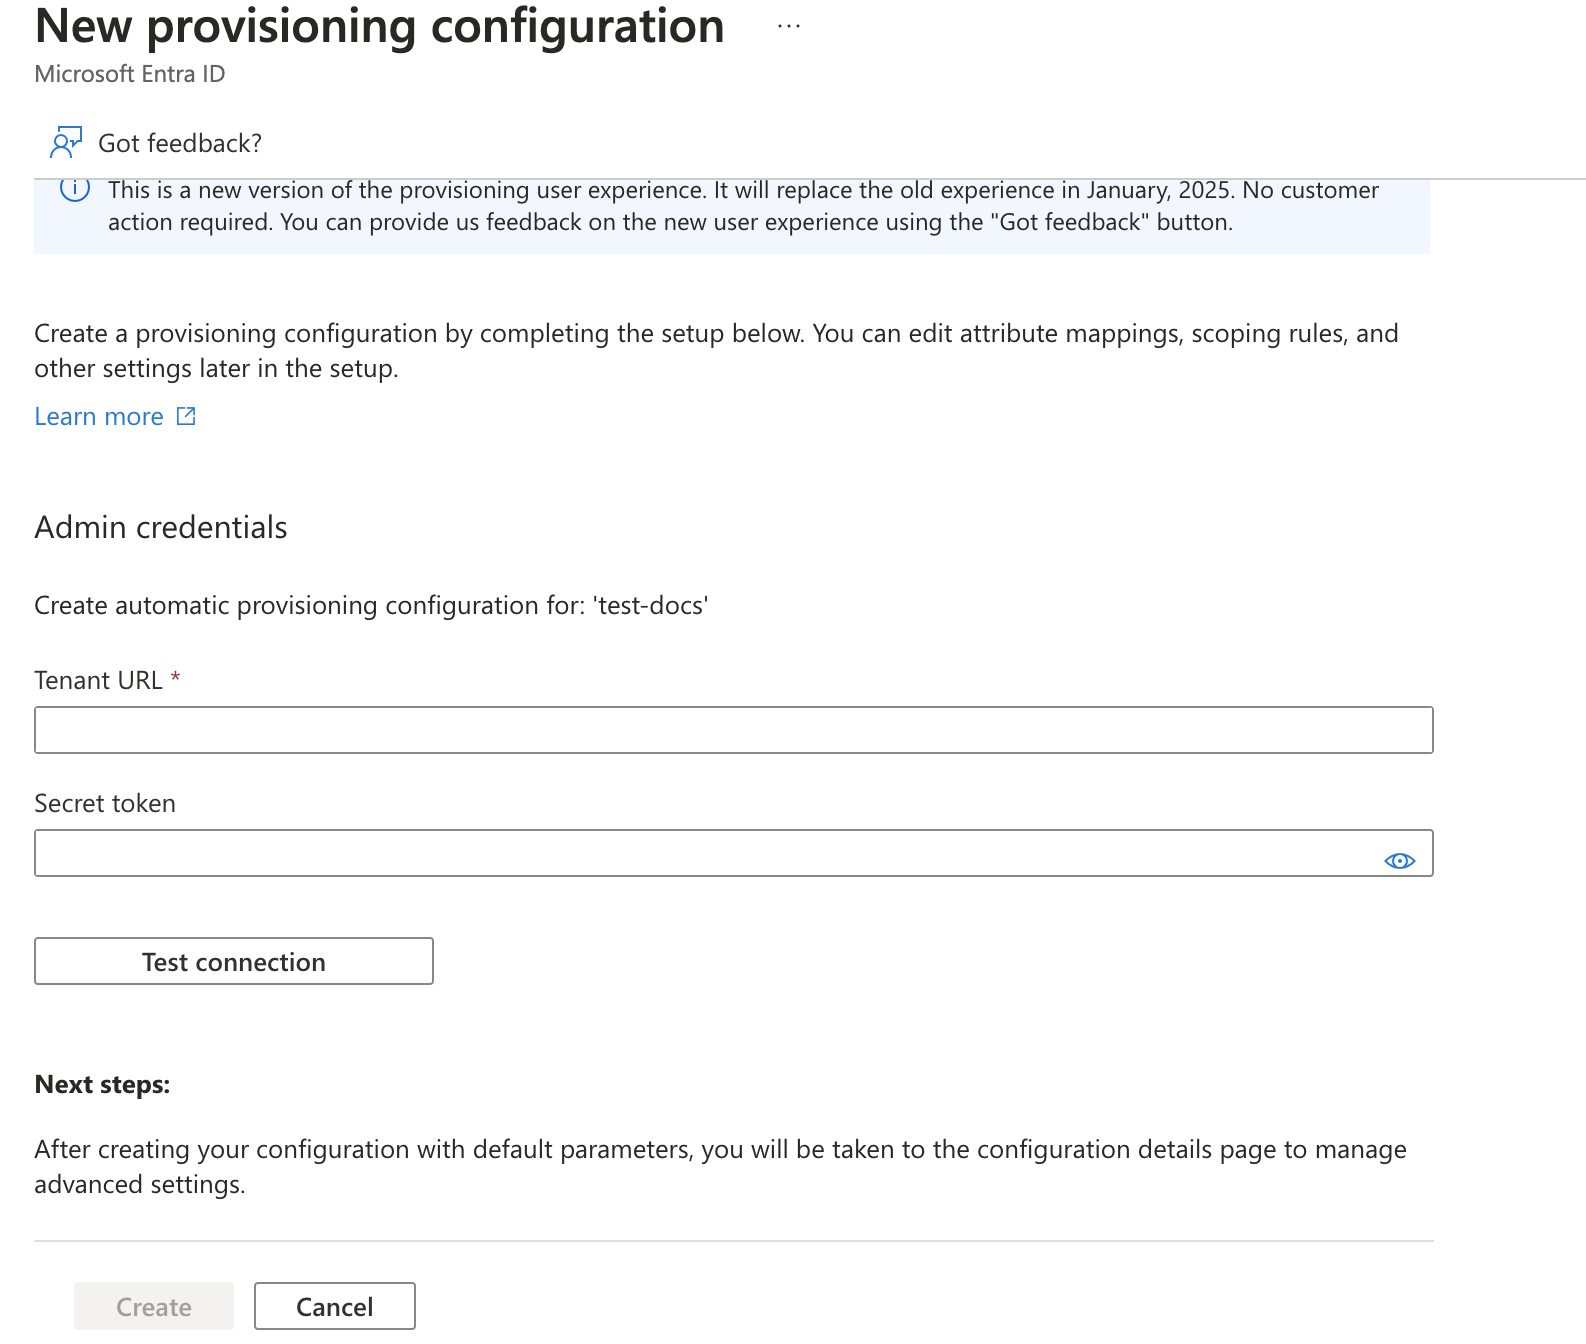 5. Obtain the **Tenant URL** and **Secret Token** from the Portkey Admin Settings page (if SCIM is enabled for your organization).
* [Portkey Settings Page](https://app.portkey.ai/settings/organisation/sso)
5. Obtain the **Tenant URL** and **Secret Token** from the Portkey Admin Settings page (if SCIM is enabled for your organization).
* [Portkey Settings Page](https://app.portkey.ai/settings/organisation/sso)
 6. Fill in the values from the Portkey dashboard in Entra's provisioning settings and click **`Test Connection`**. If successful, click **`Create`**.
> If the test connection returns any errors, please contact us at [support@portkey.ai](mailto:support@portkey.ai).
***
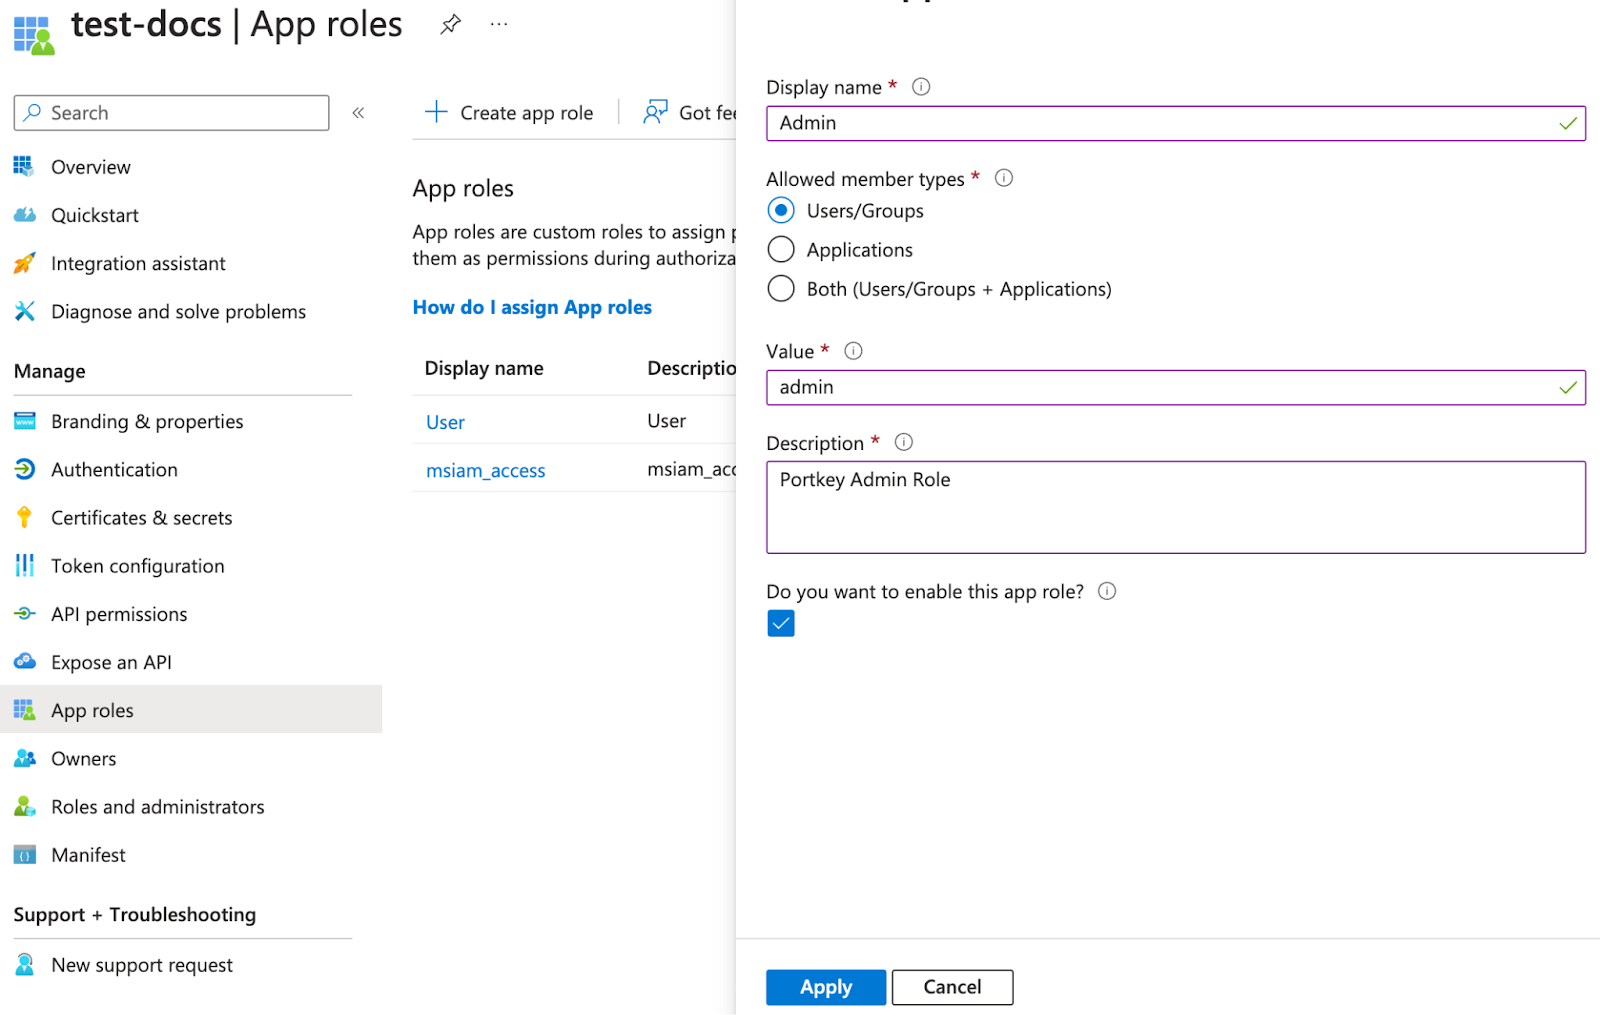
##### Application Roles
Portkey supported roles should match Entra's application roles.
1. Navigate to **App Registrations** under **Enterprise Applications**, click **All Applications**, and select the application created earlier.
2. Go to the **App Roles** page and click **`Create app role`**.
> Portkey supports two application-level roles:
>
> * **`member`** (Organization Member)
> * **`admin`** (Organization Admin)
> * **`owner`** (Organization Owner)
6. Fill in the values from the Portkey dashboard in Entra's provisioning settings and click **`Test Connection`**. If successful, click **`Create`**.
> If the test connection returns any errors, please contact us at [support@portkey.ai](mailto:support@portkey.ai).
***
##### Application Roles
Portkey supported roles should match Entra's application roles.
1. Navigate to **App Registrations** under **Enterprise Applications**, click **All Applications**, and select the application created earlier.
2. Go to the **App Roles** page and click **`Create app role`**.
> Portkey supports two application-level roles:
>
> * **`member`** (Organization Member)
> * **`admin`** (Organization Admin)
> * **`owner`** (Organization Owner)
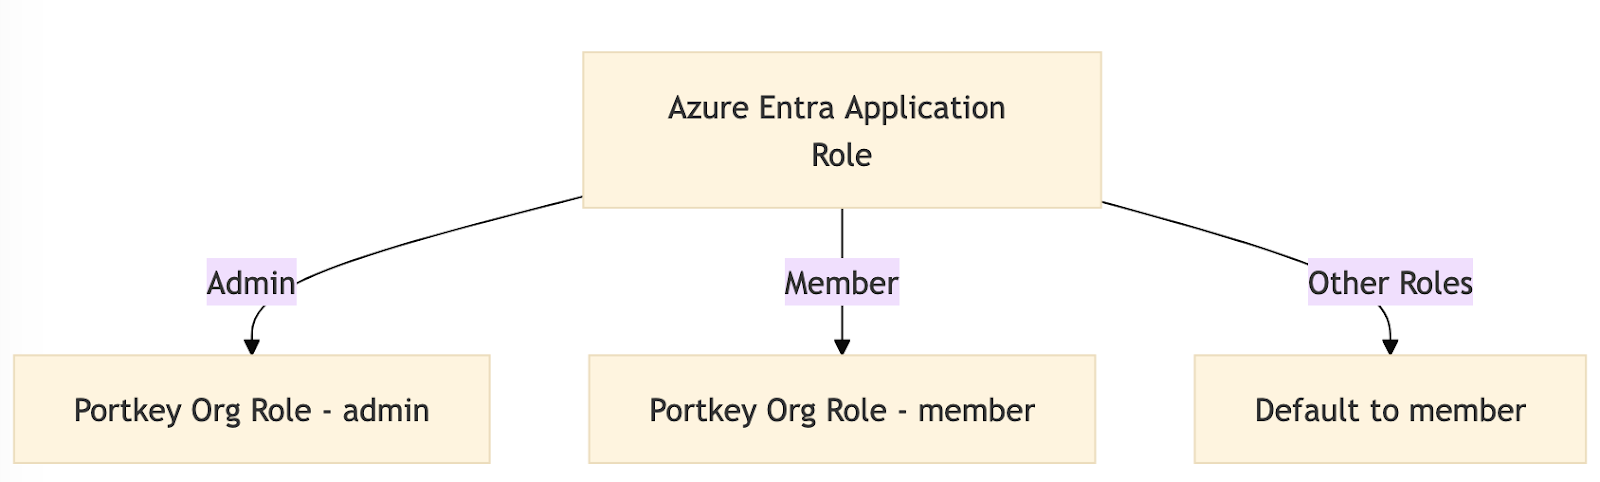 > Users assigned any other role will default to the **member** role.
3. To support group roles, create a role with the value **`group`** and a name in title-case (e.g., `Group` for the value `group`).
> Users assigned any other role will default to the **member** role.
3. To support group roles, create a role with the value **`group`** and a name in title-case (e.g., `Group` for the value `group`).
 4. Assign users to the application with the desired role (e.g., **`owner`**, **`member`**, or **`admin`**) for the organization.
 ***
#### Attribute Mapping
###### Adding a New Attribute
1. Go to the **Provisioning** page and click **Attribute Mapping (Preview)** to access the attributes page.
2. Enable advanced options and click **`Edit attribute list for customappsso`**.
***
#### Attribute Mapping
###### Adding a New Attribute
1. Go to the **Provisioning** page and click **Attribute Mapping (Preview)** to access the attributes page.
2. Enable advanced options and click **`Edit attribute list for customappsso`**.
 3. Add a new attribute called **`roles`** with the following properties:
* **Multi-valued:** Enabled
* **Type:** String
3. Add a new attribute called **`roles`** with the following properties:
* **Multi-valued:** Enabled
* **Type:** String
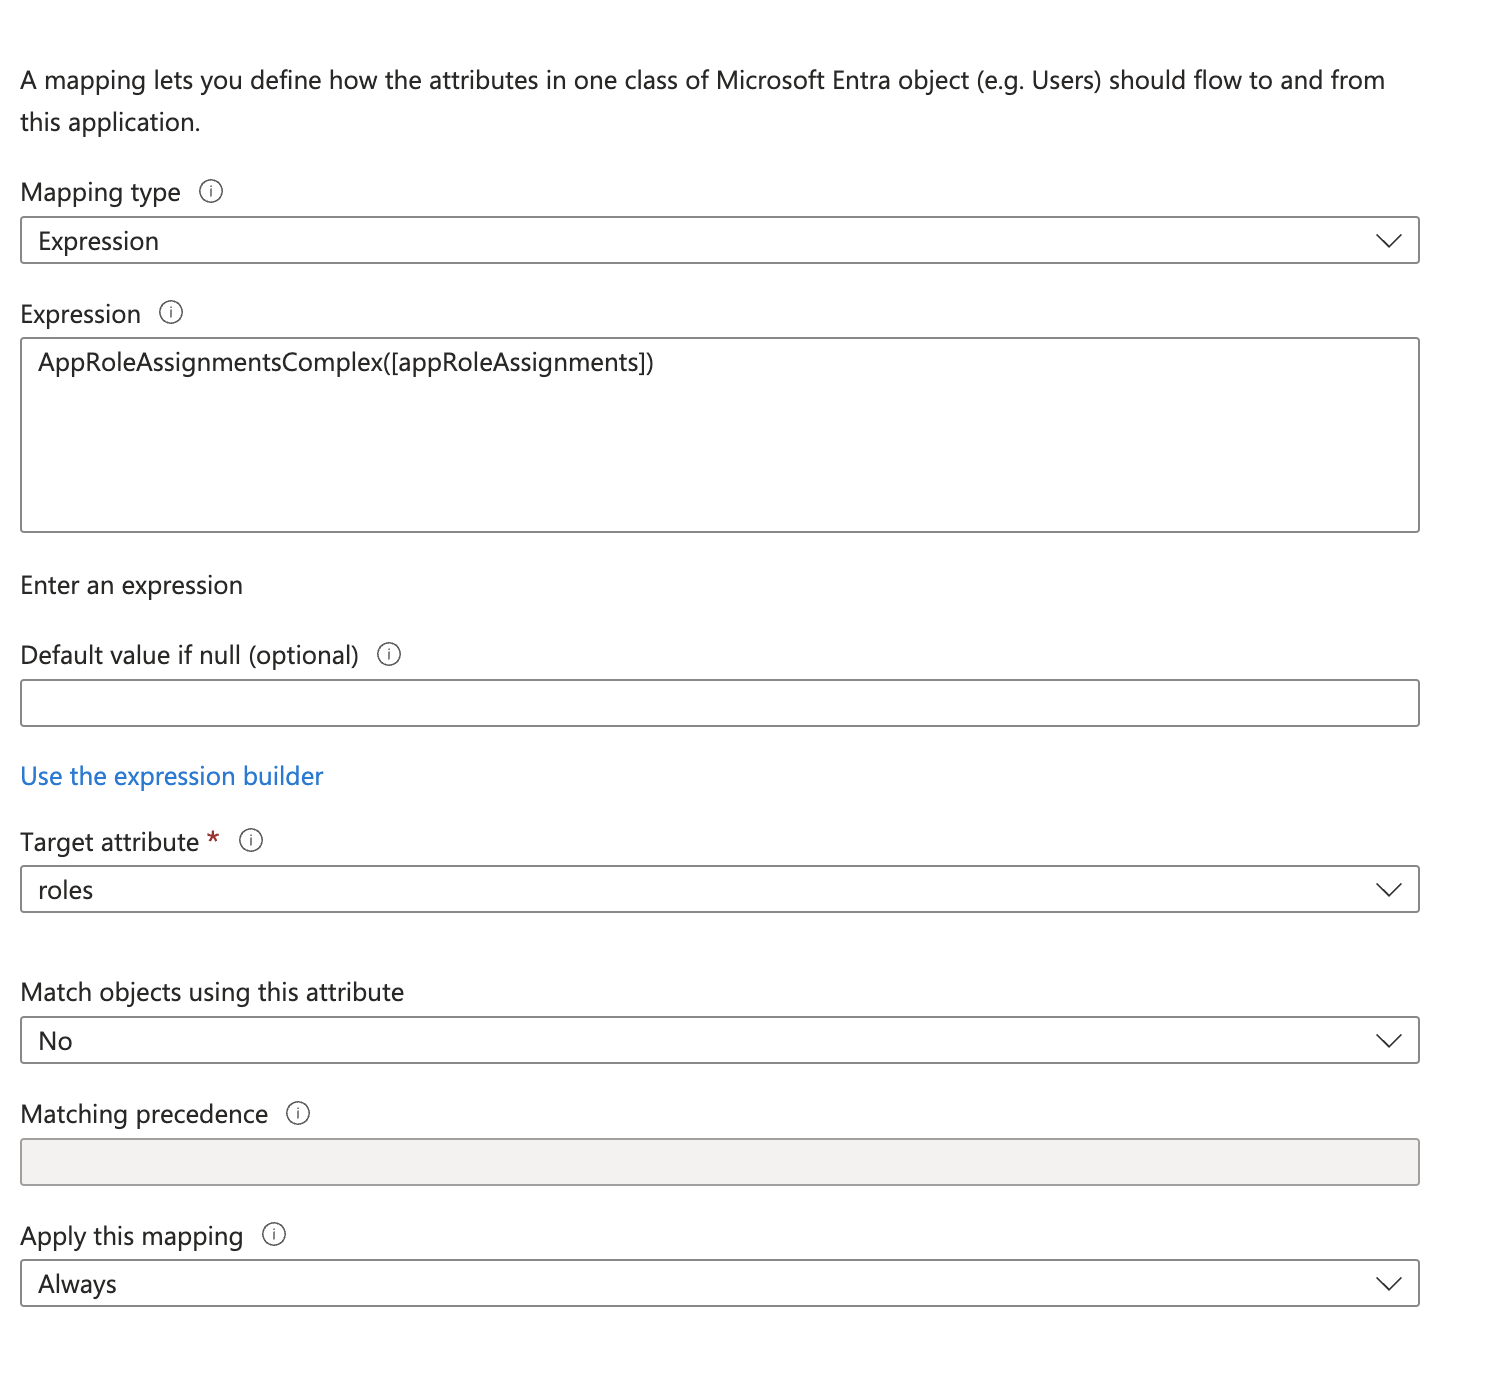
 ###### Adding a new mapping
1. Click on the **`Add new mapping`** link to add a new mapping. (refer to the above images).
2. Follow the values from the below image to add a new mapping.
###### Adding a new mapping
1. Click on the **`Add new mapping`** link to add a new mapping. (refer to the above images).
2. Follow the values from the below image to add a new mapping.
 3. Once done, save the changes.
###### Removing Unnecessary Attributes
Delete the following unsupported attributes:
* **preferredLanguage**
* **addresses (all fields)**
* **phoneNumbers**
***
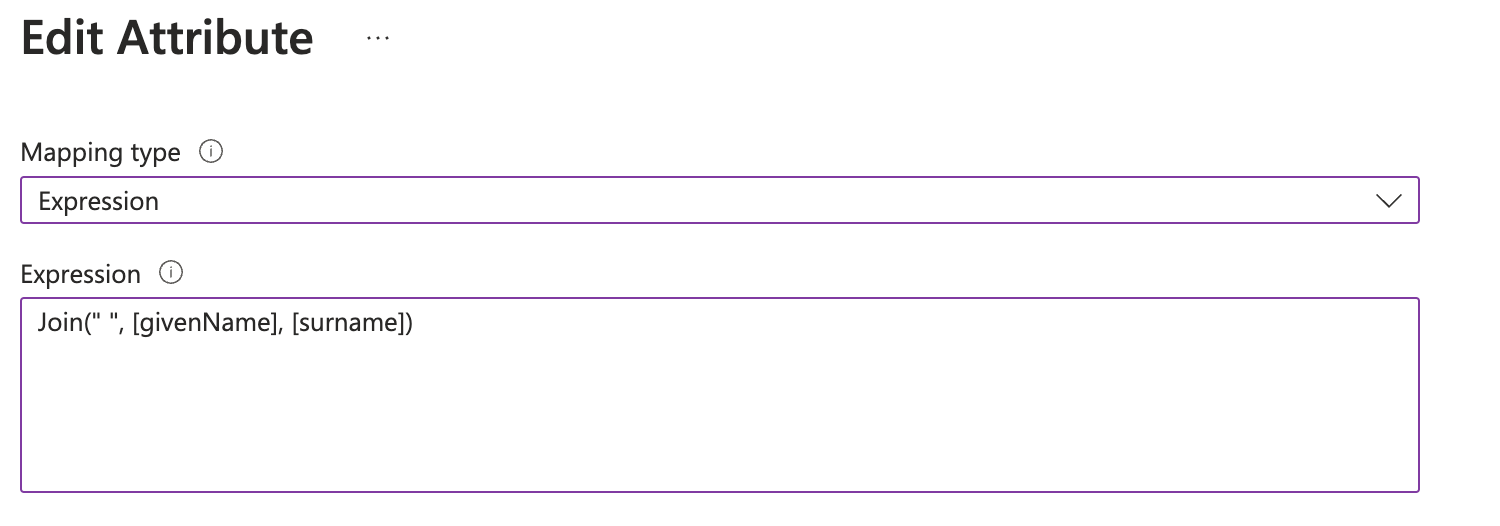
#### Updating Attributes
**Update `displayName`**
1. Edit the **`displayName`** field to concatenate `firstName + lastName` instead of using the default `displayName` value from Entra records.
3. Once done, save the changes.
###### Removing Unnecessary Attributes
Delete the following unsupported attributes:
* **preferredLanguage**
* **addresses (all fields)**
* **phoneNumbers**
***
#### Updating Attributes
**Update `displayName`**
1. Edit the **`displayName`** field to concatenate `firstName + lastName` instead of using the default `displayName` value from Entra records.
 2. Save the changes and enable provisioning on the **Overview** page of the provisioning settings.
***
Looking for Workspace Management? Check out our [Workspace Management](/product/enterprise-offering/org-management/scim/group-management) page.
##### Group (Workspace) Provisioning
Portkey supports RBAC (Role-Based Access Control) for workspaces mapped to groups in Entra. You have two options for mapping groups to workspaces:
**Option 1: Flexible Group Mapping (Recommended)**
Provision groups with any naming convention from Azure Entra, then map them to workspaces and assign roles directly from Portkey Control Plane. This eliminates the need for specific naming formats.
1. Provision your groups from Azure Entra (assign groups to the application)
2. Navigate to **Admin Settings > Authentication Settings > SCIM Provisioning** in Portkey
3. Use the **SCIM Mappings List** section to map groups to workspaces and assign roles
For detailed instructions, see the [SCIM Group Management](/product/enterprise-offering/org-management/scim/group-management) guide.
This is the recommended approach as it provides flexibility in group naming and easier management of group-to-workspace mappings.
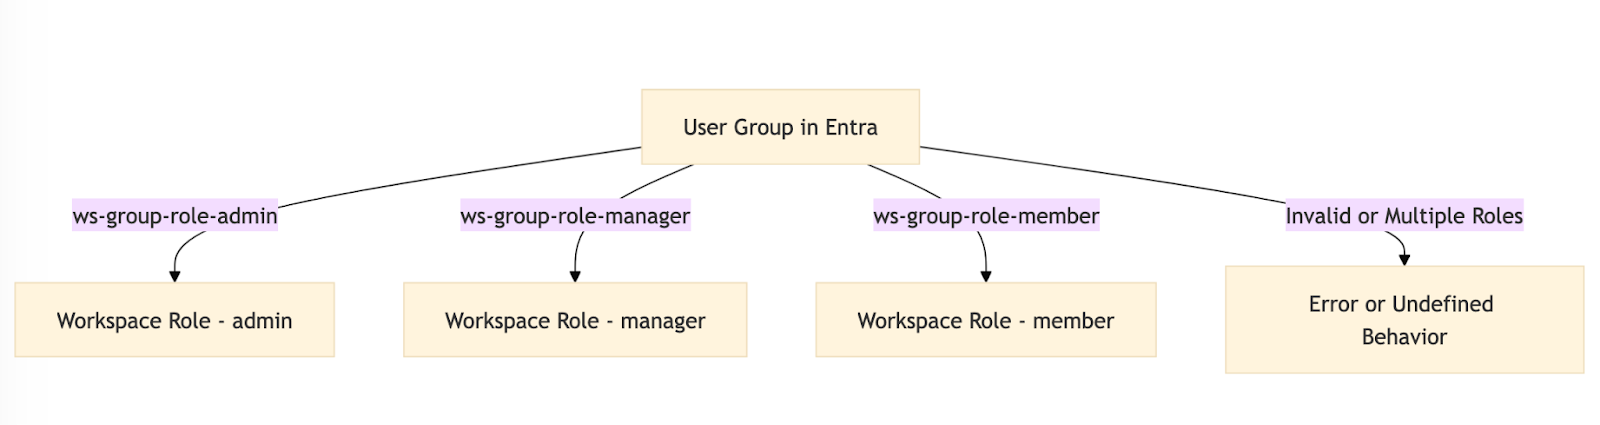
**Option 2: Naming Convention (Legacy)**
Alternatively, you can use the following naming convention for automatic mapping:
* **Format:** `ws-{group}-role-{role}`
* **Role:** One of `admin`, `member`, or `manager`
* A user should belong to only one group per `{group}`.
**Example:**
For a `Sales` workspace:
* `ws-Sales-role-admin`
* `ws-Sales-role-manager`
* `ws-Sales-role-member`
Users assigned to these groups will inherit the corresponding role in Portkey.
**Custom Prefix and Separator Configuration:**
You can configure your own prefix and separator to match your organization's group naming conventions. Navigate to **Admin Settings > Authentication Settings > SCIM Provisioning** in Portkey Control Plane and configure the **Pattern Based SCIM Grouping** section with your preferred prefix and separator.
For example, if you configure:
* **Prefix:** `ws-`
* **Role Separator:** `-role-`
Then your groups should follow: `ws-{group}{role_separator}{admin,manager,member}`
For detailed instructions, see the [SCIM Group Management](/product/enterprise-offering/org-management/scim/group-management#configuring-group-naming-format-optional) guide.
2. Save the changes and enable provisioning on the **Overview** page of the provisioning settings.
***
Looking for Workspace Management? Check out our [Workspace Management](/product/enterprise-offering/org-management/scim/group-management) page.
##### Group (Workspace) Provisioning
Portkey supports RBAC (Role-Based Access Control) for workspaces mapped to groups in Entra. You have two options for mapping groups to workspaces:
**Option 1: Flexible Group Mapping (Recommended)**
Provision groups with any naming convention from Azure Entra, then map them to workspaces and assign roles directly from Portkey Control Plane. This eliminates the need for specific naming formats.
1. Provision your groups from Azure Entra (assign groups to the application)
2. Navigate to **Admin Settings > Authentication Settings > SCIM Provisioning** in Portkey
3. Use the **SCIM Mappings List** section to map groups to workspaces and assign roles
For detailed instructions, see the [SCIM Group Management](/product/enterprise-offering/org-management/scim/group-management) guide.
This is the recommended approach as it provides flexibility in group naming and easier management of group-to-workspace mappings.
**Option 2: Naming Convention (Legacy)**
Alternatively, you can use the following naming convention for automatic mapping:
* **Format:** `ws-{group}-role-{role}`
* **Role:** One of `admin`, `member`, or `manager`
* A user should belong to only one group per `{group}`.
**Example:**
For a `Sales` workspace:
* `ws-Sales-role-admin`
* `ws-Sales-role-manager`
* `ws-Sales-role-member`
Users assigned to these groups will inherit the corresponding role in Portkey.
**Custom Prefix and Separator Configuration:**
You can configure your own prefix and separator to match your organization's group naming conventions. Navigate to **Admin Settings > Authentication Settings > SCIM Provisioning** in Portkey Control Plane and configure the **Pattern Based SCIM Grouping** section with your preferred prefix and separator.
For example, if you configure:
* **Prefix:** `ws-`
* **Role Separator:** `-role-`
Then your groups should follow: `ws-{group}{role_separator}{admin,manager,member}`
For detailed instructions, see the [SCIM Group Management](/product/enterprise-offering/org-management/scim/group-management#configuring-group-naming-format-optional) guide.
 ***
### Support
If you face any issues with the group provisioning, please reach out to us at [here](mailto:support@portkey.ai).
***
### Support
If you face any issues with the group provisioning, please reach out to us at [here](mailto:support@portkey.ai).