> ## Documentation Index
> Fetch the complete documentation index at: https://docs.portkey.ai/docs/llms.txt
> Use this file to discover all available pages before exploring further.
# Ollama
Portkey provides a robust and secure gateway to facilitate the integration of various Large Language Models (LLMs) into your applications, including your **locally hosted models through Ollama**.
Provider Slug. `ollama`
## Portkey SDK Integration with Ollama Models
Portkey provides a consistent API to interact with models from various providers.
If you are running the open source Portkey Gateway, refer to this guide on how to connect Portkey with Ollama.
### 1. Expose your Ollama API
Expose your Ollama API by using a tunneling service like [ngrok](https://ngrok.com/) or any other way you prefer.
You can skip this step if you're self-hosting the Gateway.
For using Ollama with ngrok, here's a [useful guide](https://github.com/ollama/ollama/blob/main/docs/faq.md#how-can-i-use-ollama-with-ngrok)
```sh theme={"system"}
ngrok http 11434 --host-header="localhost:11434"
```
### 2. Install the Portkey SDK
Install the Portkey SDK in your application to interact with your Ollama API through Portkey.
```sh theme={"system"}
npm install --save portkey-ai
```
```sh theme={"system"}
pip install portkey-ai
```
### 3. Initialize Portkey with Ollama URL
Instantiate the Portkey client by adding your Ollama publicly-exposed URL to the `customHost` property.
```js theme={"system"}
import Portkey from 'portkey-ai'
const portkey = new Portkey({
apiKey: "PORTKEY_API_KEY", // defaults to process.env["PORTKEY_API_KEY"]
provider: "ollama",
customHost: "https://7cc4-3-235-157-146.ngrok-free.app" // Your Ollama ngrok URL
})
```
```python theme={"system"}
from portkey_ai import Portkey
portkey = Portkey(
api_key="PORTKEY_API_KEY", # Replace with your Portkey API key
provider="ollama",
custom_host="https://7cc4-3-235-157-146.ngrok-free.app" # Your Ollama ngrok URL
)
```
For the Ollama integration, you only need to pass the base URL to `customHost` without the version identifier (such as `/v1`) - Portkey takes care of the rest!
### **4. Invoke Chat Completions with** Ollama
Use the Portkey SDK to invoke chat completions from your Ollama model, just as you would with any other provider.
```js theme={"system"}
const chatCompletion = await portkey.chat.completions.create({
messages: [{ role: 'user', content: 'Say this is a test' }],
model: 'llama3',
});
console.log(chatCompletion.choices);
```
```python theme={"system"}
completion = portkey.chat.completions.create(
messages= [{ "role": 'user', "content": 'Say this is a test' }],
model= 'llama3'
)
print(completion)
```
```sh theme={"system"}
curl --location 'https://api.portkey.ai/v1/chat/completions' \
--header 'Content-Type: application/json' \
--header 'x-portkey-custom-host: https://1eb6-103-180-45-236.ngrok-free.app' \
--header 'x-portkey-provider: ollama' \
--header 'x-portkey-api-key: PORTKEY_API_KEY' \
--data '{
"model": "tinyllama",
"max_tokens": 200,
"stream": false,
"messages": [
{
"role": "system",
"content": [
{
"type": "text",
"text": "You are Batman"
}
]
},
{
"role": "user",
"content": [
{
"type": "text",
"text": "Who is the greatest detective"
}
]
},
{
"role": "assistant",
"content": [
{
"type": "text",
"text": "is it me?"
}
]
}
]
}'
```
## [Using Virtual Keys](https://app.portkey.ai/virtual-keys)
Virtual Keys serve as Portkey's unified authentication system for all LLM interactions, simplifying the use of multiple providers and Portkey features within your application. For self-hosted LLMs, you can configure custom authentication requirements including authorization keys, bearer tokens, or any other headers needed to access your model:
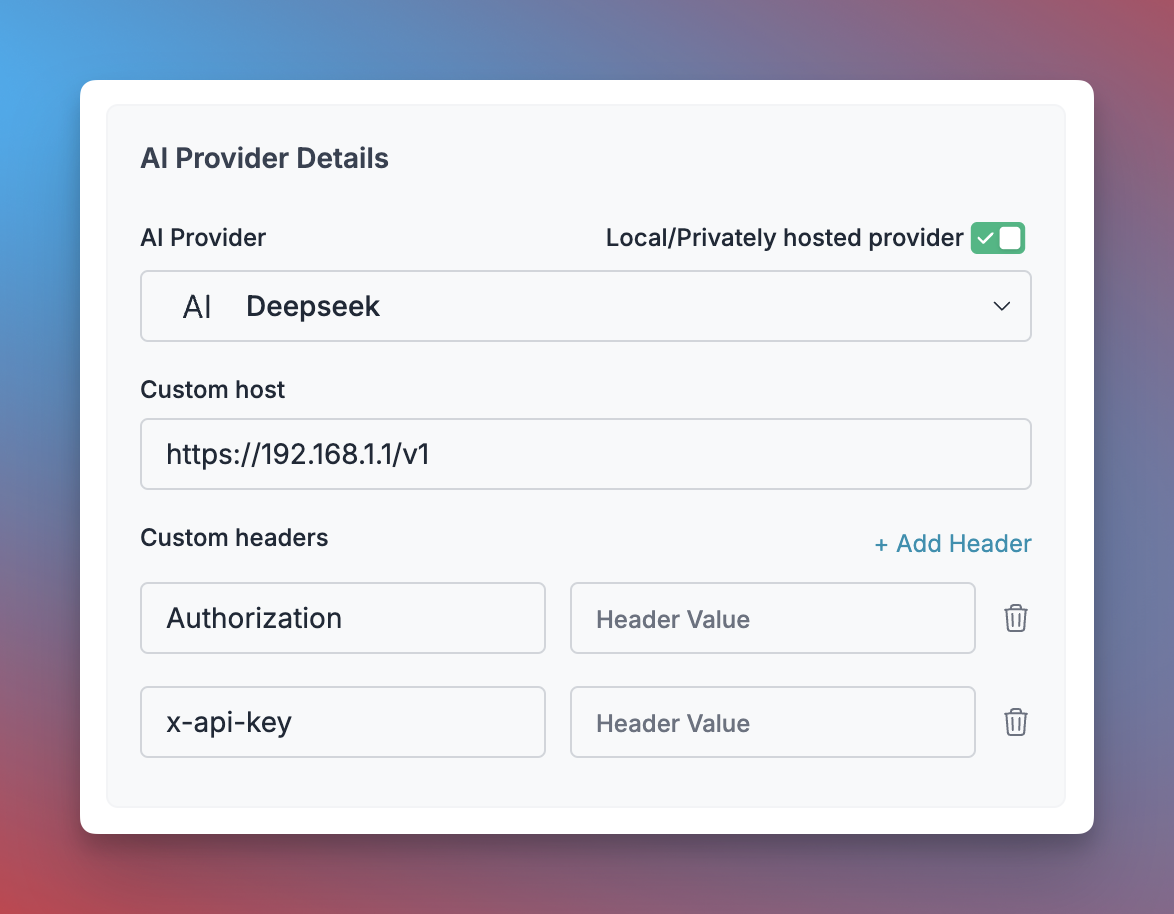 1. Navigate to [Virtual Keys](https://app.portkey.ai/virtual-keys) in your Portkey dashboard
2. Click **"Add Key"** and enable the **"Local/Privately hosted provider"** toggle
3. Configure your deployment:
* Select the matching provider API specification (typically `OpenAI`)
* Enter your model's base URL in the `Custom Host` field
* Add required authentication headers and their values
4. Click **"Create"** to generate your virtual key
You can now use this virtual key in your requests:
```js theme={"system"}
const portkey = new Portkey({
apiKey: "PORTKEY_API_KEY",
virtualKey: "YOUR_SELF_HOSTED_LLM_VIRTUAL_KEY"
async function main() {
const response = await client.chat.completions.create({
messages: [{ role: "user", content: "Bob the builder.." }],
model: "your-self-hosted-model-name",
});
console.log(response.choices[0].message.content);
})
```
```python theme={"system"}
portkey = Portkey(
api_key="PORTKEY_API_KEY",
virtual_key="YOUR_SELF_HOSTED_LLM_VIRTUAL_KEY"
)
response = portkey.chat.completions.create(
model="your-self-hosted-model-name",
messages=[
{"role": "system", "content": "You are a helpful assistant."},
{"role": "user", "content": "Hello!"}
]
print(response)
)
```
For more information about managing self-hosted LLMs with Portkey, see [Bring Your Own LLM](/integrations/llms/byollm).
## Local Setup (npm or docker)
First, install the Gateway locally:
```sh theme={"system"}
npx @portkey-ai/gateway
```
| Your Gateway is running on [http://localhost:8080/v1](http://localhost:8080/v1) 🚀 | |
| ---------------------------------------------------------------------------------- | - |
```sh theme={"system"}
docker pull portkeyai/gateway
```
| Your Gateway is running on [http://host.docker.internal:8080/v1](http://host.docker.internal:8080/v1) 🚀 | |
| -------------------------------------------------------------------------------------------------------- | - |
Then, just change the `baseURL` to the Gateway URL, `customHost` to the Ollam URL, and make requests.
If you are running Portkey inside a `Docker container`, but Ollama is running natively on your machine (i.e. not in Docker), you will have to refer to Ollama using `http://host.docker.internal:11434` for the Gateway to be able to call it.
```ts NodeJS theme={"system"}
import Portkey from 'portkey-ai';
const client = new Portkey({
baseUrl: 'http://localhost:8080/v1',
apiKey: 'PORTKEY_API_KEY',
virtualKey: 'PROVIDER_VIRTUAL_KEY',
customHost: "http://host.docker.internal:11434" // Your Ollama Docker URL
});
async function main() {
const response = await client.chat.completions.create({
messages: [{ role: "user", content: "Bob the builder.." }],
model: "gpt-4o",
});
console.log(response.choices[0].message.content);
}
main();
```
```py Python theme={"system"}
from portkey_ai import Portkey
client = Portkey(
base_url = 'http://localhost:8080/v1',
api_key = "PORTKEY_API_KEY",
virtual_key = "PROVIDER_VIRTUAL_KEY",
custom_host="http://localhost:11434" # Your Ollama URL
)
response = client.chat.completions.create(
model="gpt-4o",
messages=[
{"role": "system", "content": "You are a helpful assistant."},
{"role": "user", "content": "Hello!"}
]
)
print(response.choices[0].message)
```
```sh cURL theme={"system"}
curl http://localhost:8080/v1/chat/completions \
-H "Content-Type: application/json" \
-H "x-portkey-api-key: $PORTKEY_API_KEY" \
-H "x-portkey-custom-host: http://localhost:11434" \
-H "x-portkey-virtual-key: $PORTKEY_PROVIDER_VIRTUAL_KEY" \
-d '{
"model": "gpt-4o",
"messages": [
{ "role": "user", "content": "Hello!" }
]
}'
```
```py OpenAI Python SDK theme={"system"}
from openai import OpenAI
from portkey_ai import createHeaders, PORTKEY_GATEWAY_URL
client = OpenAI(
api_key="xx",
base_url="https://localhost:8080/v1",
default_headers=createHeaders(
api_key="PORTKEY_API_KEY",
virtual_key="OPENAI_VIRTUAL_KEY",
custom_host="http://localhost:11434"
)
)
completion = client.chat.completions.create(
model="gpt-4o",
messages=[
{"role": "system", "content": "You are a helpful assistant."},
{"role": "user", "content": "Hello!"}
]
)
print(completion.choices[0].message)
```
```ts OpenAI NodeJS SDK theme={"system"}
import OpenAI from 'openai';
import { PORTKEY_GATEWAY_URL, createHeaders } from 'portkey-ai'
const openai = new OpenAI({
apiKey: 'xx',
baseURL: 'https://localhost:8080/v1',
defaultHeaders: createHeaders({
apiKey: "PORTKEY_API_KEY",
virtualKey: "OPENAI_VIRTUAL_KEY",
customHost: "http://localhost:11434"
})
});
async function main() {
const completion = await openai.chat.completions.create({
messages: [{ role: 'user', content: 'Say this is a test' }],
model: 'gpt-4o',
});
console.log(chatCompletion.choices);
}
main();
```
### Ollama Tool Calling
Tool calling feature lets models trigger external tools based on conversation context. You define available functions, the model chooses when to use them, and your application executes them and returns results.
Portkey supports Ollama Tool Calling and makes it interoperable across multiple providers. With Portkey Prompts, you can templatize various your prompts & tool schemas as well.
```javascript Get Weather Tool theme={"system"}
let tools = [{
type: "function",
function: {
name: "getWeather",
description: "Get the current weather",
parameters: {
type: "object",
properties: {
location: { type: "string", description: "City and state" },
unit: { type: "string", enum: ["celsius", "fahrenheit"] }
},
required: ["location"]
}
}
}];
let response = await portkey.chat.completions.create({
model: "llama-3.3-70b-versatile",
messages: [
{ role: "system", content: "You are a helpful assistant." },
{ role: "user", content: "What's the weather like in Delhi - respond in JSON" }
],
tools,
tool_choice: "auto",
});
console.log(response.choices[0].finish_reason);
```
```python Get Weather Tool theme={"system"}
tools = [{
"type": "function",
"function": {
"name": "getWeather",
"description": "Get the current weather",
"parameters": {
"type": "object",
"properties": {
"location": {"type": "string", "description": "City and state"},
"unit": {"type": "string", "enum": ["celsius", "fahrenheit"]}
},
"required": ["location"]
}
}
}]
response = portkey.chat.completions.create(
model="llama-3.3-70b-versatile",
messages=[
{"role": "system", "content": "You are a helpful assistant."},
{"role": "user", "content": "What's the weather like in Delhi - respond in JSON"}
],
tools=tools,
tool_choice="auto"
)
print(response.choices[0].finish_reason)
```
```sh Get Weather Tool theme={"system"}
curl -X POST "https://api.portkey.ai/v1/chat/completions" \
-H "Content-Type: application/json" \
-H "Authorization: Bearer YOUR_PORTKEY_API_KEY" \
-d '{
"model": "llama-3.3-70b-versatile",
"messages": [
{"role": "system", "content": "You are a helpful assistant."},
{"role": "user", "content": "What'\''s the weather like in Delhi - respond in JSON"}
],
"tools": [{
"type": "function",
"function": {
"name": "getWeather",
"description": "Get the current weather",
"parameters": {
"type": "object",
"properties": {
"location": {"type": "string", "description": "City and state"},
"unit": {"type": "string", "enum": ["celsius", "fahrenheit"]}
},
"required": ["location"]
}
}
}],
"tool_choice": "auto"
}'
```
Checkout [Prompt Engineering Studio](/product/prompt-engineering-studio/prompt-playground)
## Next Steps
Explore the complete list of features supported in the SDK:
***
You'll find more information in the relevant sections:
1. [Add metadata to your requests](/product/observability/metadata)
2. [Add gateway configs to your Ollama requests](/product/ai-gateway/universal-api#ollama-in-configs)
3. [Tracing Ollama requests](/product/observability/traces)
4. [Setup a fallback from OpenAI to Ollama APIs](/product/ai-gateway/fallbacks)
1. Navigate to [Virtual Keys](https://app.portkey.ai/virtual-keys) in your Portkey dashboard
2. Click **"Add Key"** and enable the **"Local/Privately hosted provider"** toggle
3. Configure your deployment:
* Select the matching provider API specification (typically `OpenAI`)
* Enter your model's base URL in the `Custom Host` field
* Add required authentication headers and their values
4. Click **"Create"** to generate your virtual key
You can now use this virtual key in your requests:
```js theme={"system"}
const portkey = new Portkey({
apiKey: "PORTKEY_API_KEY",
virtualKey: "YOUR_SELF_HOSTED_LLM_VIRTUAL_KEY"
async function main() {
const response = await client.chat.completions.create({
messages: [{ role: "user", content: "Bob the builder.." }],
model: "your-self-hosted-model-name",
});
console.log(response.choices[0].message.content);
})
```
```python theme={"system"}
portkey = Portkey(
api_key="PORTKEY_API_KEY",
virtual_key="YOUR_SELF_HOSTED_LLM_VIRTUAL_KEY"
)
response = portkey.chat.completions.create(
model="your-self-hosted-model-name",
messages=[
{"role": "system", "content": "You are a helpful assistant."},
{"role": "user", "content": "Hello!"}
]
print(response)
)
```
For more information about managing self-hosted LLMs with Portkey, see [Bring Your Own LLM](/integrations/llms/byollm).
## Local Setup (npm or docker)
First, install the Gateway locally:
```sh theme={"system"}
npx @portkey-ai/gateway
```
| Your Gateway is running on [http://localhost:8080/v1](http://localhost:8080/v1) 🚀 | |
| ---------------------------------------------------------------------------------- | - |
```sh theme={"system"}
docker pull portkeyai/gateway
```
| Your Gateway is running on [http://host.docker.internal:8080/v1](http://host.docker.internal:8080/v1) 🚀 | |
| -------------------------------------------------------------------------------------------------------- | - |
Then, just change the `baseURL` to the Gateway URL, `customHost` to the Ollam URL, and make requests.
If you are running Portkey inside a `Docker container`, but Ollama is running natively on your machine (i.e. not in Docker), you will have to refer to Ollama using `http://host.docker.internal:11434` for the Gateway to be able to call it.
```ts NodeJS theme={"system"}
import Portkey from 'portkey-ai';
const client = new Portkey({
baseUrl: 'http://localhost:8080/v1',
apiKey: 'PORTKEY_API_KEY',
virtualKey: 'PROVIDER_VIRTUAL_KEY',
customHost: "http://host.docker.internal:11434" // Your Ollama Docker URL
});
async function main() {
const response = await client.chat.completions.create({
messages: [{ role: "user", content: "Bob the builder.." }],
model: "gpt-4o",
});
console.log(response.choices[0].message.content);
}
main();
```
```py Python theme={"system"}
from portkey_ai import Portkey
client = Portkey(
base_url = 'http://localhost:8080/v1',
api_key = "PORTKEY_API_KEY",
virtual_key = "PROVIDER_VIRTUAL_KEY",
custom_host="http://localhost:11434" # Your Ollama URL
)
response = client.chat.completions.create(
model="gpt-4o",
messages=[
{"role": "system", "content": "You are a helpful assistant."},
{"role": "user", "content": "Hello!"}
]
)
print(response.choices[0].message)
```
```sh cURL theme={"system"}
curl http://localhost:8080/v1/chat/completions \
-H "Content-Type: application/json" \
-H "x-portkey-api-key: $PORTKEY_API_KEY" \
-H "x-portkey-custom-host: http://localhost:11434" \
-H "x-portkey-virtual-key: $PORTKEY_PROVIDER_VIRTUAL_KEY" \
-d '{
"model": "gpt-4o",
"messages": [
{ "role": "user", "content": "Hello!" }
]
}'
```
```py OpenAI Python SDK theme={"system"}
from openai import OpenAI
from portkey_ai import createHeaders, PORTKEY_GATEWAY_URL
client = OpenAI(
api_key="xx",
base_url="https://localhost:8080/v1",
default_headers=createHeaders(
api_key="PORTKEY_API_KEY",
virtual_key="OPENAI_VIRTUAL_KEY",
custom_host="http://localhost:11434"
)
)
completion = client.chat.completions.create(
model="gpt-4o",
messages=[
{"role": "system", "content": "You are a helpful assistant."},
{"role": "user", "content": "Hello!"}
]
)
print(completion.choices[0].message)
```
```ts OpenAI NodeJS SDK theme={"system"}
import OpenAI from 'openai';
import { PORTKEY_GATEWAY_URL, createHeaders } from 'portkey-ai'
const openai = new OpenAI({
apiKey: 'xx',
baseURL: 'https://localhost:8080/v1',
defaultHeaders: createHeaders({
apiKey: "PORTKEY_API_KEY",
virtualKey: "OPENAI_VIRTUAL_KEY",
customHost: "http://localhost:11434"
})
});
async function main() {
const completion = await openai.chat.completions.create({
messages: [{ role: 'user', content: 'Say this is a test' }],
model: 'gpt-4o',
});
console.log(chatCompletion.choices);
}
main();
```
### Ollama Tool Calling
Tool calling feature lets models trigger external tools based on conversation context. You define available functions, the model chooses when to use them, and your application executes them and returns results.
Portkey supports Ollama Tool Calling and makes it interoperable across multiple providers. With Portkey Prompts, you can templatize various your prompts & tool schemas as well.
```javascript Get Weather Tool theme={"system"}
let tools = [{
type: "function",
function: {
name: "getWeather",
description: "Get the current weather",
parameters: {
type: "object",
properties: {
location: { type: "string", description: "City and state" },
unit: { type: "string", enum: ["celsius", "fahrenheit"] }
},
required: ["location"]
}
}
}];
let response = await portkey.chat.completions.create({
model: "llama-3.3-70b-versatile",
messages: [
{ role: "system", content: "You are a helpful assistant." },
{ role: "user", content: "What's the weather like in Delhi - respond in JSON" }
],
tools,
tool_choice: "auto",
});
console.log(response.choices[0].finish_reason);
```
```python Get Weather Tool theme={"system"}
tools = [{
"type": "function",
"function": {
"name": "getWeather",
"description": "Get the current weather",
"parameters": {
"type": "object",
"properties": {
"location": {"type": "string", "description": "City and state"},
"unit": {"type": "string", "enum": ["celsius", "fahrenheit"]}
},
"required": ["location"]
}
}
}]
response = portkey.chat.completions.create(
model="llama-3.3-70b-versatile",
messages=[
{"role": "system", "content": "You are a helpful assistant."},
{"role": "user", "content": "What's the weather like in Delhi - respond in JSON"}
],
tools=tools,
tool_choice="auto"
)
print(response.choices[0].finish_reason)
```
```sh Get Weather Tool theme={"system"}
curl -X POST "https://api.portkey.ai/v1/chat/completions" \
-H "Content-Type: application/json" \
-H "Authorization: Bearer YOUR_PORTKEY_API_KEY" \
-d '{
"model": "llama-3.3-70b-versatile",
"messages": [
{"role": "system", "content": "You are a helpful assistant."},
{"role": "user", "content": "What'\''s the weather like in Delhi - respond in JSON"}
],
"tools": [{
"type": "function",
"function": {
"name": "getWeather",
"description": "Get the current weather",
"parameters": {
"type": "object",
"properties": {
"location": {"type": "string", "description": "City and state"},
"unit": {"type": "string", "enum": ["celsius", "fahrenheit"]}
},
"required": ["location"]
}
}
}],
"tool_choice": "auto"
}'
```
Checkout [Prompt Engineering Studio](/product/prompt-engineering-studio/prompt-playground)
## Next Steps
Explore the complete list of features supported in the SDK:
***
You'll find more information in the relevant sections:
1. [Add metadata to your requests](/product/observability/metadata)
2. [Add gateway configs to your Ollama requests](/product/ai-gateway/universal-api#ollama-in-configs)
3. [Tracing Ollama requests](/product/observability/traces)
4. [Setup a fallback from OpenAI to Ollama APIs](/product/ai-gateway/fallbacks)