> ## Documentation Index
> Fetch the complete documentation index at: https://docs.portkey.ai/docs/llms.txt
> Use this file to discover all available pages before exploring further.
# Virtual Keys
> Portkey's virtual key system allows you to securely store your LLM API keys in our vault, utilizing a unique virtual identifier to streamline API key management.
MIGRATION NOTICE
We are upgrading the Virtual Key experience with the [Model Catalog](/support/upgrade-to-model-catalog) feature.
With Model Catalog, you can now:
* Set model level budget & rate limits
* Inherit budget & rate limits from parent AI provider integrations
* Set granular, workspace-level access controls
* Pass the provider slug (previosuly known as `virtual key`) with the model param in your LLM requests
Learn how to replace your virtual keys with Model Catalog
***
This feature also provides the following benefits:
* Easier key rotation
* The ability to generate multiple virtual keys for a single API key
* Imposition of restrictions [based on cost](/product/ai-gateway/virtual-keys/budget-limits), request volume, and user access
These can be managed within your account under the "Virtual Keys" tab.
## Creating Virtual Keys:
1. Navigate to the "Virtual Keys" page and click the "Add Key" button in the top right corner.
2. Select your AI provider, name your key uniquely, and note any usage specifics if needed.
**Tip:** You can register multiple keys for one provider or use different names for the same key for easy identification.
### Azure Virtual Keys
Azure Virtual Keys allow you to manage multiple Azure deployments under a single virtual key. This feature simplifies API key management and enables flexible usage of different Azure OpenAI models.
You can create multiple deployments under the same resource group and manage them using a single virtual key.
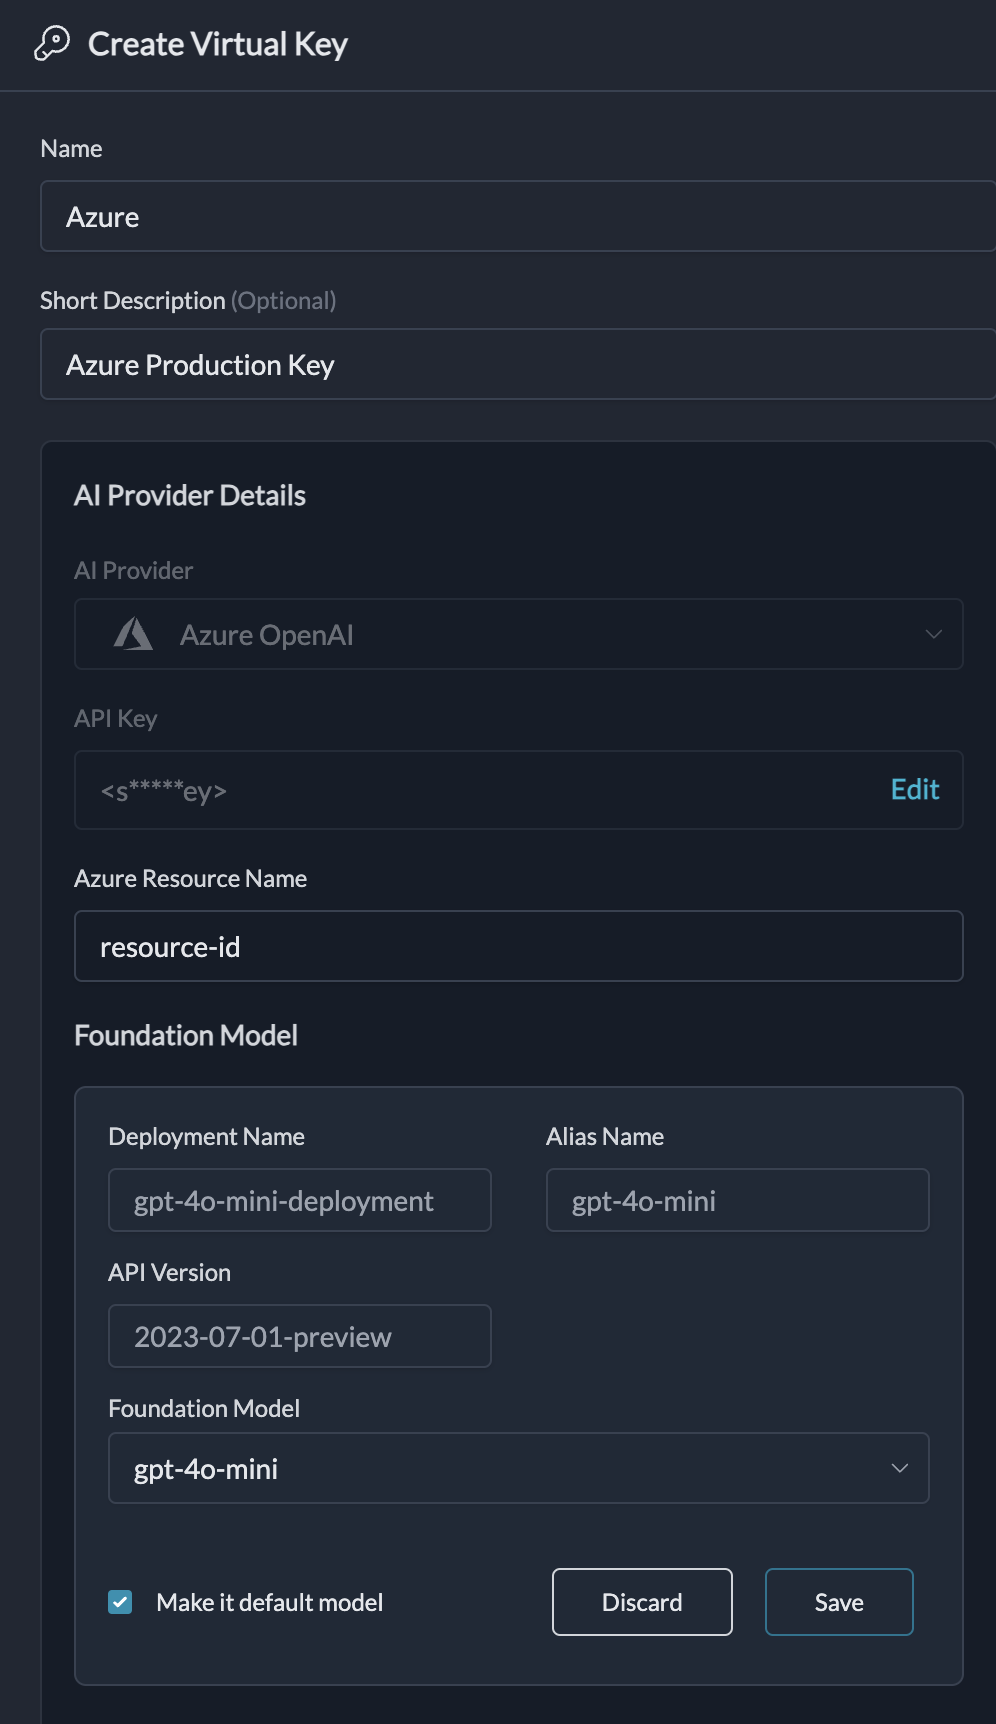 To use the required deployment, simply pass the `alias` of the deployment as the `model` in LLM request body. In case the models is left empty or the specified alias does not exist, the default deployment is used.
## How are the provider API keys stored?
Your API keys are encrypted and stored in secure vaults, accessible only at the moment of a request. Decryption is performed exclusively in isolated workers and only when necessary, ensuring the highest level of data security.
## How are the provider keys linked to the virtual key?
We randomly generate virtual keys and link them separately to the securely stored keys. This means, your raw API keys can not be reverse engineered from the virtual keys.
## Using Virtual Keys
### Using the Portkey SDK
Add the virtual key directly to the initialization configuration for Portkey.
```js theme={"system"}
import Portkey from 'portkey-ai'
const portkey = new Portkey({
apiKey: "PORTKEY_API_KEY", // defaults to process.env["PORTKEY_API_KEY"]
virtualKey: "VIRTUAL_KEY" // Portkey supports a vault for your LLM Keys
})
```
```py theme={"system"}
# Construct a client with a virtual key
portkey = Portkey(
api_key="PORTKEY_API_KEY",
virtual_key="VIRTUAL_KEY"
)
```
Alternatively, you can override the virtual key during the completions call as follows:
```js theme={"system"}
const chatCompletion = await portkey.chat.completions.create({
messages: [{ role: 'user', content: 'Say this is a test' }],
model: 'gpt-3.5-turbo',
}, {virtualKey: "OVERRIDING_VIRTUAL_KEY"});
```
```py theme={"system"}
completion = portkey.with_options(virtual_key="...").chat.completions.create(
messages = [{ "role": 'user', "content": 'Say this is a test' }],
model = 'gpt-3.5-turbo'
)
```
### Using the OpenAI SDK
Add the virtual key directly to the initialization configuration for the OpenAI client.
```js theme={"system"}
import OpenAI from "openai";
import { PORTKEY_GATEWAY_URL, createHeaders } from 'portkey-ai'
const openai = new OpenAI({
apiKey: '', // can be left blank
baseURL: PORTKEY_GATEWAY_URL,
defaultHeaders: createHeaders({
apiKey: "PORTKEY_API_KEY", // defaults to process.env["PORTKEY_API_KEY"]
virtualKey: "VIRTUAL_KEY" // Portkey supports a vault for your LLM Keys
})
});
```
```py theme={"system"}
# Construct a client with a virtual key
from openai import OpenAI
from portkey_ai import PORTKEY_GATEWAY_URL, createHeaders
client = OpenAI(
api_key="", # can be left blank
base_url=PORTKEY_GATEWAY_URL,
default_headers=createHeaders(
api_key="PORTKEY_API_KEY" # defaults to os.environ.get("PORTKEY_API_KEY")
virtual_key="VIRTUAL_KEY" # Portkey supports a vault for your LLM Keys
)
)
```
Alternatively, you can override the virtual key during the completions call as follows:
```js theme={"system"}
const chatCompletion = await portkey.chat.completions.create({
messages: [{ role: 'user', content: 'Say this is a test' }],
model: 'gpt-3.5-turbo',
}, {virtualKey: "OVERRIDING_VIRTUAL_KEY"});
```
```py theme={"system"}
completion = portkey.with_options(virtual_key="...").chat.completions.create(
messages = [{ "role": 'user', "content": 'Say this is a test' }],
model = 'gpt-3.5-turbo'
)
```
### Using alias with Azure virtual keys:
```js theme={"system"}
const chatCompletion = await portkey.chat.completions.create({
messages: [{ role: 'user', content: 'Say this is a test' }],
model: 'gpt-4o', // This will be the alias of the deployment
}, {virtualKey: "VIRTUAL_KEY"});
```
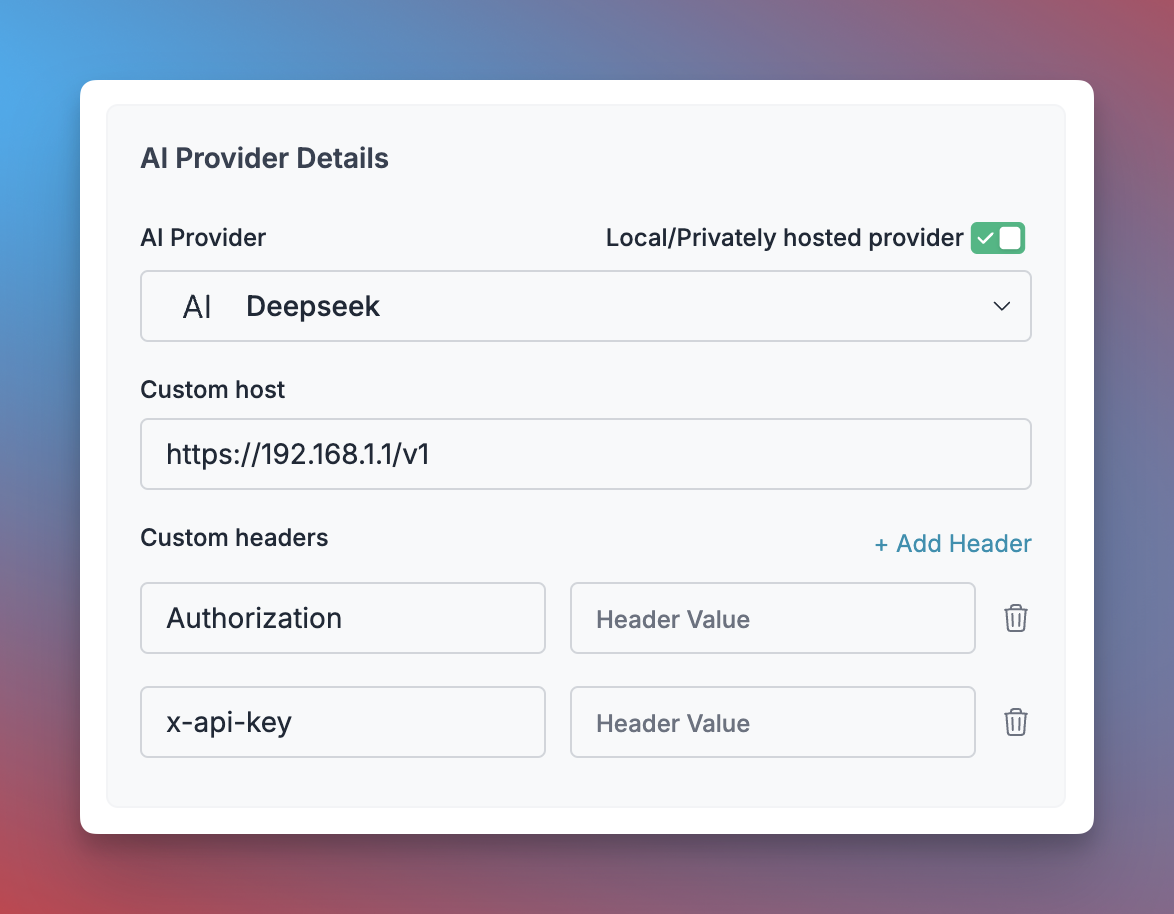
### Self-Hosted LLM Virtual Keys
Portkey supports creating virtual keys for your privately hosted LLMs, allowing you to manage them alongside commercial providers.
1. When creating a new virtual key, enable the "Local/Privately hosted provider" toggle
2. Select the provider API specification your LLM implements (typically OpenAI)
3. Enter your model's base URL in the "Custom Host" field
4. Add any required authentication headers and their values
This allows you to use your self-hosted models with all Portkey features including observability, reliability, and access control.
To use the required deployment, simply pass the `alias` of the deployment as the `model` in LLM request body. In case the models is left empty or the specified alias does not exist, the default deployment is used.
## How are the provider API keys stored?
Your API keys are encrypted and stored in secure vaults, accessible only at the moment of a request. Decryption is performed exclusively in isolated workers and only when necessary, ensuring the highest level of data security.
## How are the provider keys linked to the virtual key?
We randomly generate virtual keys and link them separately to the securely stored keys. This means, your raw API keys can not be reverse engineered from the virtual keys.
## Using Virtual Keys
### Using the Portkey SDK
Add the virtual key directly to the initialization configuration for Portkey.
```js theme={"system"}
import Portkey from 'portkey-ai'
const portkey = new Portkey({
apiKey: "PORTKEY_API_KEY", // defaults to process.env["PORTKEY_API_KEY"]
virtualKey: "VIRTUAL_KEY" // Portkey supports a vault for your LLM Keys
})
```
```py theme={"system"}
# Construct a client with a virtual key
portkey = Portkey(
api_key="PORTKEY_API_KEY",
virtual_key="VIRTUAL_KEY"
)
```
Alternatively, you can override the virtual key during the completions call as follows:
```js theme={"system"}
const chatCompletion = await portkey.chat.completions.create({
messages: [{ role: 'user', content: 'Say this is a test' }],
model: 'gpt-3.5-turbo',
}, {virtualKey: "OVERRIDING_VIRTUAL_KEY"});
```
```py theme={"system"}
completion = portkey.with_options(virtual_key="...").chat.completions.create(
messages = [{ "role": 'user', "content": 'Say this is a test' }],
model = 'gpt-3.5-turbo'
)
```
### Using the OpenAI SDK
Add the virtual key directly to the initialization configuration for the OpenAI client.
```js theme={"system"}
import OpenAI from "openai";
import { PORTKEY_GATEWAY_URL, createHeaders } from 'portkey-ai'
const openai = new OpenAI({
apiKey: '', // can be left blank
baseURL: PORTKEY_GATEWAY_URL,
defaultHeaders: createHeaders({
apiKey: "PORTKEY_API_KEY", // defaults to process.env["PORTKEY_API_KEY"]
virtualKey: "VIRTUAL_KEY" // Portkey supports a vault for your LLM Keys
})
});
```
```py theme={"system"}
# Construct a client with a virtual key
from openai import OpenAI
from portkey_ai import PORTKEY_GATEWAY_URL, createHeaders
client = OpenAI(
api_key="", # can be left blank
base_url=PORTKEY_GATEWAY_URL,
default_headers=createHeaders(
api_key="PORTKEY_API_KEY" # defaults to os.environ.get("PORTKEY_API_KEY")
virtual_key="VIRTUAL_KEY" # Portkey supports a vault for your LLM Keys
)
)
```
Alternatively, you can override the virtual key during the completions call as follows:
```js theme={"system"}
const chatCompletion = await portkey.chat.completions.create({
messages: [{ role: 'user', content: 'Say this is a test' }],
model: 'gpt-3.5-turbo',
}, {virtualKey: "OVERRIDING_VIRTUAL_KEY"});
```
```py theme={"system"}
completion = portkey.with_options(virtual_key="...").chat.completions.create(
messages = [{ "role": 'user', "content": 'Say this is a test' }],
model = 'gpt-3.5-turbo'
)
```
### Using alias with Azure virtual keys:
```js theme={"system"}
const chatCompletion = await portkey.chat.completions.create({
messages: [{ role: 'user', content: 'Say this is a test' }],
model: 'gpt-4o', // This will be the alias of the deployment
}, {virtualKey: "VIRTUAL_KEY"});
```
### Self-Hosted LLM Virtual Keys
Portkey supports creating virtual keys for your privately hosted LLMs, allowing you to manage them alongside commercial providers.
1. When creating a new virtual key, enable the "Local/Privately hosted provider" toggle
2. Select the provider API specification your LLM implements (typically OpenAI)
3. Enter your model's base URL in the "Custom Host" field
4. Add any required authentication headers and their values
This allows you to use your self-hosted models with all Portkey features including observability, reliability, and access control.
 For more details, see [Bring Your Own LLM](/integrations/llms/byollm).
## Setting Budget Limits
Portkey provides a simple way to set budget limits for any of your virtual keys and helps you manage your spending on AI providers (and LLMs) - giving you confidence and control over your application's costs.
[Budget Limits](/product/ai-gateway/virtual-keys/budget-limits)
## Prompt Templates
Choose your Virtual Key within Portkey’s prompt templates, and it will be automatically retrieved and ready for use.
## Langchain / LlamaIndex
Set the virtual key when utilizing Portkey's custom LLM as shown below:
```py theme={"system"}
# Example in Langchain
llm = PortkeyLLM(api_key="PORTKEY_API_KEY",virtual_key="VIRTUAL_KEY")
```
For more details, see [Bring Your Own LLM](/integrations/llms/byollm).
## Setting Budget Limits
Portkey provides a simple way to set budget limits for any of your virtual keys and helps you manage your spending on AI providers (and LLMs) - giving you confidence and control over your application's costs.
[Budget Limits](/product/ai-gateway/virtual-keys/budget-limits)
## Prompt Templates
Choose your Virtual Key within Portkey’s prompt templates, and it will be automatically retrieved and ready for use.
## Langchain / LlamaIndex
Set the virtual key when utilizing Portkey's custom LLM as shown below:
```py theme={"system"}
# Example in Langchain
llm = PortkeyLLM(api_key="PORTKEY_API_KEY",virtual_key="VIRTUAL_KEY")
```