

For standard deployments, use AI Gateway OAuth or External OAuth instead.
Overview
CAS bridges the MCP Gateway’s OAuth flow with Palo Alto Networks’ centralized authentication. Instead of users logging in with standard credentials, they authenticate through their organisation’s identity provider (Entra ID, Okta, or on-prem Active Directory) via CAS.How It Works
Prerequisites
Before CAS authentication works for your MCP Gateway:-
Gateway version 2.22.0 or later — On 2.21.0 the consent screen at
GET /oauth/<slug>/authorizereturns500with{"status":"failure","message":"immutable"}, so the flow stops after client registration and before the CAS login page. Check the running version withGET /v1/health. - CIE Directory Sync configured — Users must be provisioned into workspaces via CIE Directory Sync. CAS authenticates users, but CIE is what provisions them into the system. Without CIE sync, authenticated users cannot be resolved.
- Authentication Profile selected — An Auth Profile must be selected in the CIE Directory Sync configuration. This profile determines which identity provider is used for the CAS login flow. Auth Profiles are managed in the CIE Authentication Profiles console.
Setup
CAS authentication is automatically enabled on the MCP Gateway — no gateway-side configuration is needed. The admin configures identity and access in SCM and CIE before users can connect.1
Connect a directory in CIE
Open the CIE Console and add your identity provider (Entra ID, Okta, or on-prem Active Directory) as a connected directory. This is the source of truth for users and groups.See Palo Alto CIE documentation for provider-specific setup instructions.
2
Configure Directory Sync in SCM
Navigate to AI Security → AI Gateway → Admin Settings → Authentication → Directory Sync.See CIE Directory Sync for a full walkthrough.
- Select the Connected Directory you added in the previous step.
- Choose the User Identity Attribute — either UPN (User Principal Name) or Mail (Primary Email).
- Click Save.
The User Identity Attribute must match the email attribute your identity provider returns during CAS authentication. If there is a mismatch, authenticated users cannot be resolved.
3
Select an Auth Profile
On the same Directory Sync page, open the Auth Profile dropdown and select the authentication profile that should handle MCP login flows.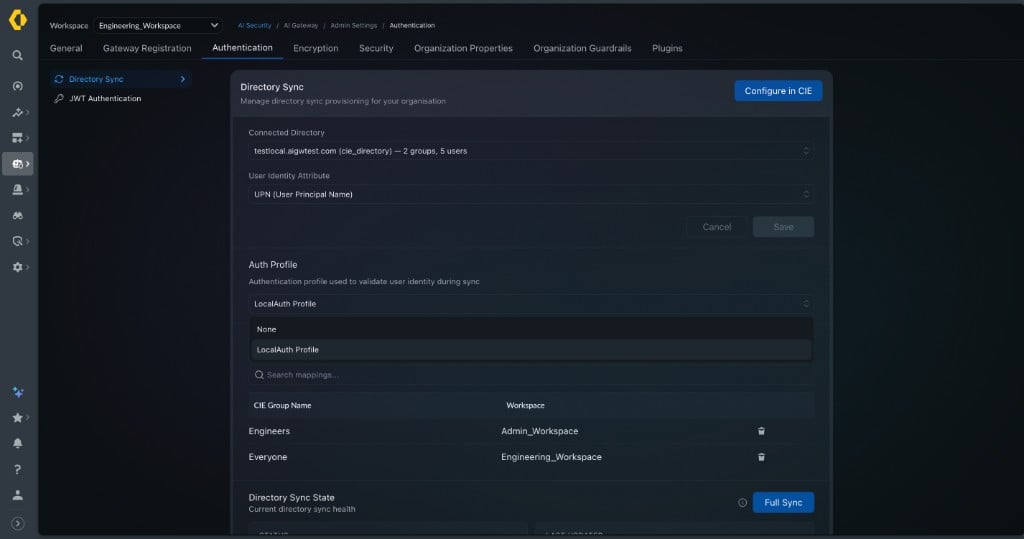
4
Map groups to workspaces
In the Group Mappings section, map CIE directory groups to AI Gateway workspaces. Each mapping is a 1:1 link — all members of a mapped group are automatically provisioned into the corresponding workspace.Users must belong to at least one mapped workspace to access MCP servers provisioned in that workspace.
User Experience
First-Time Connection
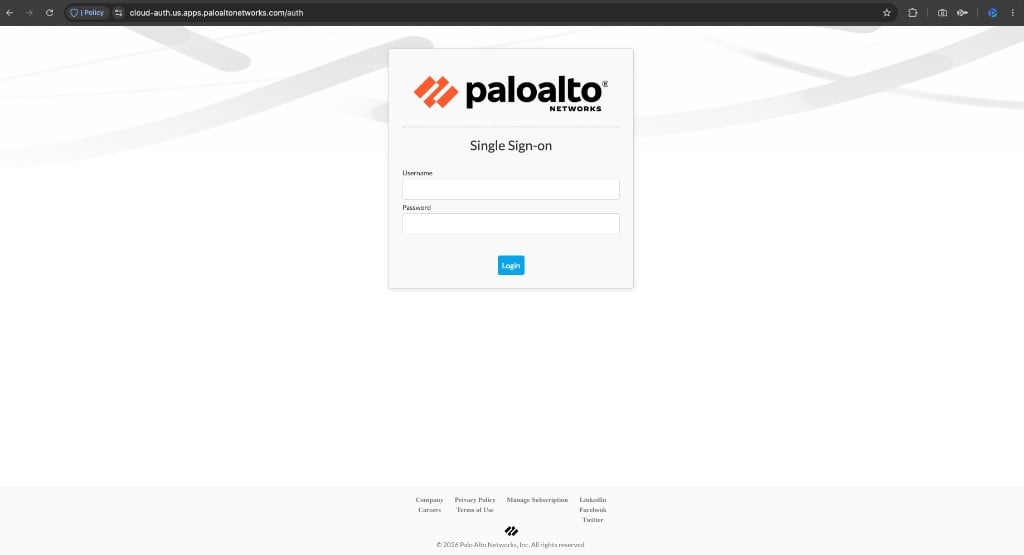
When a user connects an MCP client to the gateway for the first time, the MCP client opens a browser window and the CAS login page is shown. Step 1 — Authenticate with your identity provider The user enters their organisation credentials on the CAS Single Sign-on page. This page is hosted by Palo Alto Networks and connects to your configured identity provider.The login page appearance may vary depending on your configured Authentication Profile and identity provider. The example below shows the default CAS login for a local directory. Organisations using external IdPs (e.g., Entra ID, Okta) will see their IdP’s login page instead.
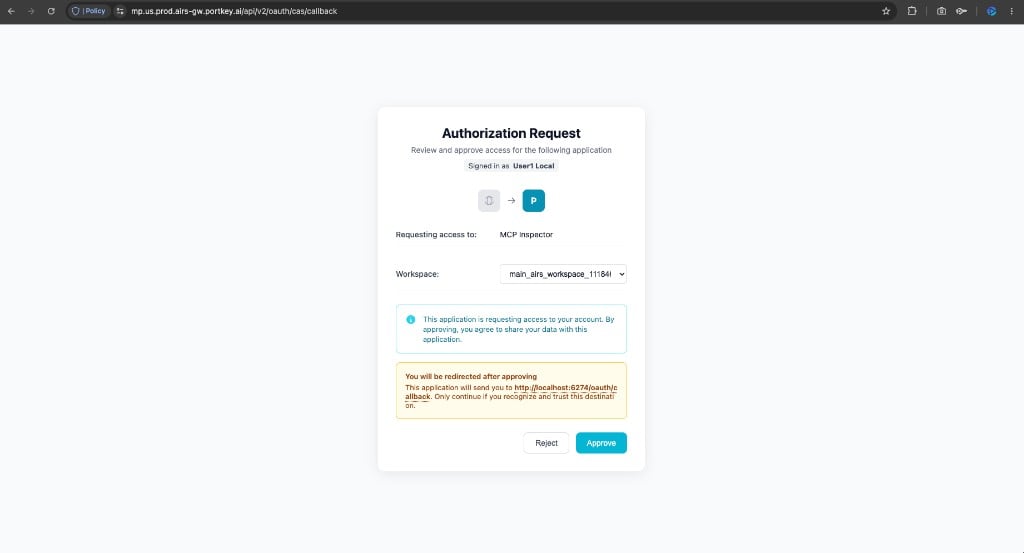
If you are a member of multiple workspaces where the MCP server is provisioned, a workspace dropdown will appear on the consent page. Select the workspace you want the access token to be scoped to.
Subsequent Connections
After the initial authentication, the MCP client uses refresh tokens to maintain access. Users are not prompted to log in again until the refresh token expires or is revoked. Approval is also remembered — subsequent connections to the same MCP server skip the consent page.End-to-end example: GitHub MCP server
This walkthrough connects the hosted GitHub MCP server as an upstream server behind MCP Gateway in SCM mode. It shows both authentication layers in action:GitHub does not support Dynamic Client Registration (DCR), so you must create an OAuth App manually and supply the credentials to the gateway. Servers that support DCR (e.g., Linear, Notion) skip Steps 1–2 entirely.
1
Create a GitHub OAuth App
Go to GitHub → Settings → Developer settings → OAuth Apps → New OAuth App.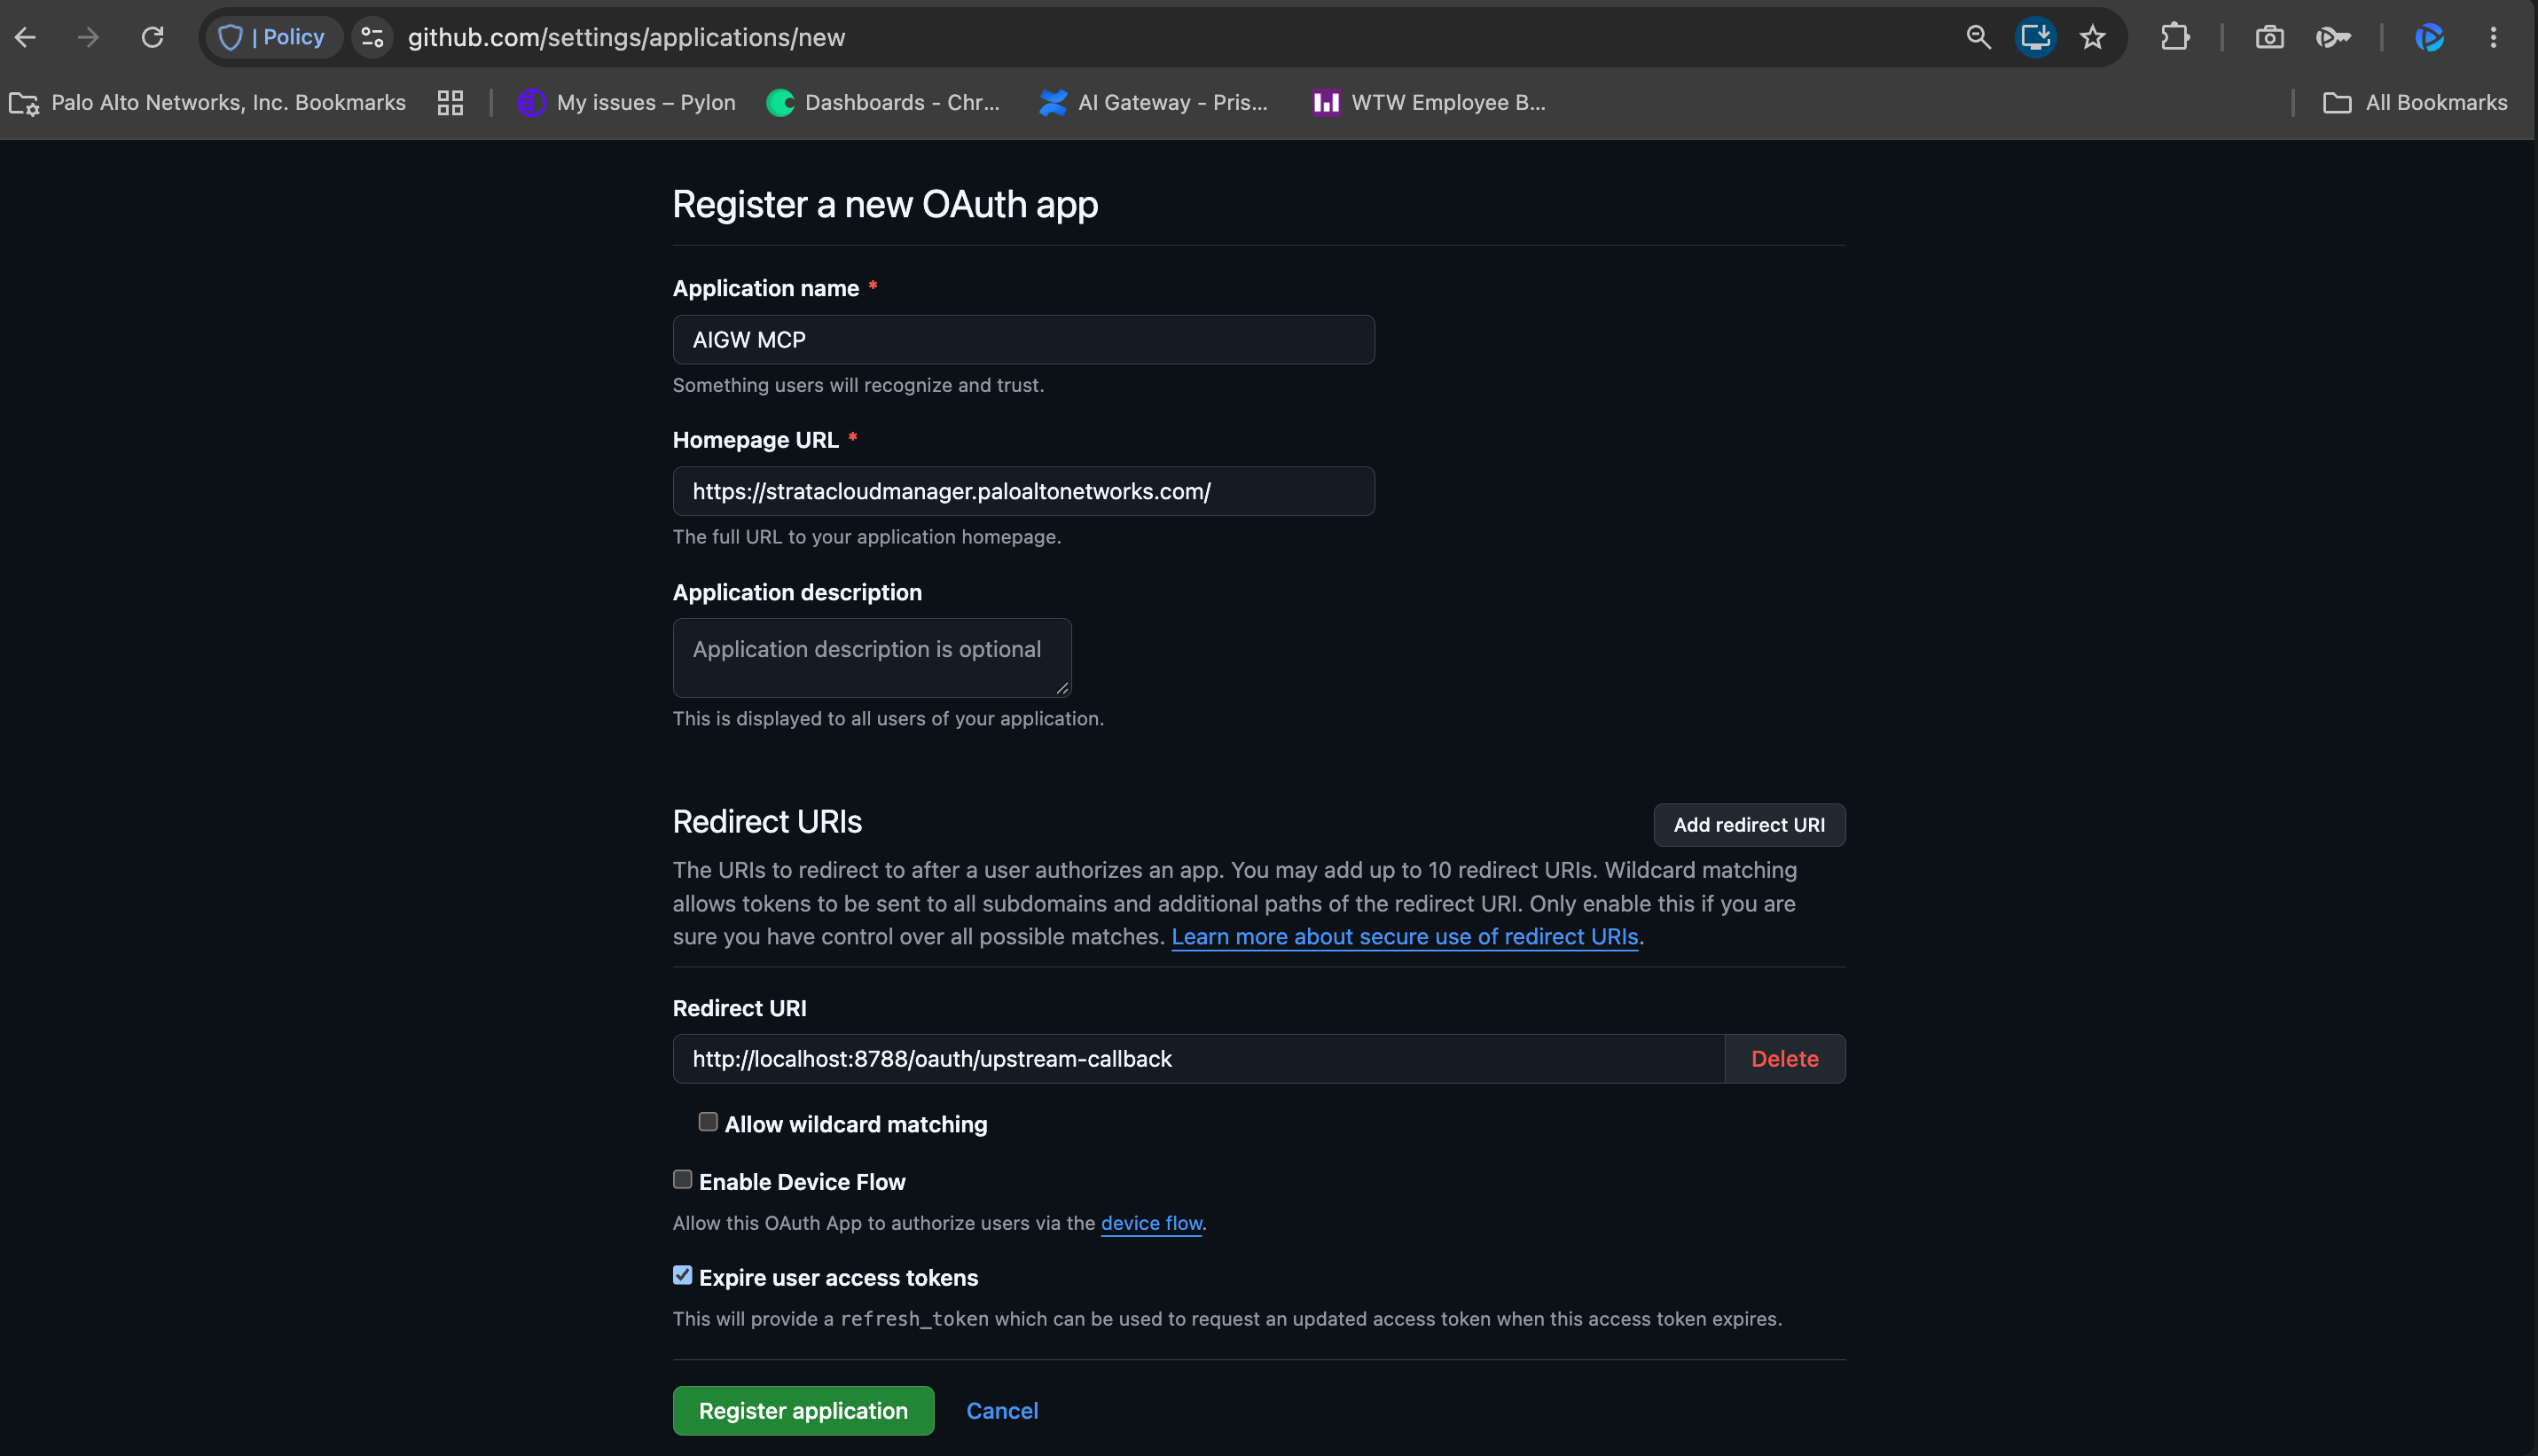
Click Register application.
2
Copy the client credentials
On the OAuth App page:
- Copy the Client ID
- Click Generate a new client secret and copy the Client Secret
3
Add the MCP server in SCM
In Strata Cloud Manager, go to AI Security → AI Gateway → Integrations → MCP Registry → Add MCP Server.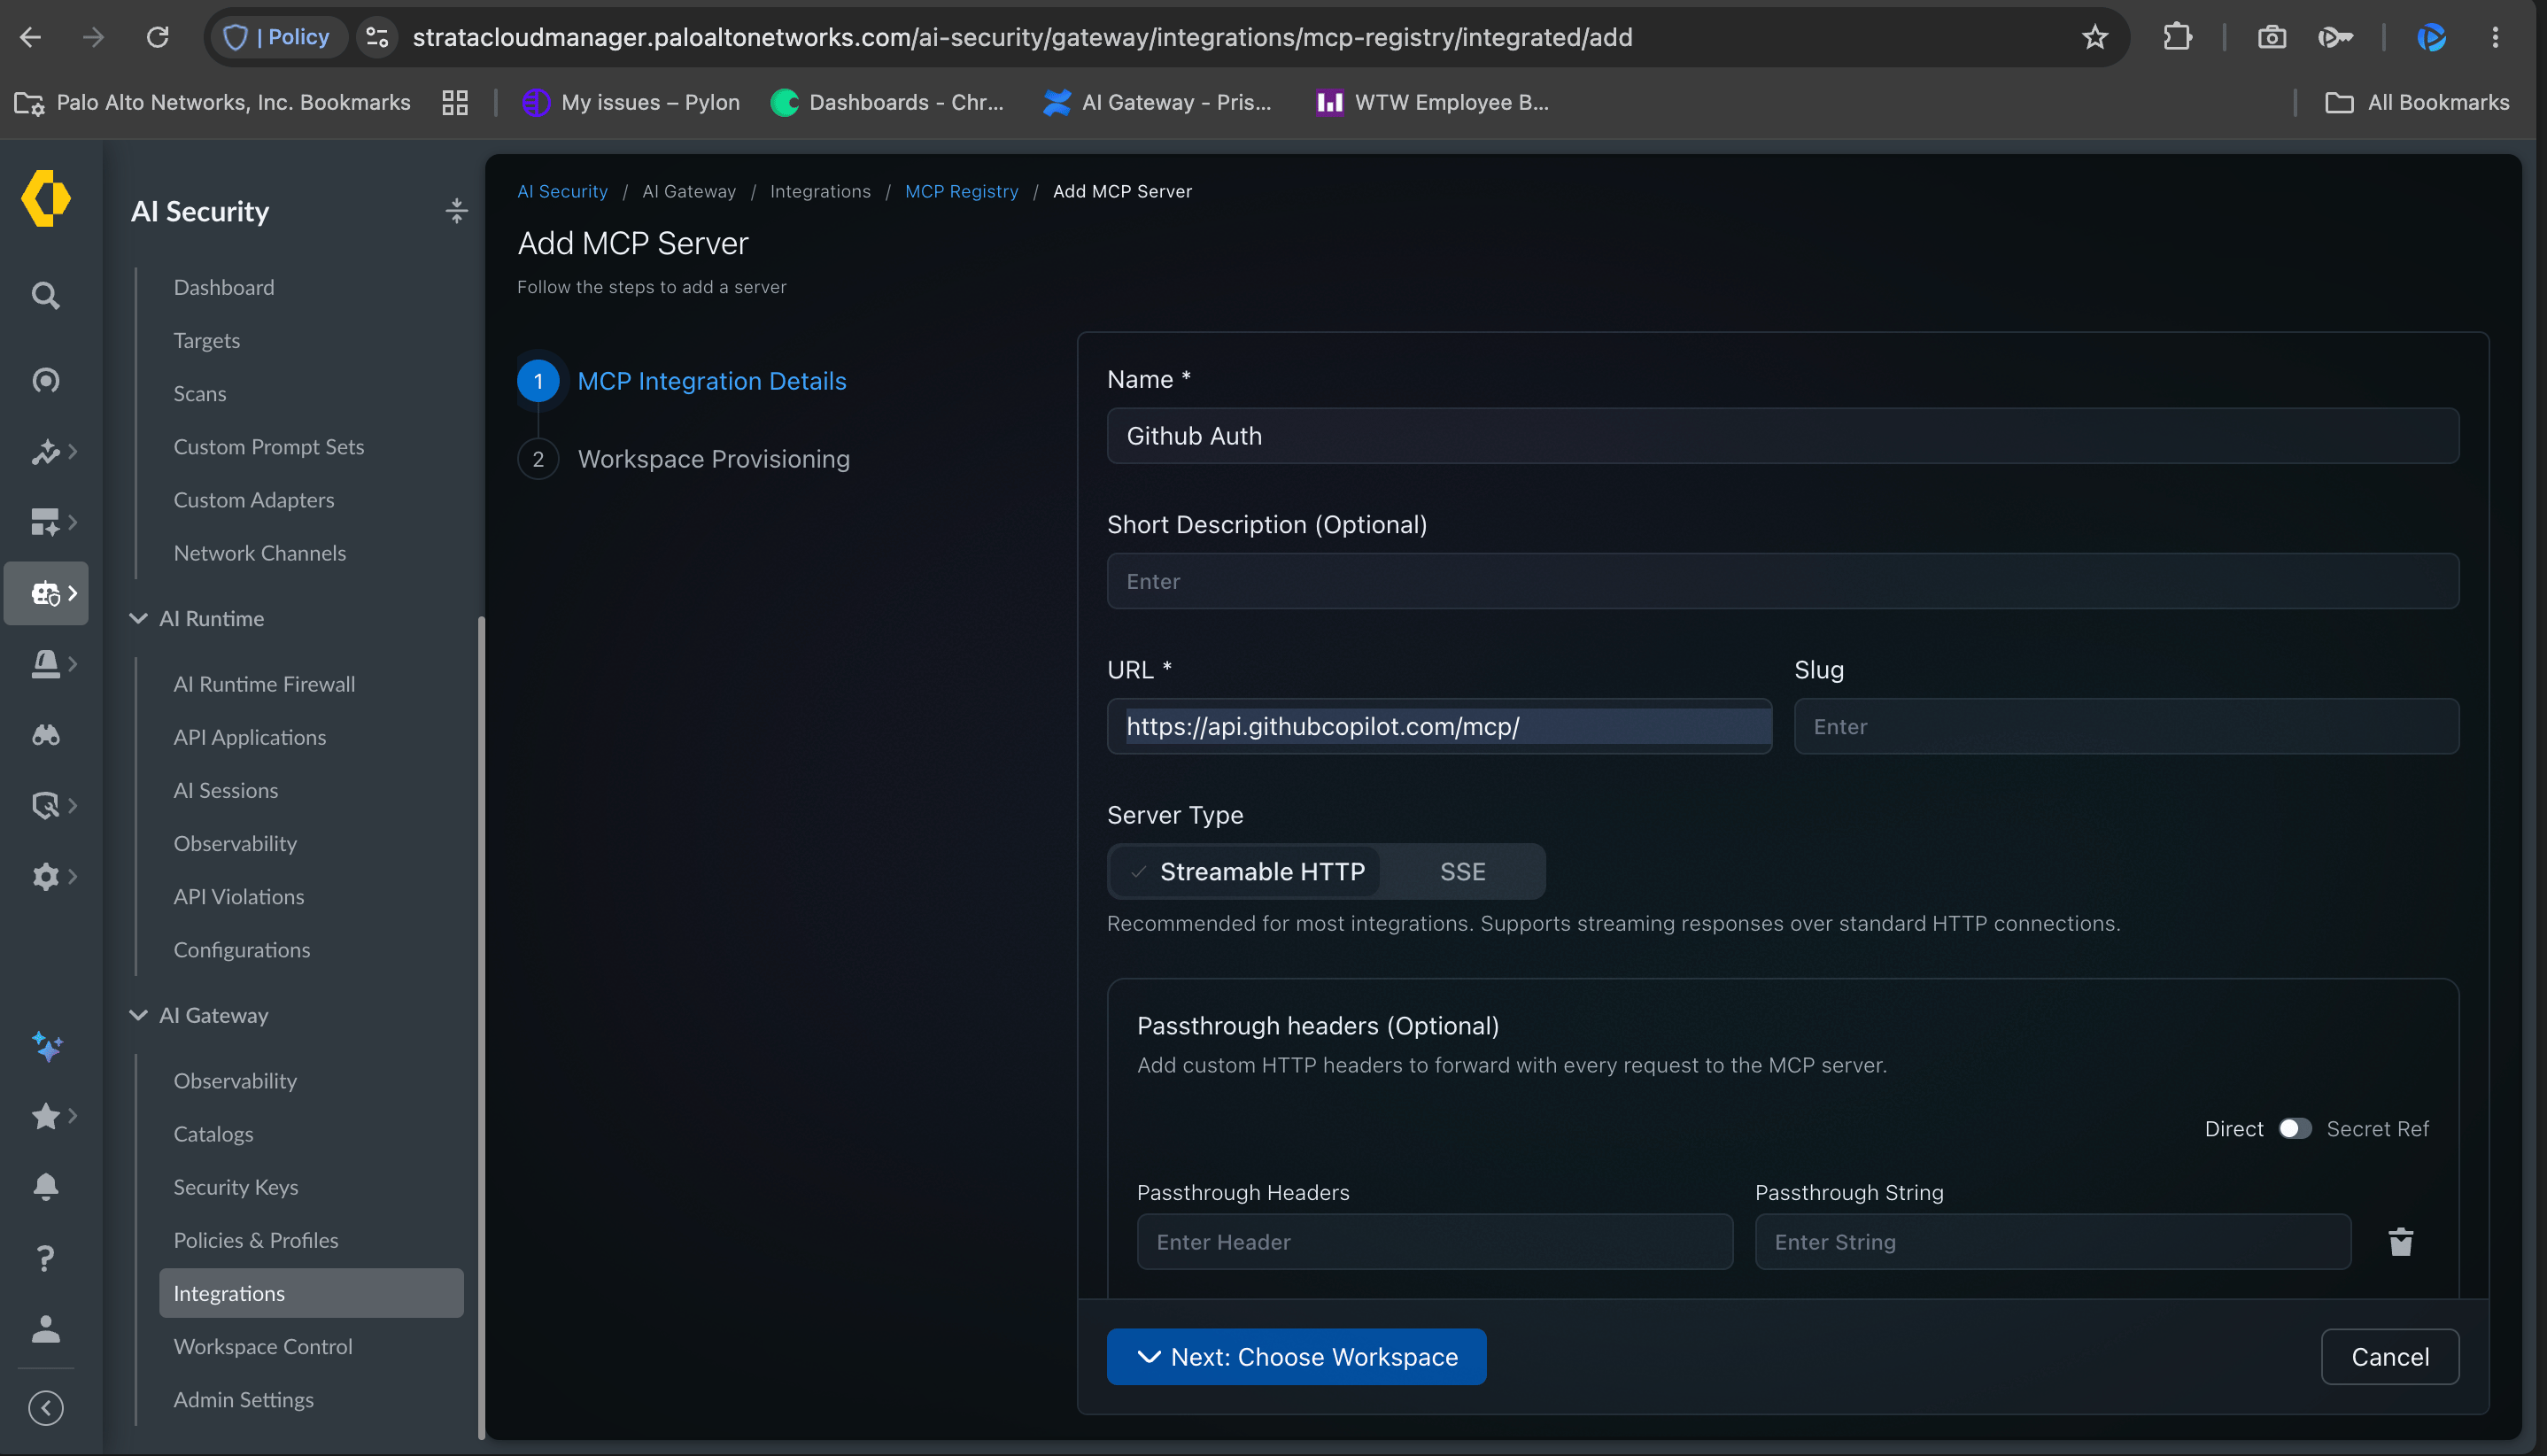
token_endpoint_auth_method must be client_secret_post. GitHub does not accept HTTP Basic authentication (client_secret_basic) on its token endpoint, so omitting this field results in a token exchange failure.4
Provision workspaces and create the server
Click Next: Choose Workspace, select the workspaces that should have access to this server, then create the MCP server.
5
Copy the MCP URL and connect your client
Go to AI Gateway → Catalogs, open the server you just created, and copy its MCP URL.Add the URL to your MCP client and click Connect:No credentials go in the client config — the gateway handles both auth layers.
6
Sign in with CAS
The client opens a browser and redirects you to the CAS Single Sign-on page. Enter your organisation credentials and click Login.
The login page appearance depends on your configured Authentication Profile. Organisations using an external IdP (Entra ID, Okta) see their own IdP login page instead.
7
Approve gateway access
The AI Gateway consent page opens, showing the MCP client requesting access and the redirect destination. If the server is provisioned to multiple workspaces, pick the workspace to scope the token to, then click Approve.
8
Authorize GitHub (upstream)
Because this is the first time you are using the GitHub MCP server, you are redirected to GitHub’s own authorization page. Review the requested scopes and organisation access, then click Authorize.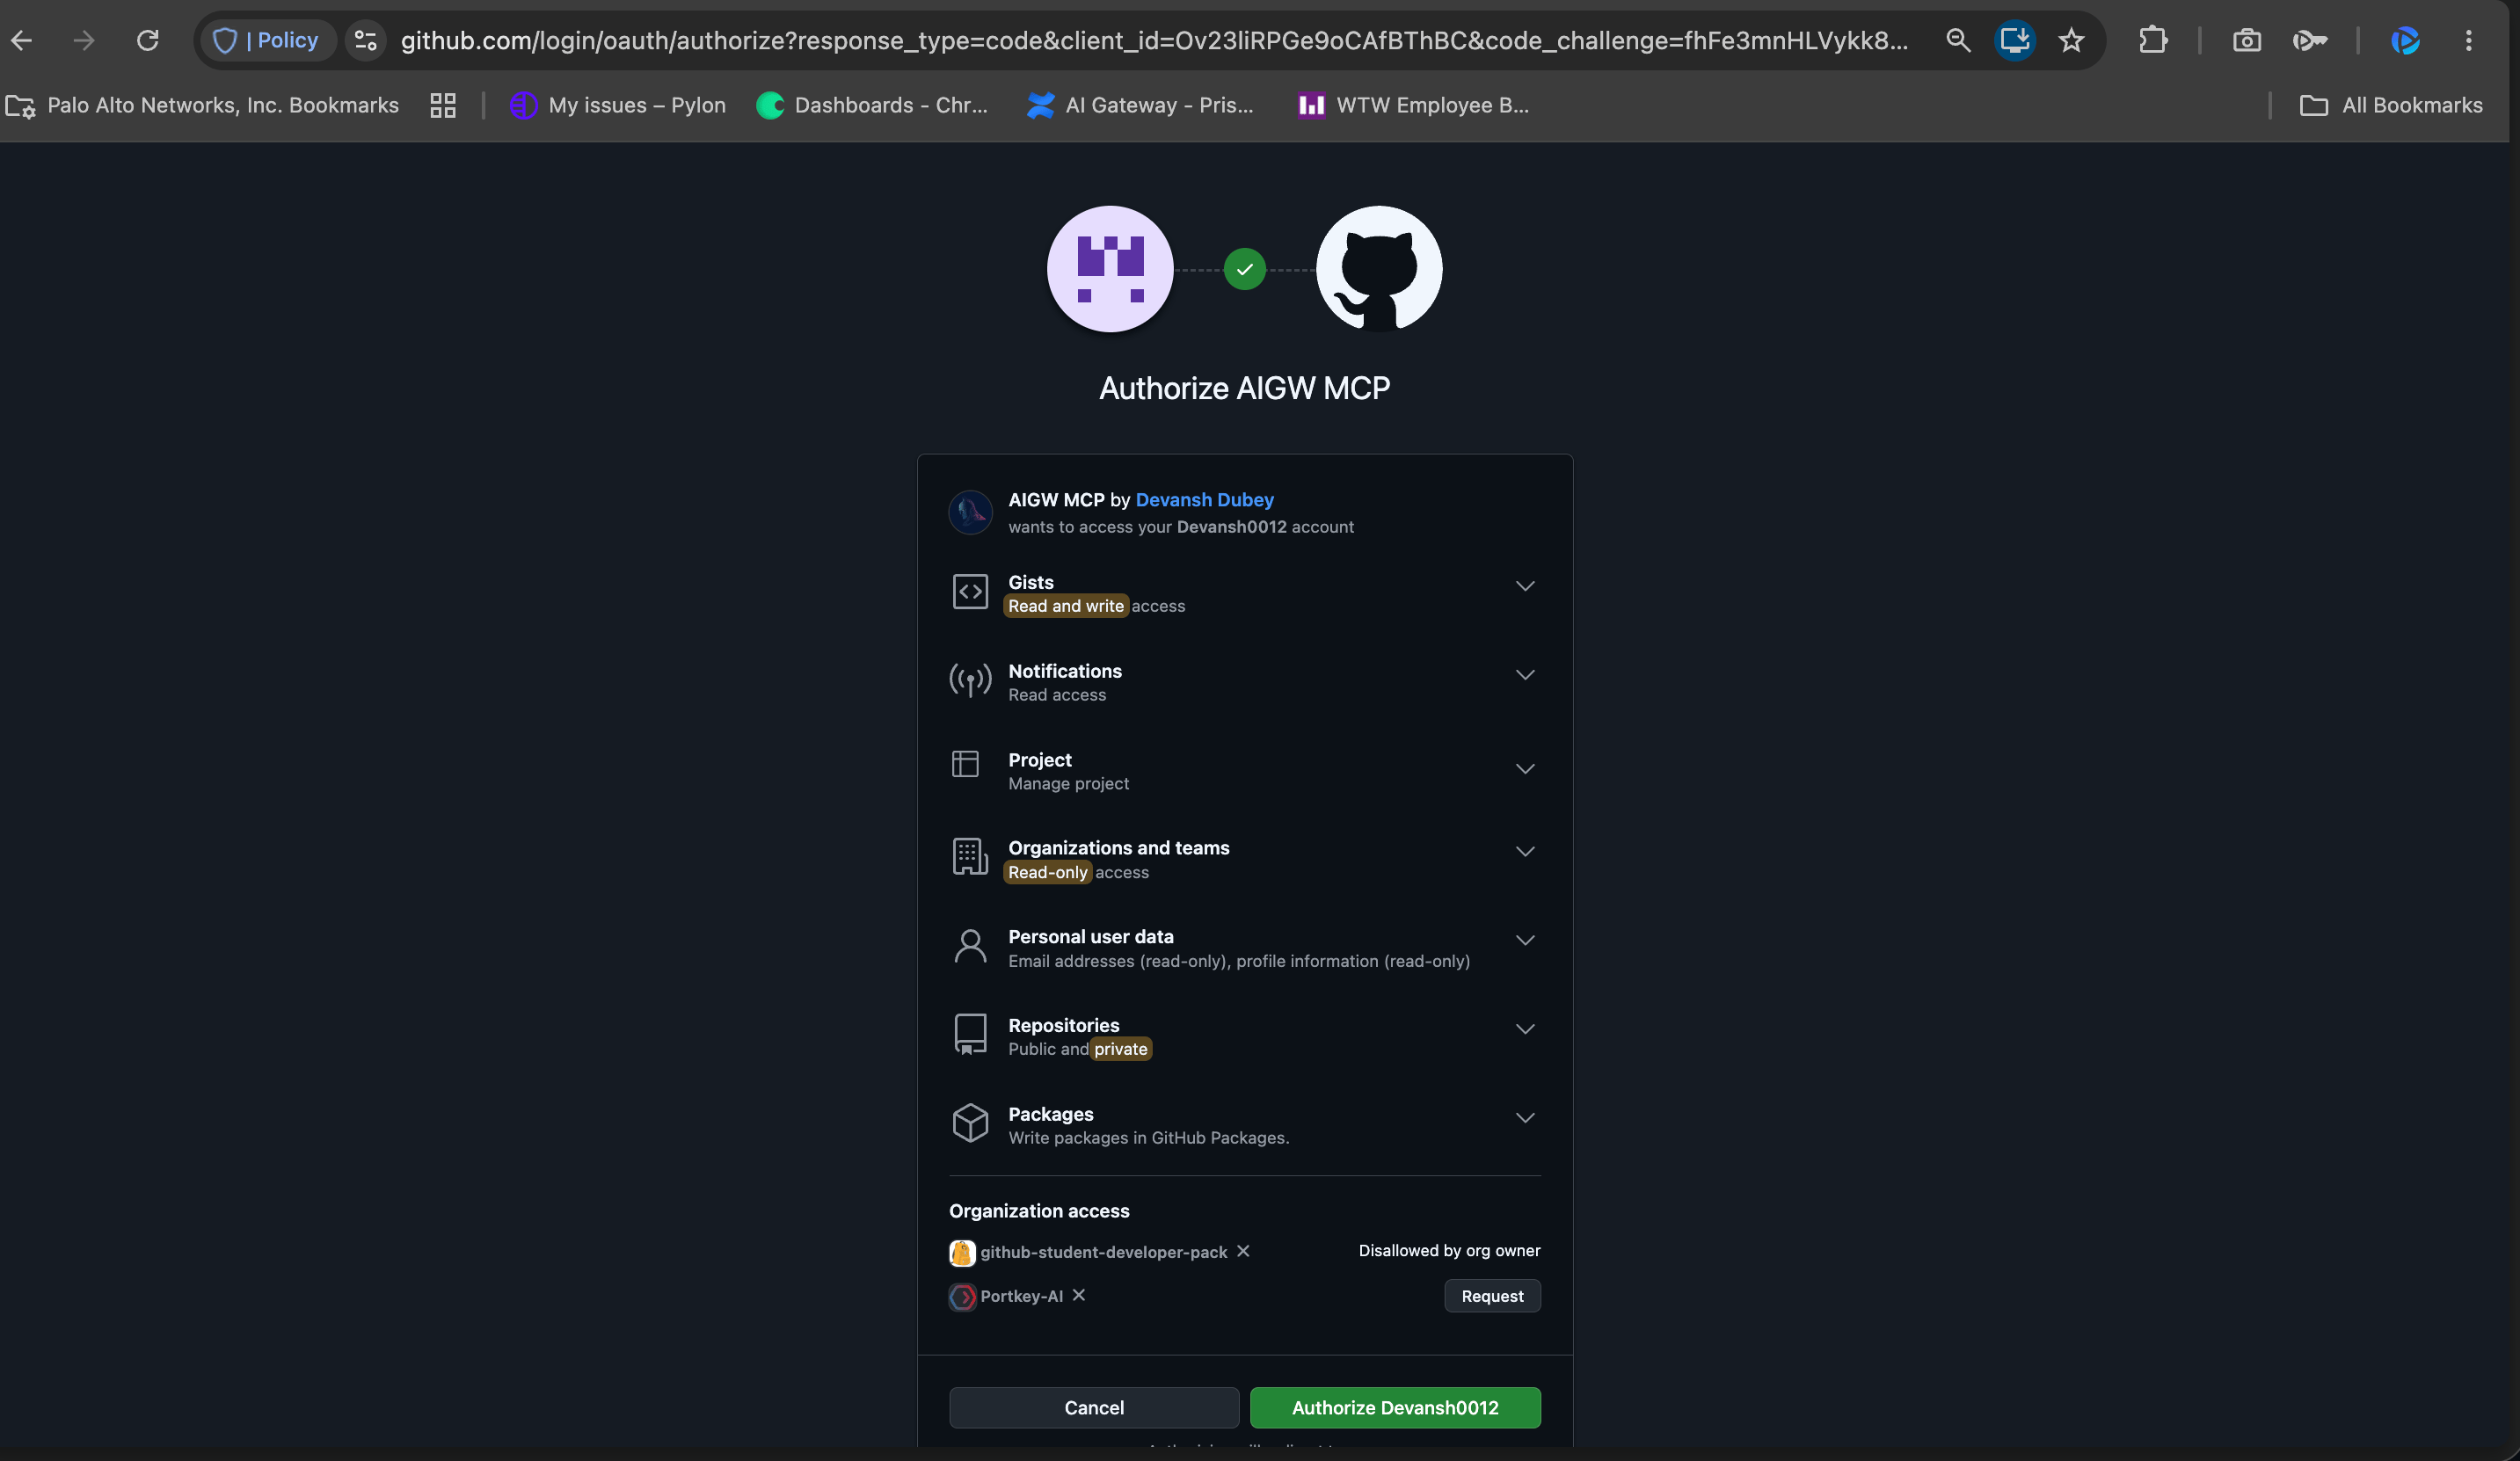
Organisation-owned resources may show Disallowed by org owner with a Request button. A GitHub organisation owner must approve the OAuth App before those repositories become available through the gateway.
9
Connection established
The browser redirects back to your MCP client and the connection succeeds. GitHub tools are now listed and callable through the gateway, with every call logged and governed by AI Gateway policies.