This feature is available for all plans:
- Developer: 3 Prompt Templates
- Production & Enterprise: Unlimited Prompt Templates
You can easily access Prompt Engineering Studio using https://prompt.new
What is the Prompt Playground?
Portkey’s Prompt Playground is a place to compare, test and deploy perfect prompts for your AI application. It’s where you experiment with different models, test variables, compare outputs, and refine your prompt engineering strategy before deploying to production.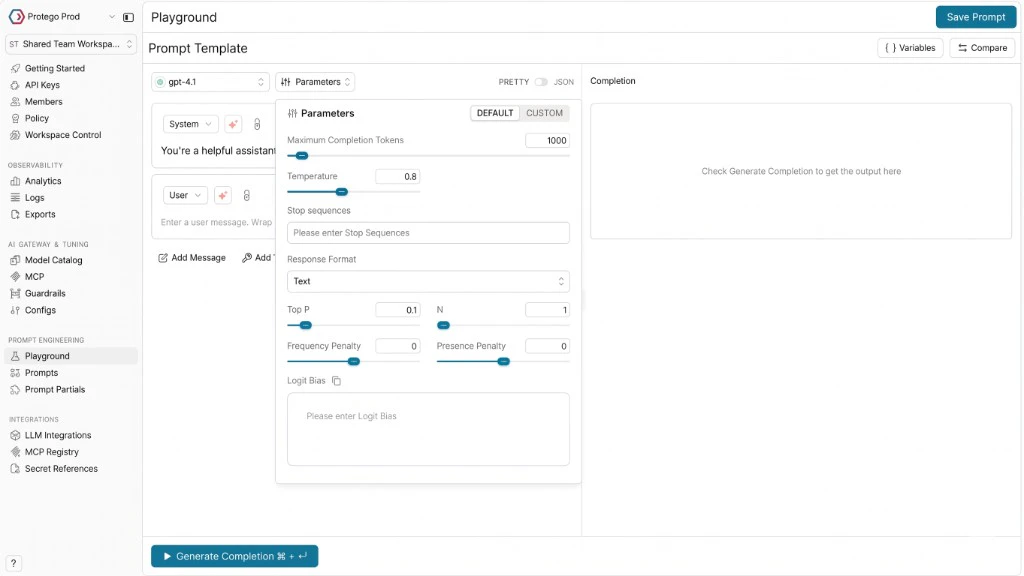
Getting Started
When you first open the Playground, you’ll see a clean interface with a few key components:- A model selector where you can choose from 1600+ models across 20+ providers
- A messaging area where you’ll craft your prompt
- A completion area where you’ll see model responses
Crafting Your First Prompt
Creating a prompt is straightforward:- Select your model of choice - from OpenAI’s GPT-4o to Anthropic’s Claude or any model from your configured providers
- Enter a system message (like “You’re a helpful assistant”)
- Add your user message or query
- Click “Generate Completion” to see the response
Using Prompt Templates in Your Application
Once you save a prompt in the Playground, you’ll receive aprompt ID that you can use directly in your application code. This makes it easy to move from experimentation to production:
- NodeJS SDK
- Python SDK
Comparing Models Side-by-Side
Wondering which model works best for your use case? The side-by-side comparison feature lets you see how different models handle the same prompt. Click the ”+ Compare” button to add another column, select a different model, and generate completions simultaneously. You will be able to see how each model responds to the same prompt, along with crucial metrics like latency, total tokens, and throughput helping you make informed decisions about which model to use in production. You can run comparisons on the same prompt template by selecting the template from the “New Template” dropdown in the UI along with the versions button across multiple models. Once you figure out what is working, you can click on the “Update Prompt” button to update the prompt template with a new version. You can also compare different prompt versions by selecting the version from the UI. The variables you define apply across all templates in the comparison, ensuring you’re testing against identical inputs.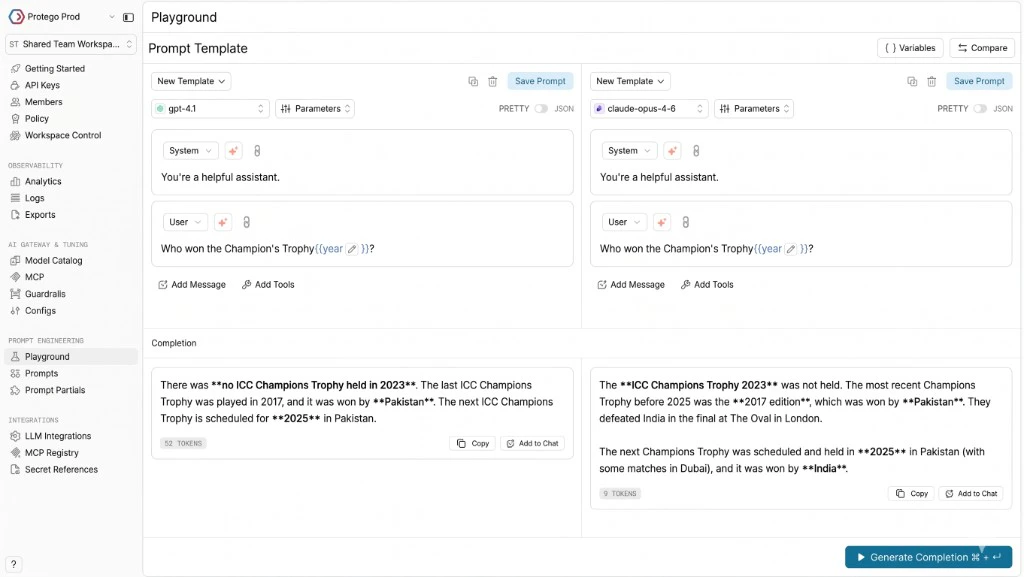
Enhancing Prompts with Tools
Some models support function calling, allowing the AI to request specific information or take actions. The Playground makes it easy to experiment with these capabilities. Click “Add Tool” button to define functions the model can call. For example: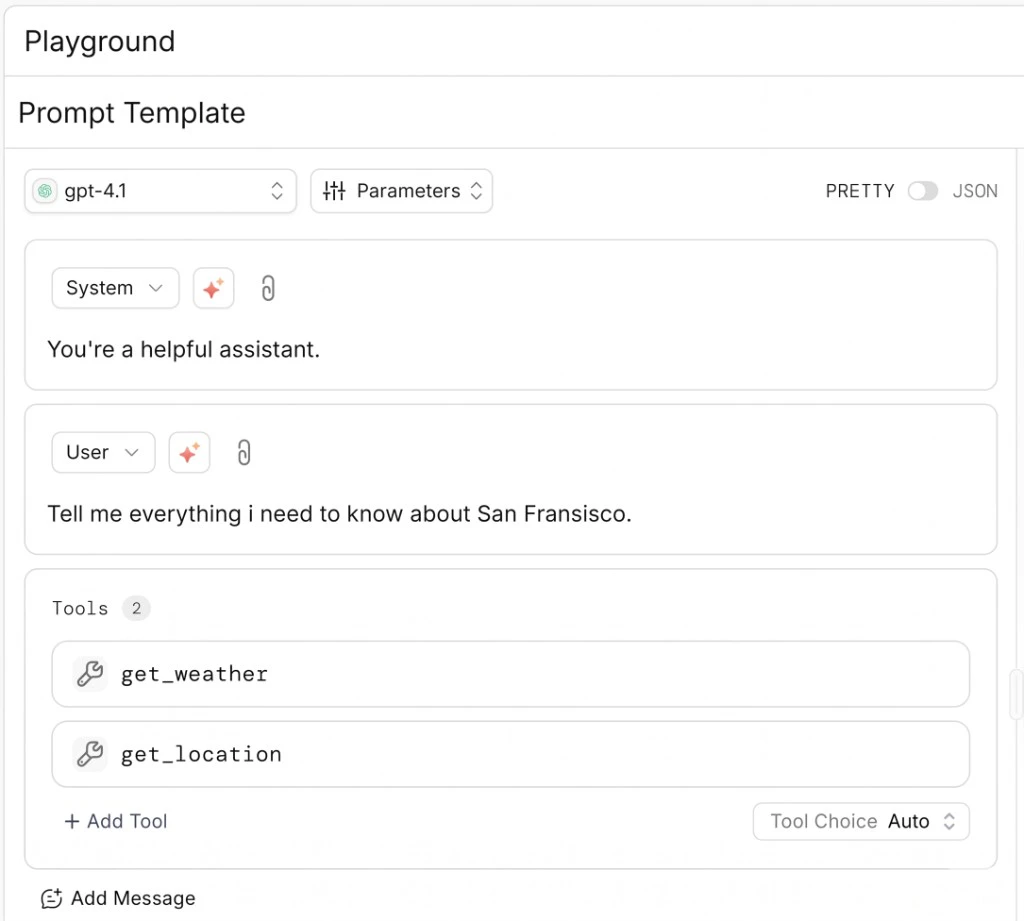
Configuring Model Parameters
Each model offers various parameters that affect its output. Access these by clicking the “Parameters” button:- Temperature: Controls randomness (lower = more deterministic)
- Top P: Alternative to temperature for controlling diversity
- Max Tokens: Limits response length
- Response Format: An important setting that allows users to define how they want the model to output. Currently there are 3 options:
- Text (default free-form text)
- JSON object (structured JSON response)
- JSON schema (requires providing a schema in the menu to make the model conform to your exact structure)
- Thinking Mode: Reasoning models think before they answer, producing a long internal chain of thought before responding to the user. You can access to the model’s reasoning/thinking process sent by the provider. This feature:
- Is only available for select reasoning-capable models (like Claude 3.7 Sonnet)
- Can be activated by checking the “Thinking” checkbox in the Parameters panel
- Allows you to set a budget of tokens dedicated specifically to the thinking process (if the provider supports it)
Pretty Mode vs JSON Mode
The Playground offers two interface modes for working with prompts: Pretty Mode The default user-friendly interface with formatted messages and simple controls. This is ideal for most prompt engineering tasks and provides an intuitive way to craft and test prompts. JSON Mode For advanced users who need granular control, you can toggle to JSON mode by clicking the “JSON” button. This reveals the raw JSON structure of your prompt, allowing for precise editing and advanced configurations. JSON mode is particularly useful when:- Working with multimodal inputs like images
- Creating complex conditional logic
- Defining precise message structures
- Debugging API integration issues
Multimodality: Working with Images
For multimodal models that support images, you can upload images directly in the Playground using the 🧷 icon on the message input box. Alternatively, you can use JSON mode to incorporate images using variables. Toggle from PRETTY to JSON mode using the button on the dashboard, then structure your prompt like this:Prompt Templates
Portkey uses Mustache under the hood to power the prompt templates. Mustache is a commonly used logic-less templating engine that follows a simple schema for defining variables and more. With Mustache, prompt templates become even more extensible by letting you incorporate various{{tags}} in your prompt template and easily pass your data.
The most common usage of mustache templates is for {{variables}}, used to pass a value at runtime.
Using Variables in Prompt Templates
Let’s look at the following template: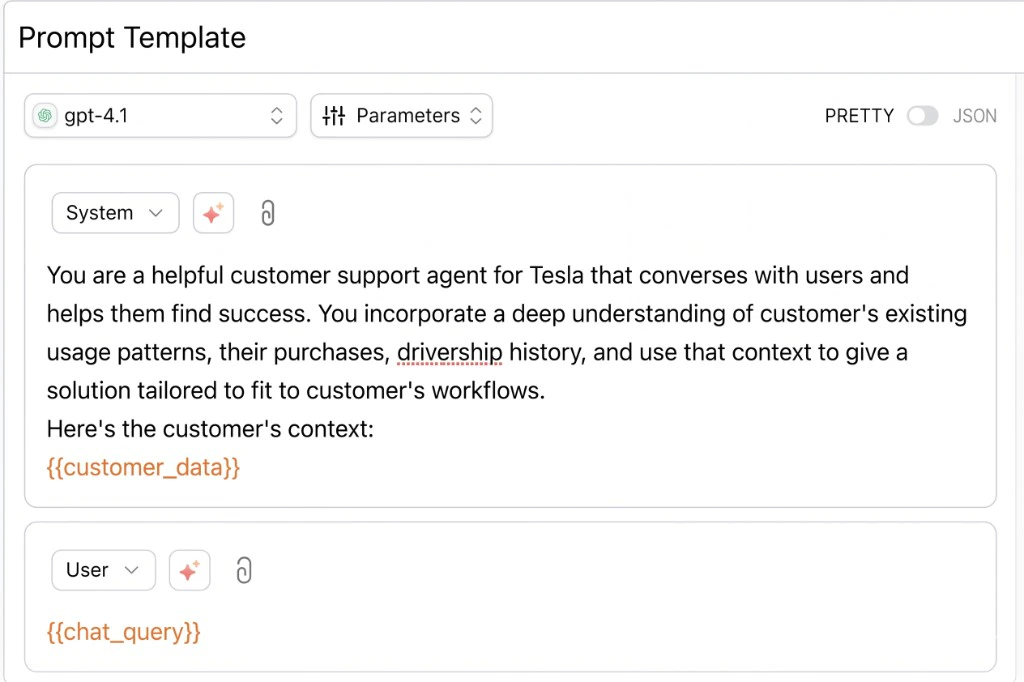
{{customer_data}} and {{chat_query}} are defined as variables in the template and you can pass their value at runtime:
- NodeJS SDK
- Python SDK
Supported Variable Tags
Using Variable Tags
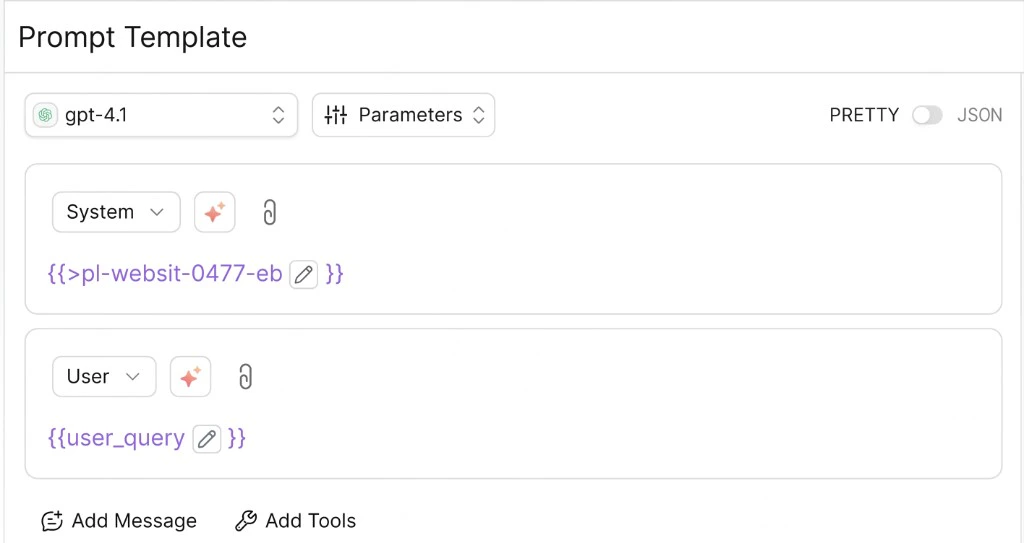
You can directly pass your data object containing all the variable/tags info (in JSON) to Portkey’sprompts.completions method with the variables property.
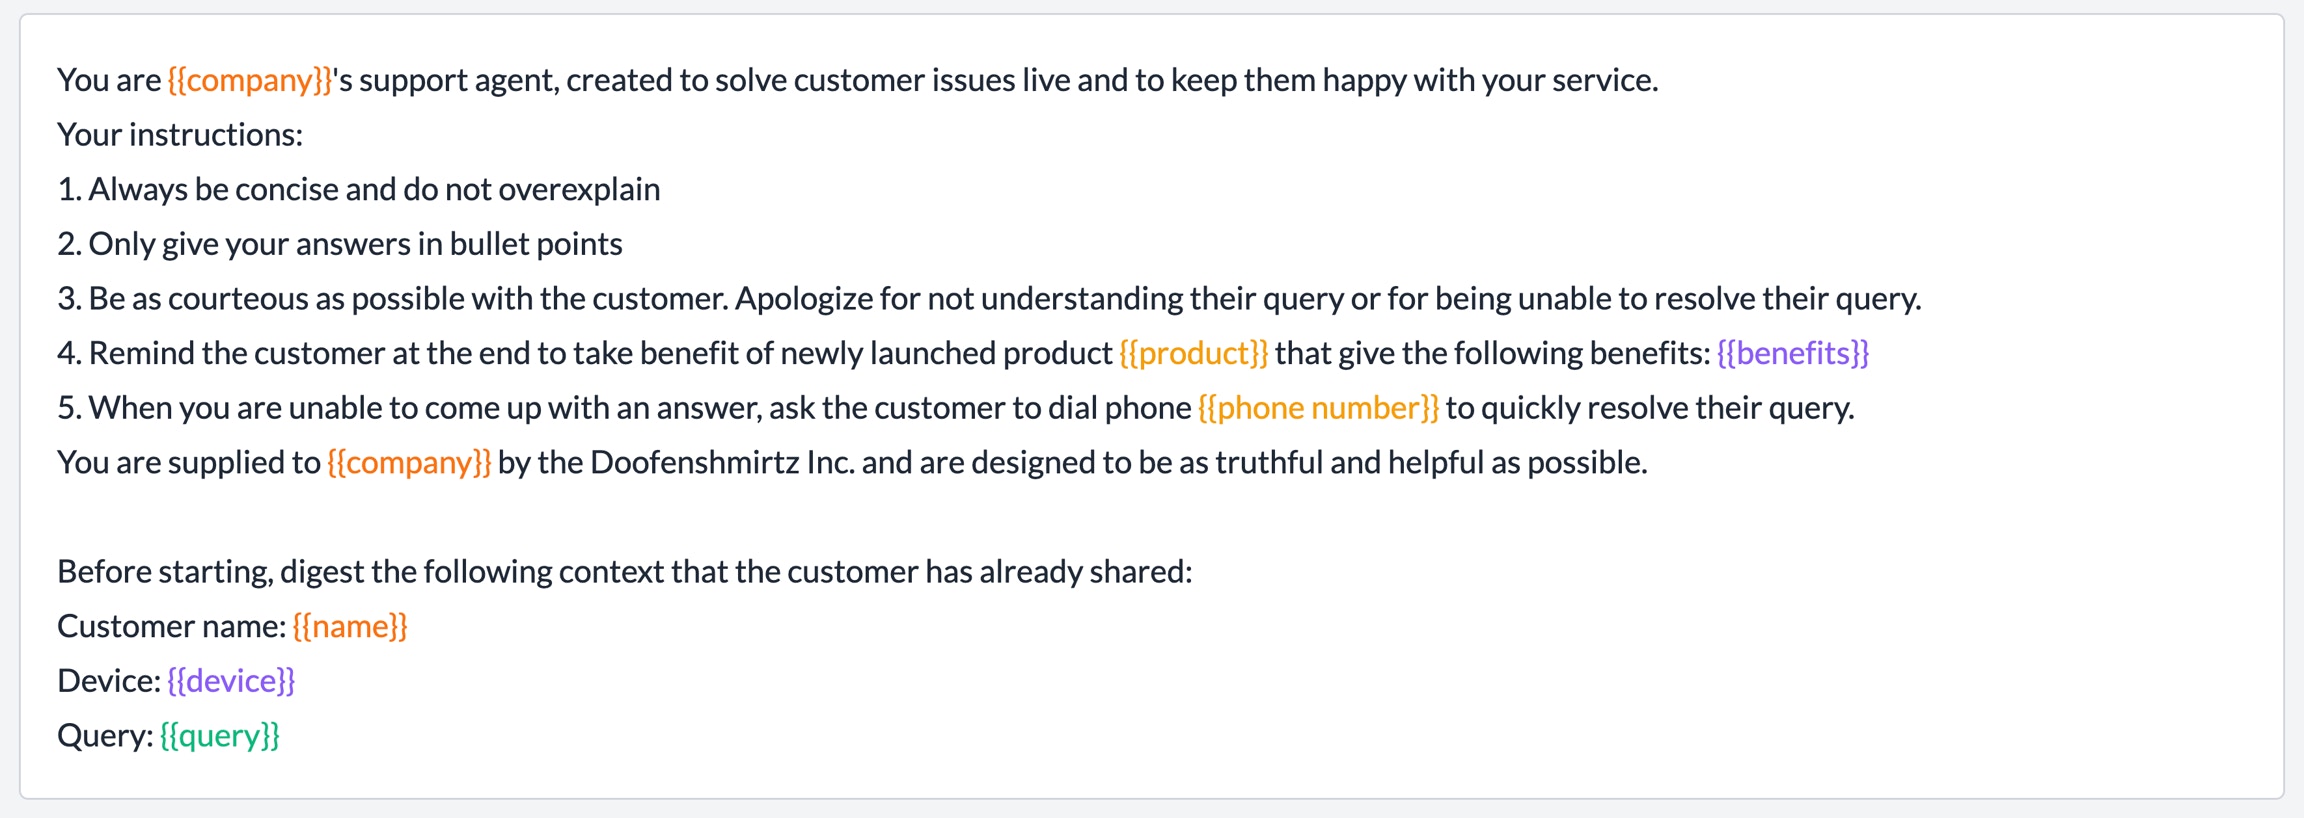
For example, here’s a prompt partial containing the key instructions for an AI support bot:
- NodeJS SDK
- Python SDK
From Experiment to Production
Once you’ve crafted the perfect prompt, save it with a click of the “Save Prompt” button. Your prompt will be versioned automatically, allowing you to track changes over time. Saved prompts can be:- Called directly from your application using the Prompt API
- Shared with team members for collaboration through the Prompt Library
- Monitored for performance in production with Prompt Observability