from autogen_agentchat.agents import AssistantAgentfrom autogen_agentchat.ui import Consolefrom autogen_core.models import ModelFamilyfrom autogen_ext.models.openai import OpenAIChatCompletionClientimport asyncio# Define a model client that talks to Portkey's OpenAI-compatible endpoint.# Use a Model Catalog model string: "@provider_slug/model_name"model_client = OpenAIChatCompletionClient( base_url="https://api.portkey.ai/v1", api_key="YOUR_PORTKEY_API_KEY", model="@your-provider-slug/gpt-4o", model_info={ "vision": True, "function_calling": True, "json_output": True, "structured_output": True, # Use GPT family for gpt-4o to allow tools + system message "family": ModelFamily.GPT_45, }, # Optional headers: attach Portkey Configs, tracing, or metadata default_headers={ "x-portkey-config": "pc-xxxx", "x-portkey-trace-id": "trace-id", })# Define a simple function tool that the agent can use.async def get_weather(city: str) -> str: """Get the weather for a given city.""" return f"The weather in {city} is 73 degrees and Sunny."# Create an AssistantAgent with the Portkey-backed model clientagent = AssistantAgent( name="weather_agent", model_client=model_client, tools=[get_weather], system_message="You are a helpful assistant.", reflect_on_tool_use=True, model_client_stream=True, # Enable token streaming)async def main() -> None: await Console(agent.run_stream(task="What is the weather in New York?")) await model_client.close()if __name__ == "__main__": asyncio.run(main())
Portkey provides comprehensive observability for your Autogen agents, helping you understand exactly what’s happening during each execution.
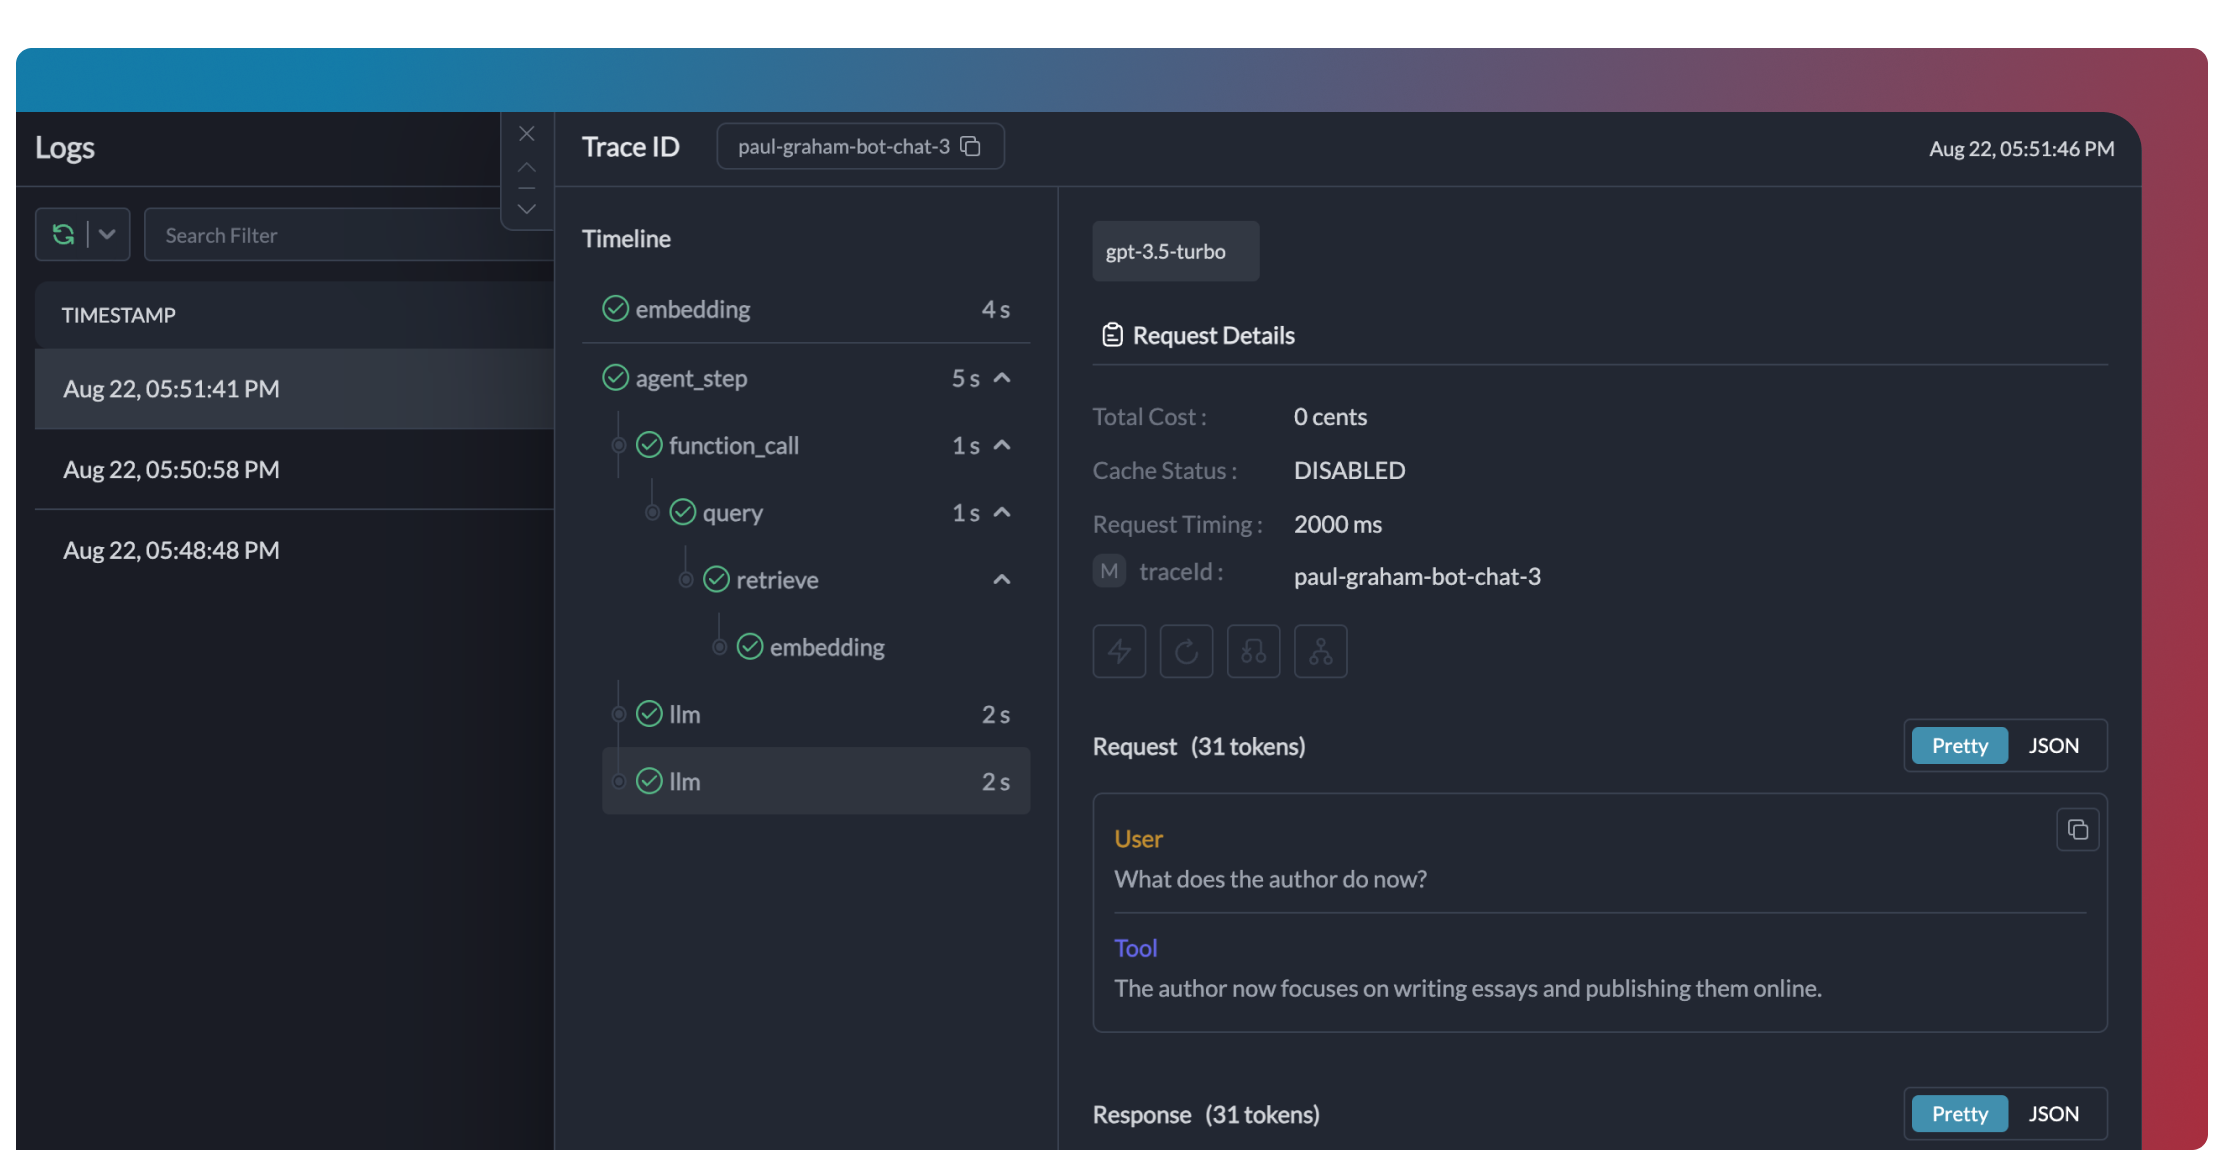
Traces
Logs
Metrics & Dashboards
Metadata Filtering
Traces provide a hierarchical view of your agent’s execution, showing the sequence of LLM calls, tool invocations, and state transitions.
from autogen_agentchat.agents import AssistantAgentfrom autogen_agentchat.ui import Consolefrom autogen_ext.models.openai import OpenAIChatCompletionClientfrom autogen_core.models import ModelFamilyimport asyncio# Add tracing to your Autogen agents via Portkey headersmodel_client = OpenAIChatCompletionClient( base_url="https://api.portkey.ai/v1", api_key="YOUR_PORTKEY_API_KEY", model="@your-provider-slug/gpt-4o", model_info={"family": ModelFamily.GPT_45}, default_headers={ "x-portkey-trace-id": "unique_execution_trace_id" })agent = AssistantAgent( name="observer", model_client=model_client, system_message="You are a helpful assistant.")async def main(): await Console(agent.run_stream(task="Say hello")) await model_client.close()asyncio.run(main())
Portkey logs every interaction with LLMs, including:
Complete request and response payloads
Latency and token usage metrics
Cost calculations
Tool calls and function executions
All logs can be filtered by metadata, trace IDs, models, and more, making it easy to debug specific agent runs.
Portkey provides built-in dashboards that help you:
Track cost and token usage across all agent runs
Analyze performance metrics like latency and success rates
Identify bottlenecks in your agent workflows
Compare different agent configurations and LLMs
You can filter and segment all metrics by custom metadata to analyze specific agent types, user groups, or use cases.
Add custom metadata to your Autogen agent calls to enable powerful filtering and segmentation:
from autogen_agentchat.agents import AssistantAgentfrom autogen_ext.models.openai import OpenAIChatCompletionClientfrom autogen_core.models import ModelFamilyfrom portkey_ai import createHeadersmodel_client = OpenAIChatCompletionClient( base_url="https://api.portkey.ai/v1", api_key="YOUR_PORTKEY_API_KEY", model="@your-provider-slug/gpt-4o", model_info={"family": ModelFamily.GPT_45}, default_headers=createHeaders( metadata={"agent_type": "research_agent"} ))agent = AssistantAgent( name="research_agent", model_client=model_client, system_message="You are a research assistant.")
This metadata can be used to filter logs, traces, and metrics on the Portkey dashboard, allowing you to analyze specific agent runs, users, or environments.
2. Reliability - Keep Your Autogen Agents Running Smoothly
When running agents in production, things can go wrong - API rate limits, network issues, or provider outages. Portkey’s reliability features ensure your agents keep running smoothly even when problems occur.It’s this simple to enable fallback in your Autogen agents:
from autogen_agentchat.agents import AssistantAgentfrom autogen_ext.models.openai import OpenAIChatCompletionClientfrom autogen_core.models import ModelFamilyfrom portkey_ai import createHeaders# Create a config with fallbacks (recommend creating this in Portkey App)config = { "strategy": {"mode": "fallback"}, "targets": [ {"override_params": {"model": "@your-provider-slug/gpt-4o"}}, {"override_params": {"model": "@your-anthropic-provider/claude-3-opus-20240229"}} ]}model_client = OpenAIChatCompletionClient( base_url="https://api.portkey.ai/v1", api_key="YOUR_PORTKEY_API_KEY", model="@your-provider-slug/gpt-4o", model_info={"family": ModelFamily.GPT_45}, default_headers=createHeaders(config=config))agent = AssistantAgent( name="resilient_agent", model_client=model_client, system_message="You are a helpful assistant.")
This configuration will automatically try Claude if the GPT-4o request fails, ensuring your agent can continue operating.
Automatic Retries
Handles temporary failures automatically. If an LLM call fails, Portkey will retry the same request for the specified number of times - perfect for rate limits or network blips.
Request Timeouts
Prevent your agents from hanging. Set timeouts to ensure you get responses (or can fail gracefully) within your required timeframes.
Conditional Routing
Send different requests to different providers. Route complex reasoning to GPT-4, creative tasks to Claude, and quick responses to Gemini based on your needs.
Fallbacks
Keep running even if your primary provider fails. Automatically switch to backup providers to maintain availability.
Load Balancing
Spread requests across multiple API keys or providers. Great for high-volume agent operations and staying within rate limits.
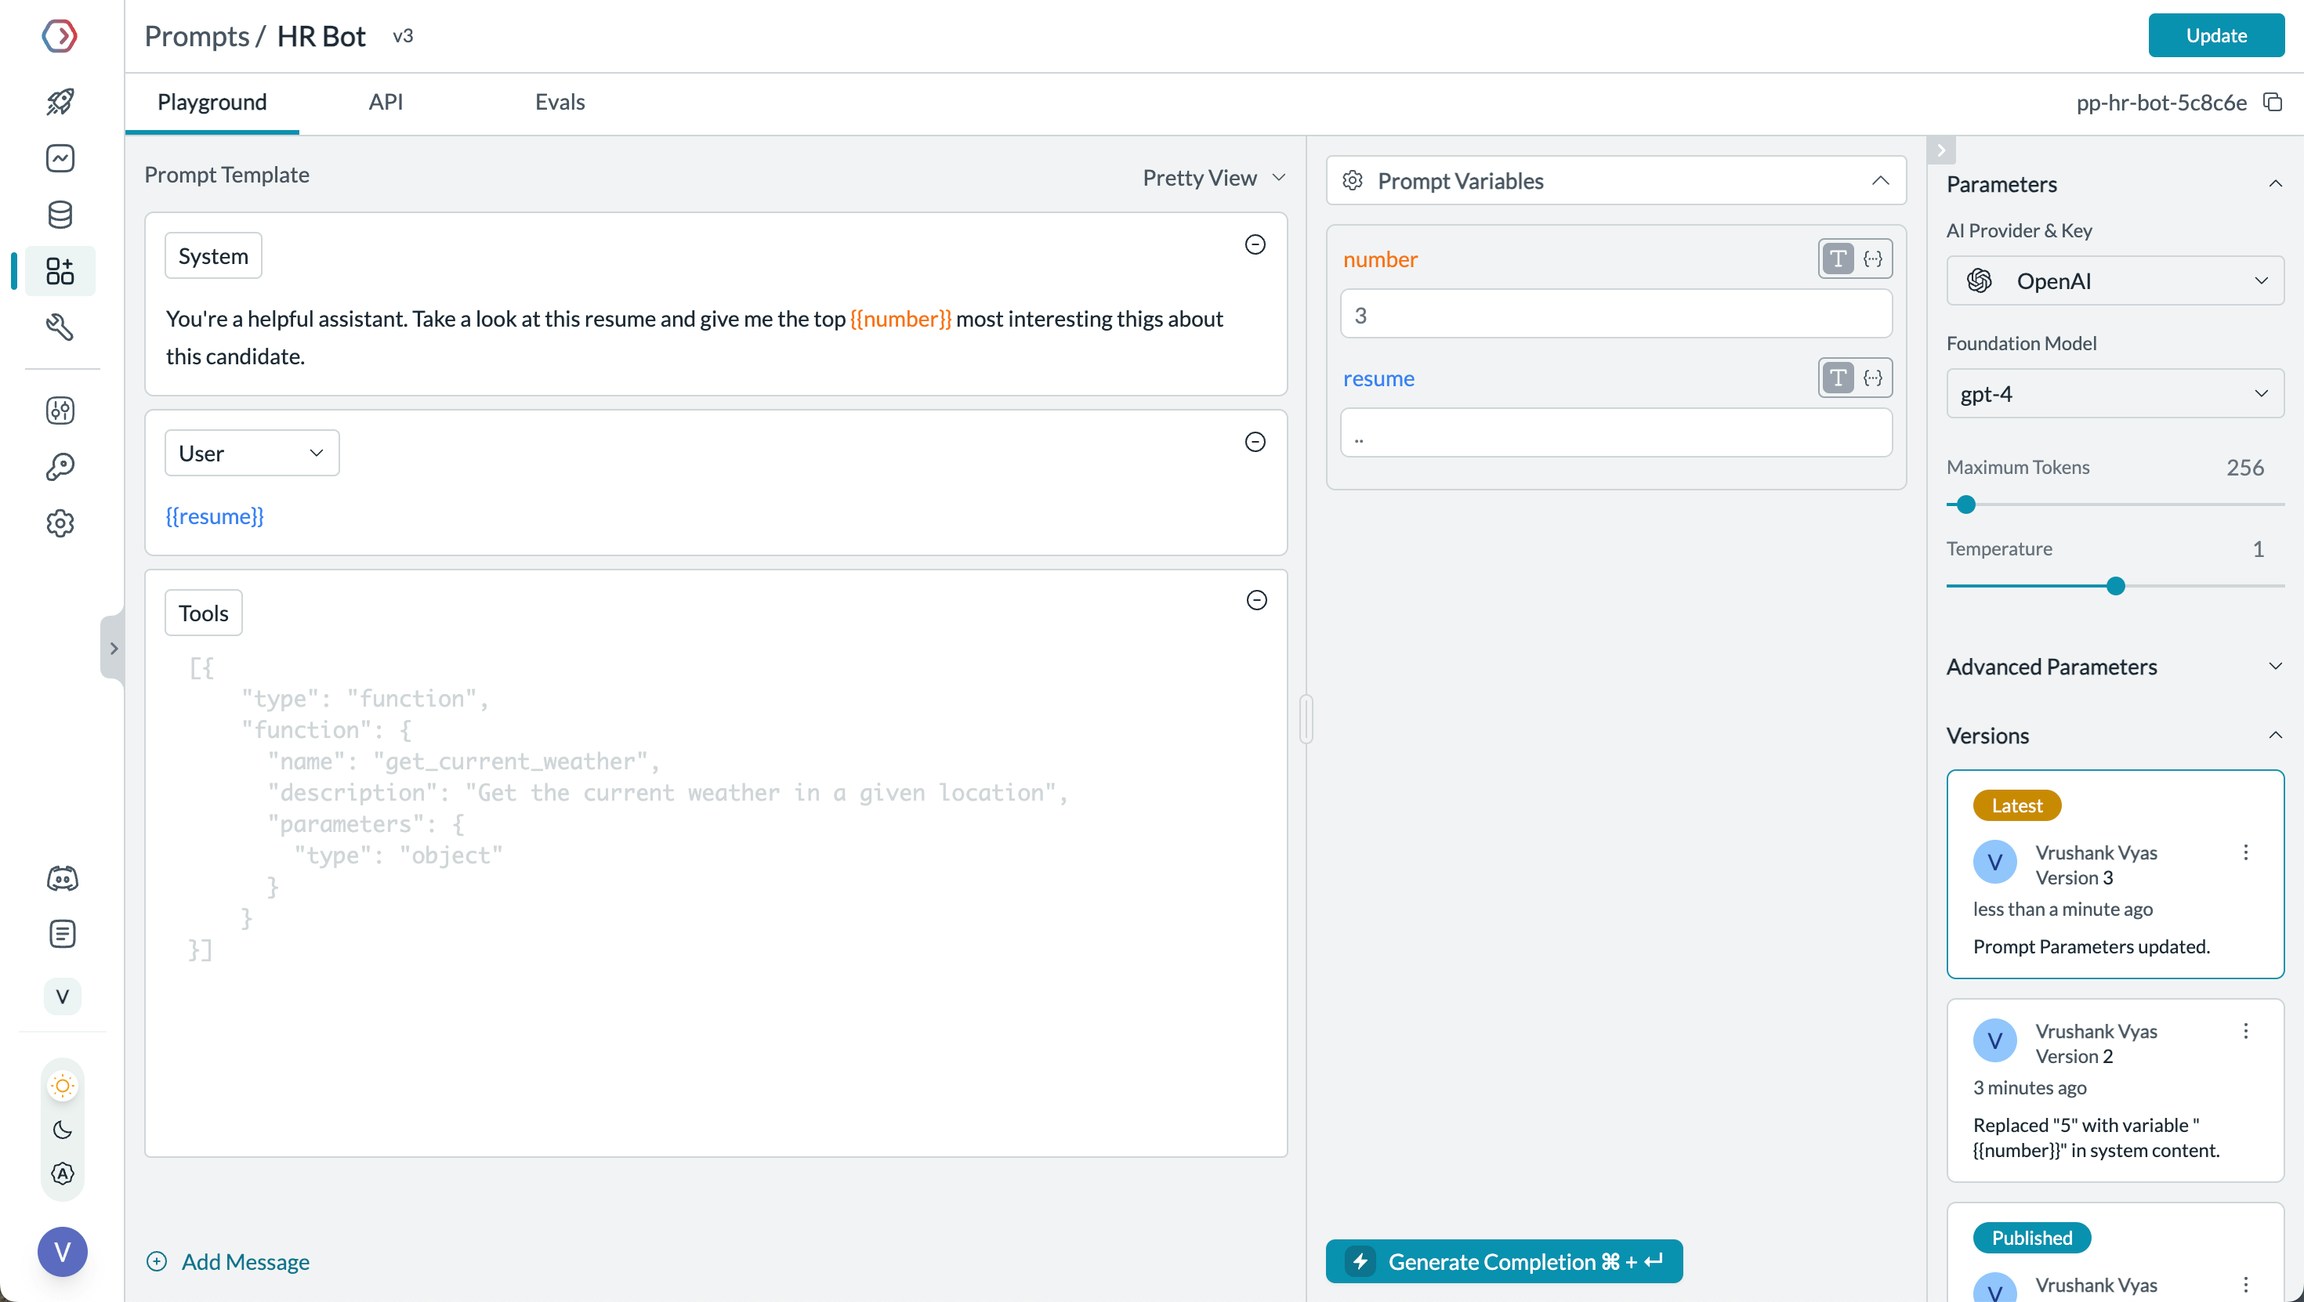
Portkey’s Prompt Engineering Studio helps you create, manage, and optimize the prompts used in your Autogen agents. Instead of hardcoding prompts or instructions, use Portkey’s prompt rendering API to dynamically fetch and apply your versioned prompts.
Prompt Playground
Using Prompt Templates
Prompt Versioning
Mustache Templating for variables
Prompt Playground is a place to compare, test and deploy perfect prompts for your AI application. It’s where you experiment with different models, test variables, compare outputs, and refine your prompt engineering strategy before deploying to production. It allows you to:
Iteratively develop prompts before using them in your agents
Test prompts with different variables and models
Compare outputs between different prompt versions
Collaborate with team members on prompt development
This visual environment makes it easier to craft effective prompts for each step in your Autogen agent’s workflow.
The Prompt Render API retrieves your prompt templates with all parameters configured:
from autogen_agentchat.agents import AssistantAgentfrom autogen_agentchat.ui import Consolefrom autogen_ext.models.openai import OpenAIChatCompletionClientfrom autogen_core.models import ModelFamilyfrom portkey_ai import Portkeyimport asyncio# Initialize Portkey admin client to render promptsportkey_admin = Portkey(api_key="YOUR_PORTKEY_API_KEY")prompt_data = portkey_admin.prompts.render( prompt_id="YOUR_PROMPT_ID", variables={"user_input": "Tell me about artificial intelligence"})model_client = OpenAIChatCompletionClient( base_url="https://api.portkey.ai/v1", api_key="YOUR_PORTKEY_API_KEY", model="@your-provider-slug/gpt-4o", model_info={"family": ModelFamily.GPT_45})agent = AssistantAgent( name="assistant", model_client=model_client, system_message=prompt_data.data.messages[0]["content"])async def main(): await Console(agent.run_stream(task="Tell me about artificial intelligence")) await model_client.close()asyncio.run(main())
You can:
Create multiple versions of the same prompt
Compare performance between versions
Roll back to previous versions if needed
Specify which version to use in your code:
# Use a specific prompt versionprompt_data = portkey_client.prompts.render( prompt_id="YOUR_PROMPT_ID@version_number", variables={ "user_input": "Tell me about quantum computing" })
Portkey prompts use Mustache-style templating for easy variable substitution:
You are an AI assistant helping with {{task_type}}.User question: {{user_input}}Please respond in a {{tone}} tone and include {{required_elements}}.
When rendering, simply pass the variables:
prompt_data = portkey_client.prompts.render( prompt_id="YOUR_PROMPT_ID", variables={ "task_type": "research", "user_input": "Tell me about quantum computing", "tone": "professional", "required_elements": "recent academic references" })
Prompt Engineering Studio
Learn more about Portkey’s prompt management features
Guardrails ensure your Autogen agents operate safely and respond appropriately in all situations.Why Use Guardrails?Autogen agents can experience various failure modes:
Generating harmful or inappropriate content
Leaking sensitive information like PII
Hallucinating incorrect information
Generating outputs in incorrect formats
Portkey’s guardrails protect against these issues by validating both inputs and outputs.Implementing Guardrails
from autogen_agentchat.agents import AssistantAgentfrom autogen_ext.models.openai import OpenAIChatCompletionClientfrom autogen_core.models import ModelFamilyfrom portkey_ai import createHeaders# Create a config with input and output guardrails (recommend using Portkey App)config = { "input_guardrails": ["guardrails-id-xxx", "guardrails-id-yyy"], "output_guardrails": ["guardrails-id-xxx"]}model_client = OpenAIChatCompletionClient( base_url="https://api.portkey.ai/v1", api_key="YOUR_PORTKEY_API_KEY", model="@your-provider-slug/gpt-4o", model_info={"family": ModelFamily.GPT_45}, default_headers=createHeaders(config=config))agent = AssistantAgent( name="safe_agent", model_client=model_client, system_message="You are a helpful assistant that provides safe responses.")
Portkey’s guardrails can:
Detect and redact PII in both inputs and outputs
Filter harmful or inappropriate content
Validate response formats against schemas
Check for hallucinations against ground truth
Apply custom business logic and rules
Learn More About Guardrails
Explore Portkey’s guardrail features to enhance agent safety
Track individual users through your Autogen agents using Portkey’s metadata system.What is Metadata in Portkey?Metadata allows you to associate custom data with each request, enabling filtering, segmentation, and analytics. The special _user field is specifically designed for user tracking.
Reliability: Ensuring consistent service across all users
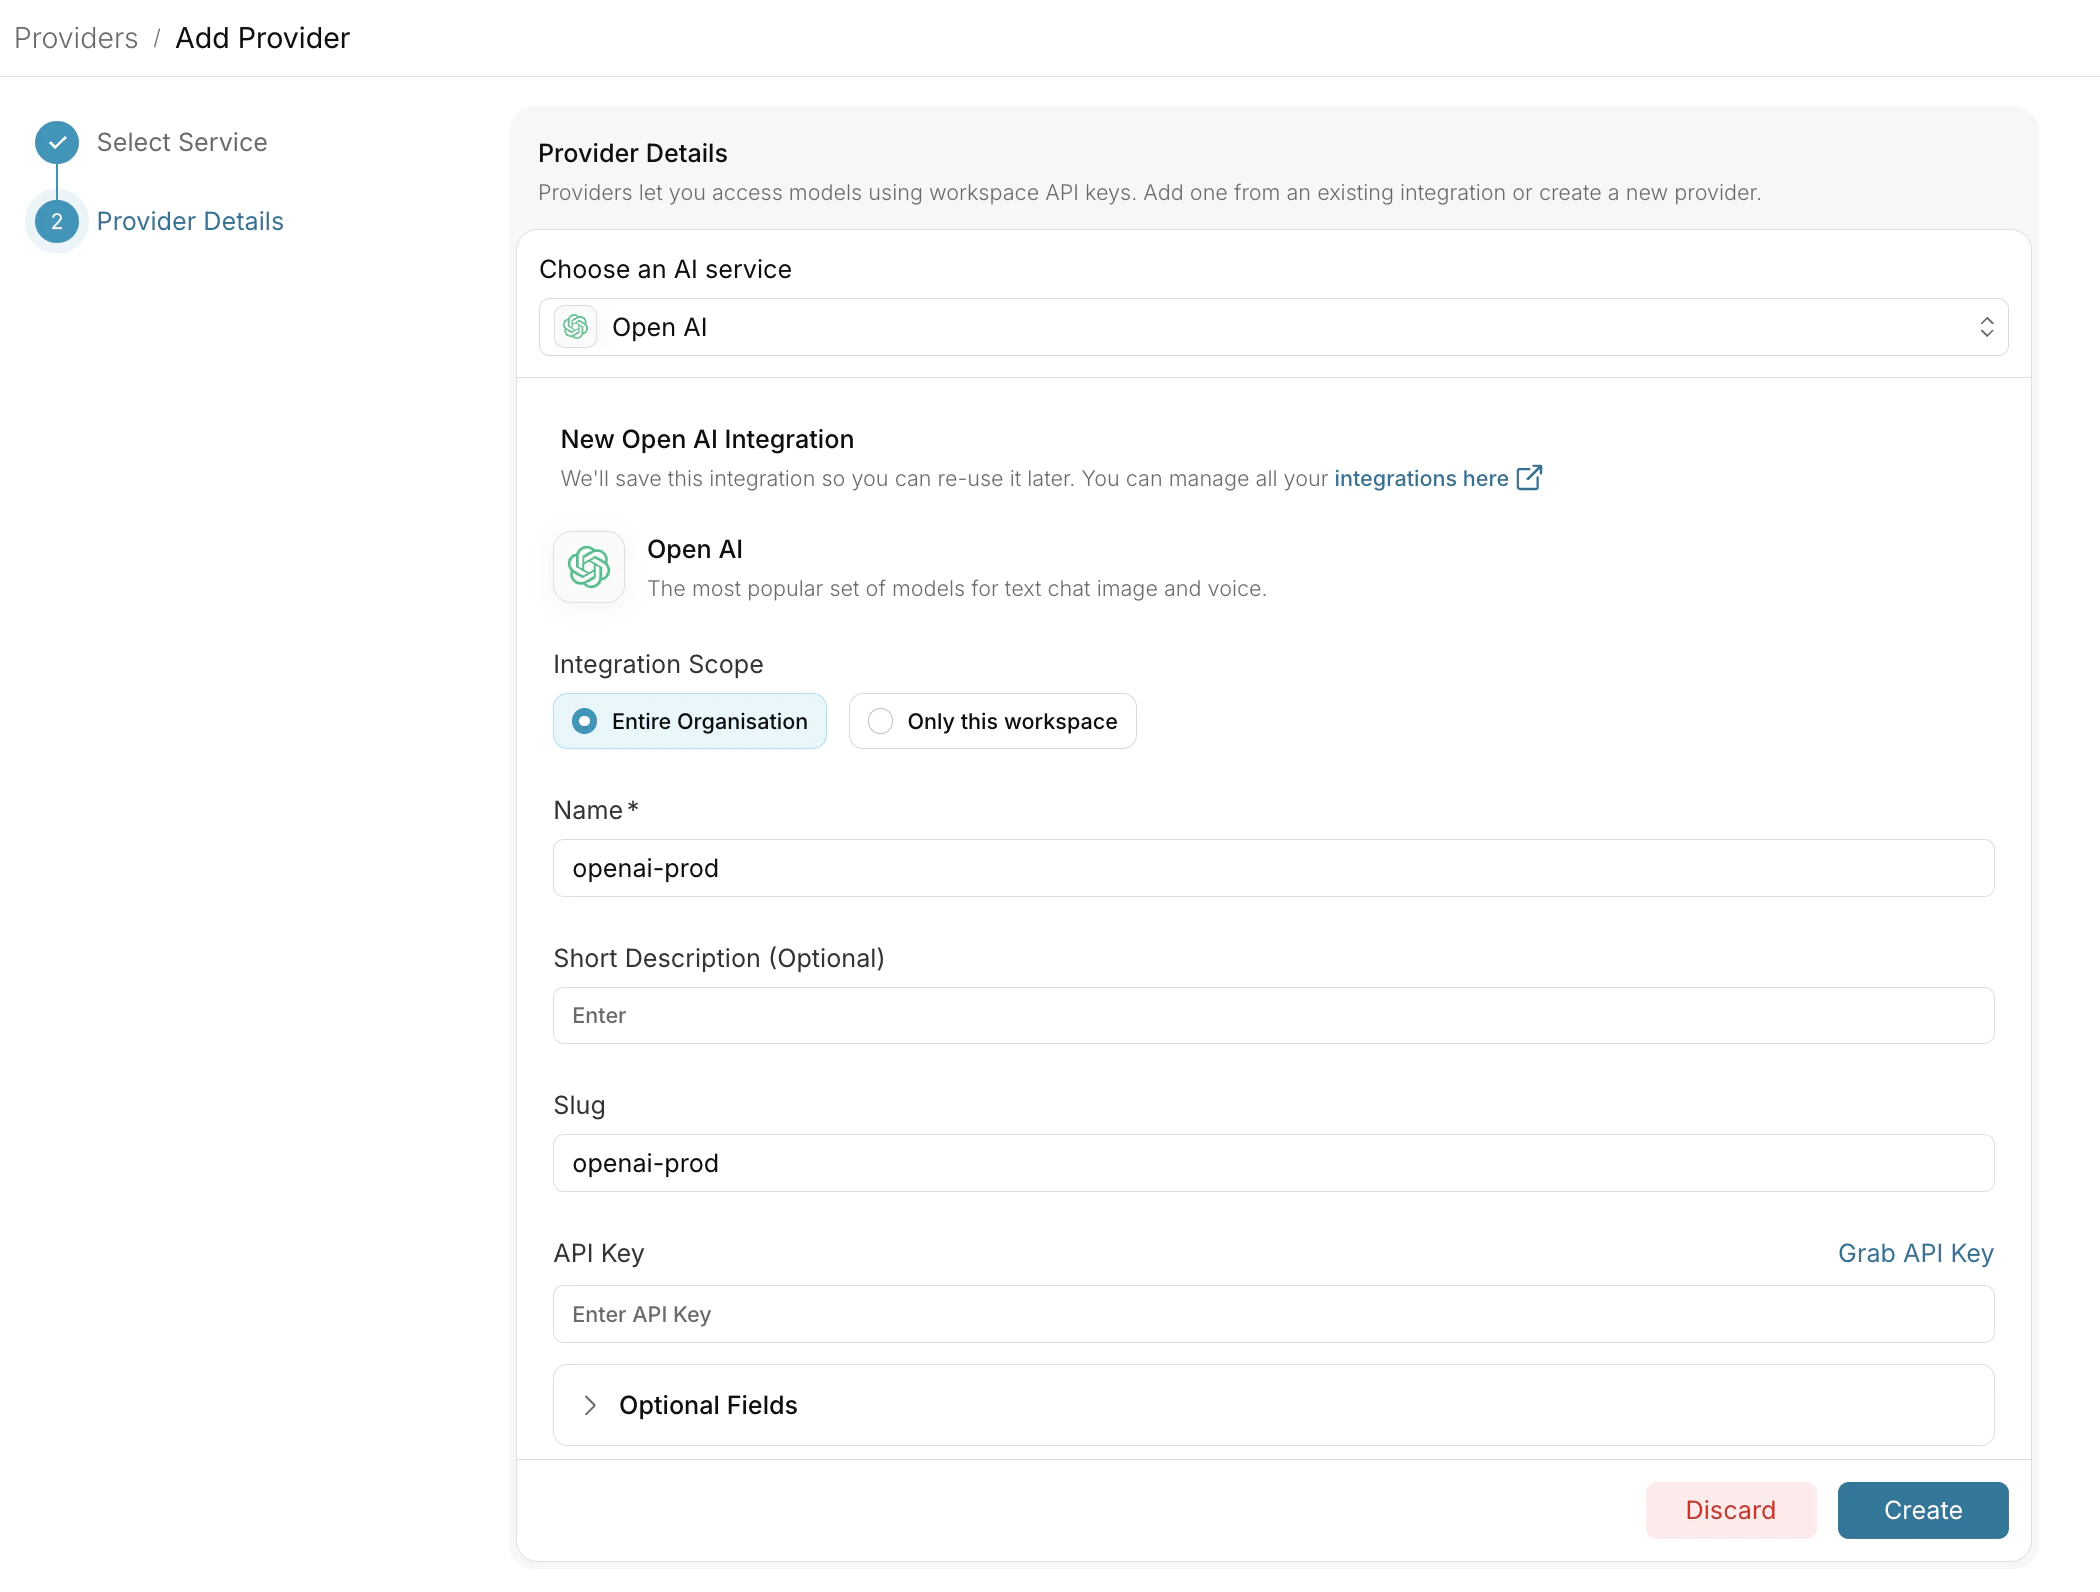
Portkey adds a comprehensive governance layer to address these enterprise needs. Let’s implement these controls step by step.Enterprise Implementation GuidePortkey allows you to use 1600+ LLMs with your Autogen setup, with minimal configuration required. Let’s set up the core components in Portkey that you’ll need for integration.
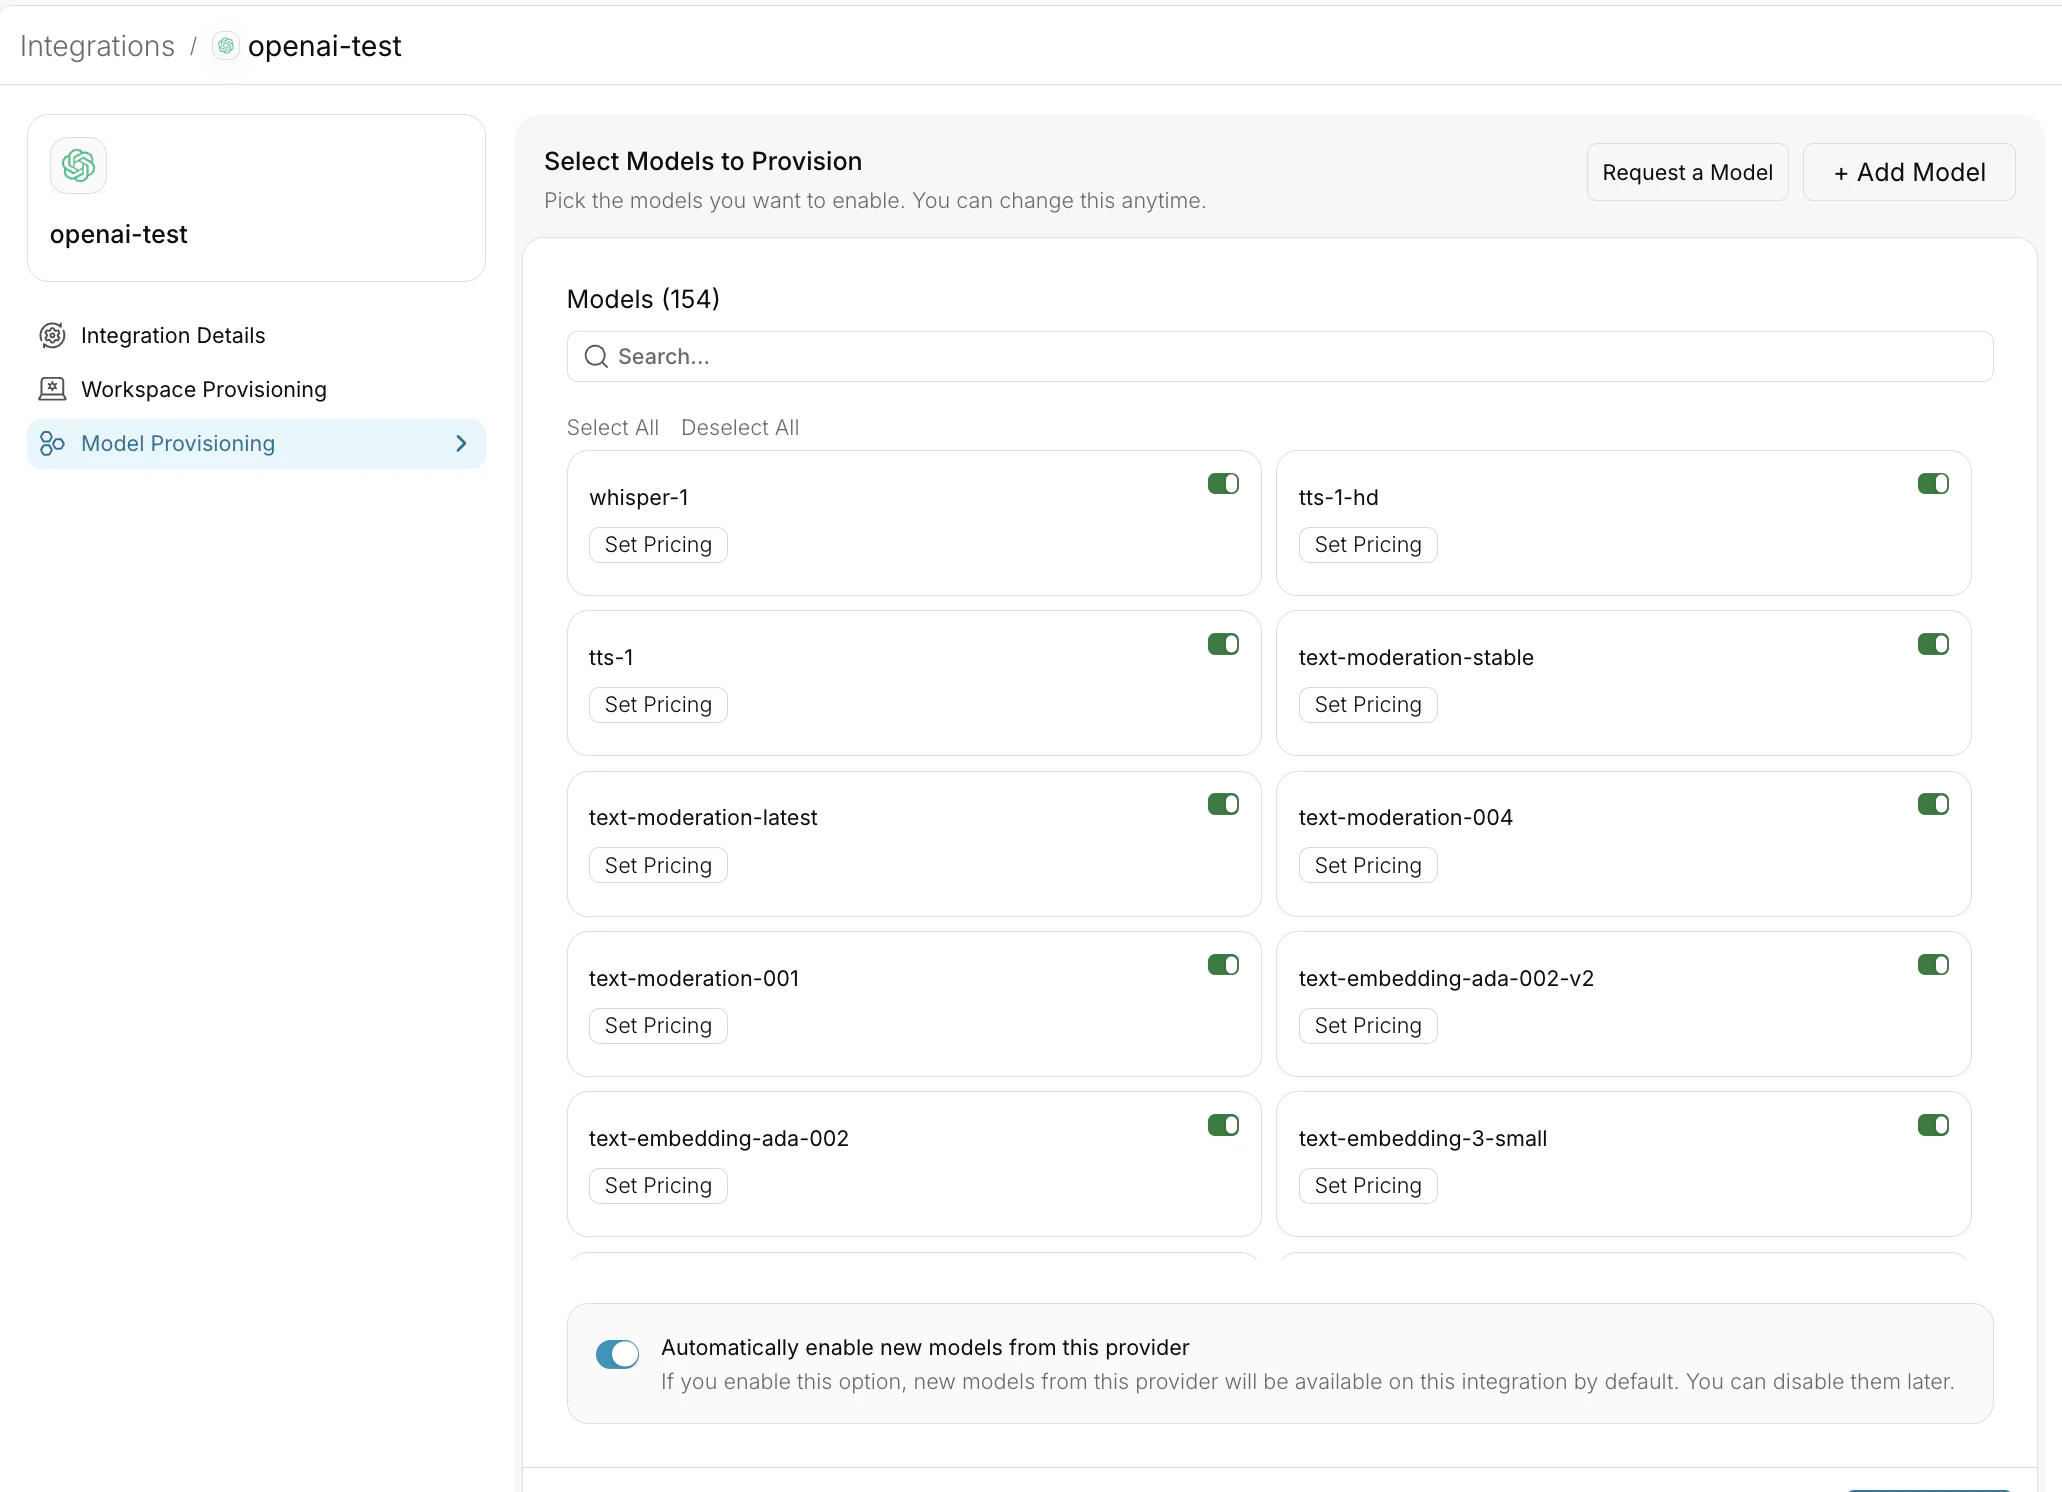
As your AI usage scales, controlling which teams can access specific models becomes crucial. You can simply manage AI models in your org by provisioning model at the top integration level.
Step 4: Set Routing Configuration
Portkey allows you to control your routing logic very simply with it’s Configs feature. Portkey Configs provide this control layer with things like:
Data Protection: Implement guardrails for sensitive code and data
After distributing API keys to your engineering teams, your enterprise-ready Autogen setup is ready to go. Each developer can now use their designated API keys with appropriate access levels and budget controls.
Apply your governance setup using the integration steps from earlier sections
Monitor usage in Portkey dashboard:
Portkey adds production-grade features to Autogen agents including comprehensive observability (traces, logs, analytics), reliability (fallbacks, retries, load balancing), access to 1600+ LLMs, cost management, and enterprise governance - all without changing your agent logic.
Can I use any LLM with Autogen through Portkey?
Yes! Portkey provides access to 1600+ LLMs from providers like OpenAI, Anthropic, Google, Cohere, and many more. Just change the model ID in your configuration to switch between providers.
How do I track costs for different agents?
Portkey automatically tracks costs for all LLM calls. You can segment costs by agent type, user, or custom metadata. Set up AI Provider integrations with budget limits to control spending on Model Catalog.
Does Portkey support all Autogen features?
Yes! Portkey works seamlessly with Autogen’s tool use and agent workflows. It adds observability and reliability without limiting any Autogen functionality.
How do I debug agent failures?
Portkey’s detailed logs and traces make debugging easy. You can see the complete execution flow, including failed tool calls, LLM errors, and retry attempts. Filter by trace ID or metadata to find specific issues.