FutureAGI is an AI lifecycle platform that provides automated evaluation, tracing, and quality assessment for LLM applications. When combined with Portkey, you get a complete end-to-end observability solution covering both operational performance and response quality.

Portkey handles the “what happened, how fast, and how much did it cost?” while FutureAGI answers “how good was the response?”

Why FutureAGI + Portkey?

The integration creates a powerful synergy:

  • Portkey acts as the operational layer - unifying API calls, managing keys, and monitoring metrics like latency, cost, and request volume
  • FutureAGI acts as the quality layer - capturing full request context and running automated evaluations to score model outputs

Getting Started

Prerequisites

Before integrating FutureAGI with Portkey, ensure you have:

  1. Python 3.8+ installed
  2. API Keys:

Installation

pip install portkey-ai fi-instrumentation traceai-portkey

Setting up Environment Variables

Create a .env file in your project root:

# .env
PORTKEY_API_KEY="your-portkey-api-key"
FI_API_KEY="your-futureagi-api-key"
FI_SECRET_KEY="your-futureagi-secret-key"

Integration Guide

Step 1: Basic Setup

Import the necessary libraries and configure your environment:

import asyncio
import json
import time
from portkey_ai import Portkey
from traceai_portkey import PortkeyInstrumentor
from fi_instrumentation import register
from fi_instrumentation.fi_types import (
    ProjectType, EvalTag, EvalTagType,
    EvalSpanKind, EvalName, ModelChoices
)
from dotenv import load_dotenv

load_dotenv()

Step 2: Configure FutureAGI Tracing

Set up comprehensive evaluation tags to automatically assess model responses:

def setup_tracing(project_version_name: str):
    """Setup tracing with comprehensive evaluation tags"""
    tracer_provider = register(
        project_name="Model-Benchmarking",
        project_type=ProjectType.EXPERIMENT,
        project_version_name=project_version_name,
        eval_tags=[
            # Evaluates if the response is concise
            EvalTag(
                type=EvalTagType.OBSERVATION_SPAN,
                value=EvalSpanKind.LLM,
                eval_name=EvalName.IS_CONCISE,
                custom_eval_name="Is_Concise",
                mapping={"input": "llm.output_messages.0.message.content"},
                model=ModelChoices.TURING_LARGE
            ),
            # Evaluates context adherence
            EvalTag(
                type=EvalTagType.OBSERVATION_SPAN,
                value=EvalSpanKind.LLM,
                eval_name=EvalName.CONTEXT_ADHERENCE,
                custom_eval_name="Response_Quality",
                mapping={
                    "context": "llm.input_messages.0.message.content",
                    "output": "llm.output_messages.0.message.content",
                },
                model=ModelChoices.TURING_LARGE
            ),
            # Evaluates task completion
            EvalTag(
                type=EvalTagType.OBSERVATION_SPAN,
                value=EvalSpanKind.LLM,
                eval_name=EvalName.TASK_COMPLETION,
                custom_eval_name="Task_Completion",
                mapping={
                    "input": "llm.input_messages.0.message.content",
                    "output": "llm.output_messages.0.message.content",
                },
                model=ModelChoices.TURING_LARGE
            ),
        ]
    )
    # Instrument the Portkey library
    PortkeyInstrumentor().instrument(tracer_provider=tracer_provider)
    return tracer_provider

The mapping parameter in EvalTag tells the evaluator where to find the necessary data within the trace. This is crucial for accurate evaluation.

Step 3: Define Models and Test Scenarios

Configure the models you want to test and create test scenarios:

def get_models():
    """Setup model configurations with their Portkey Virtual Keys"""
    return [
        {
            "name": "GPT-4o",
            "provider": "OpenAI",
            "virtual_key": "openai-virtual-key",
            "model_id": "gpt-4o"
        },
        {
            "name": "Claude-3.7-Sonnet",
            "provider": "Anthropic",
            "virtual_key": "anthropic-virtual-key",
            "model_id": "claude-3-7-sonnet-latest"
        },
        {
            "name": "Llama-3-70b",
            "provider": "Groq",
            "virtual_key": "groq-virtual-key",
            "model_id": "llama3-70b-8192"
        },
    ]

def get_test_scenarios():
    """Returns a dictionary of test scenarios"""
    return {
        "reasoning_logic": "A farmer has 17 sheep. All but 9 die. How many are left?",
        "creative_writing": "Write a 6-word story about a robot who discovers music.",
        "code_generation": "Write a Python function to find the nth Fibonacci number.",
    }

Step 4: Execute Tests with Automatic Evaluation

Run tests on each model while capturing both operational metrics and quality evaluations:

async def test_model(model_config, prompt):
    """Tests a single model with a single prompt and returns the response"""

    tracer_provider = setup_tracing(model_config["name"])

    print(f"Testing {model_config['name']}...")

    client = Portkey(virtual_key=model_config['virtual_key'])
    start_time = time.time()

    completion = await client.chat.completions.create(
        messages=[{"role": "user", "content": prompt}],
        model=model_config['model_id'],
        max_tokens=1024,
        temperature=0.5
    )
    response_time = time.time() - start_time
    response_text = completion.choices[0].message.content or ""

    return response_text

async def main():
    """Main execution function to run all tests"""
    models_to_test = get_models()
    scenarios = get_test_scenarios()

    for test_name, prompt in scenarios.items():
        print(f"\n{'='*20} SCENARIO: {test_name.upper()} {'='*20}")
        print(f"PROMPT: {prompt}")
        print("-" * 60)

        for model in models_to_test:
            await test_model(model, prompt)

        await asyncio.sleep(1)  # Brief pause between scenarios
        PortkeyInstrumentor().uninstrument()

if __name__ == "__main__":
    asyncio.run(main())

Viewing Results

After running your tests, you’ll have two powerful dashboards to analyze performance:

FutureAGI Dashboard - Quality View

Navigate to the Prototype Tab in your FutureAGI Dashboard to find your “Model-Benchmarking” project.

Key features:

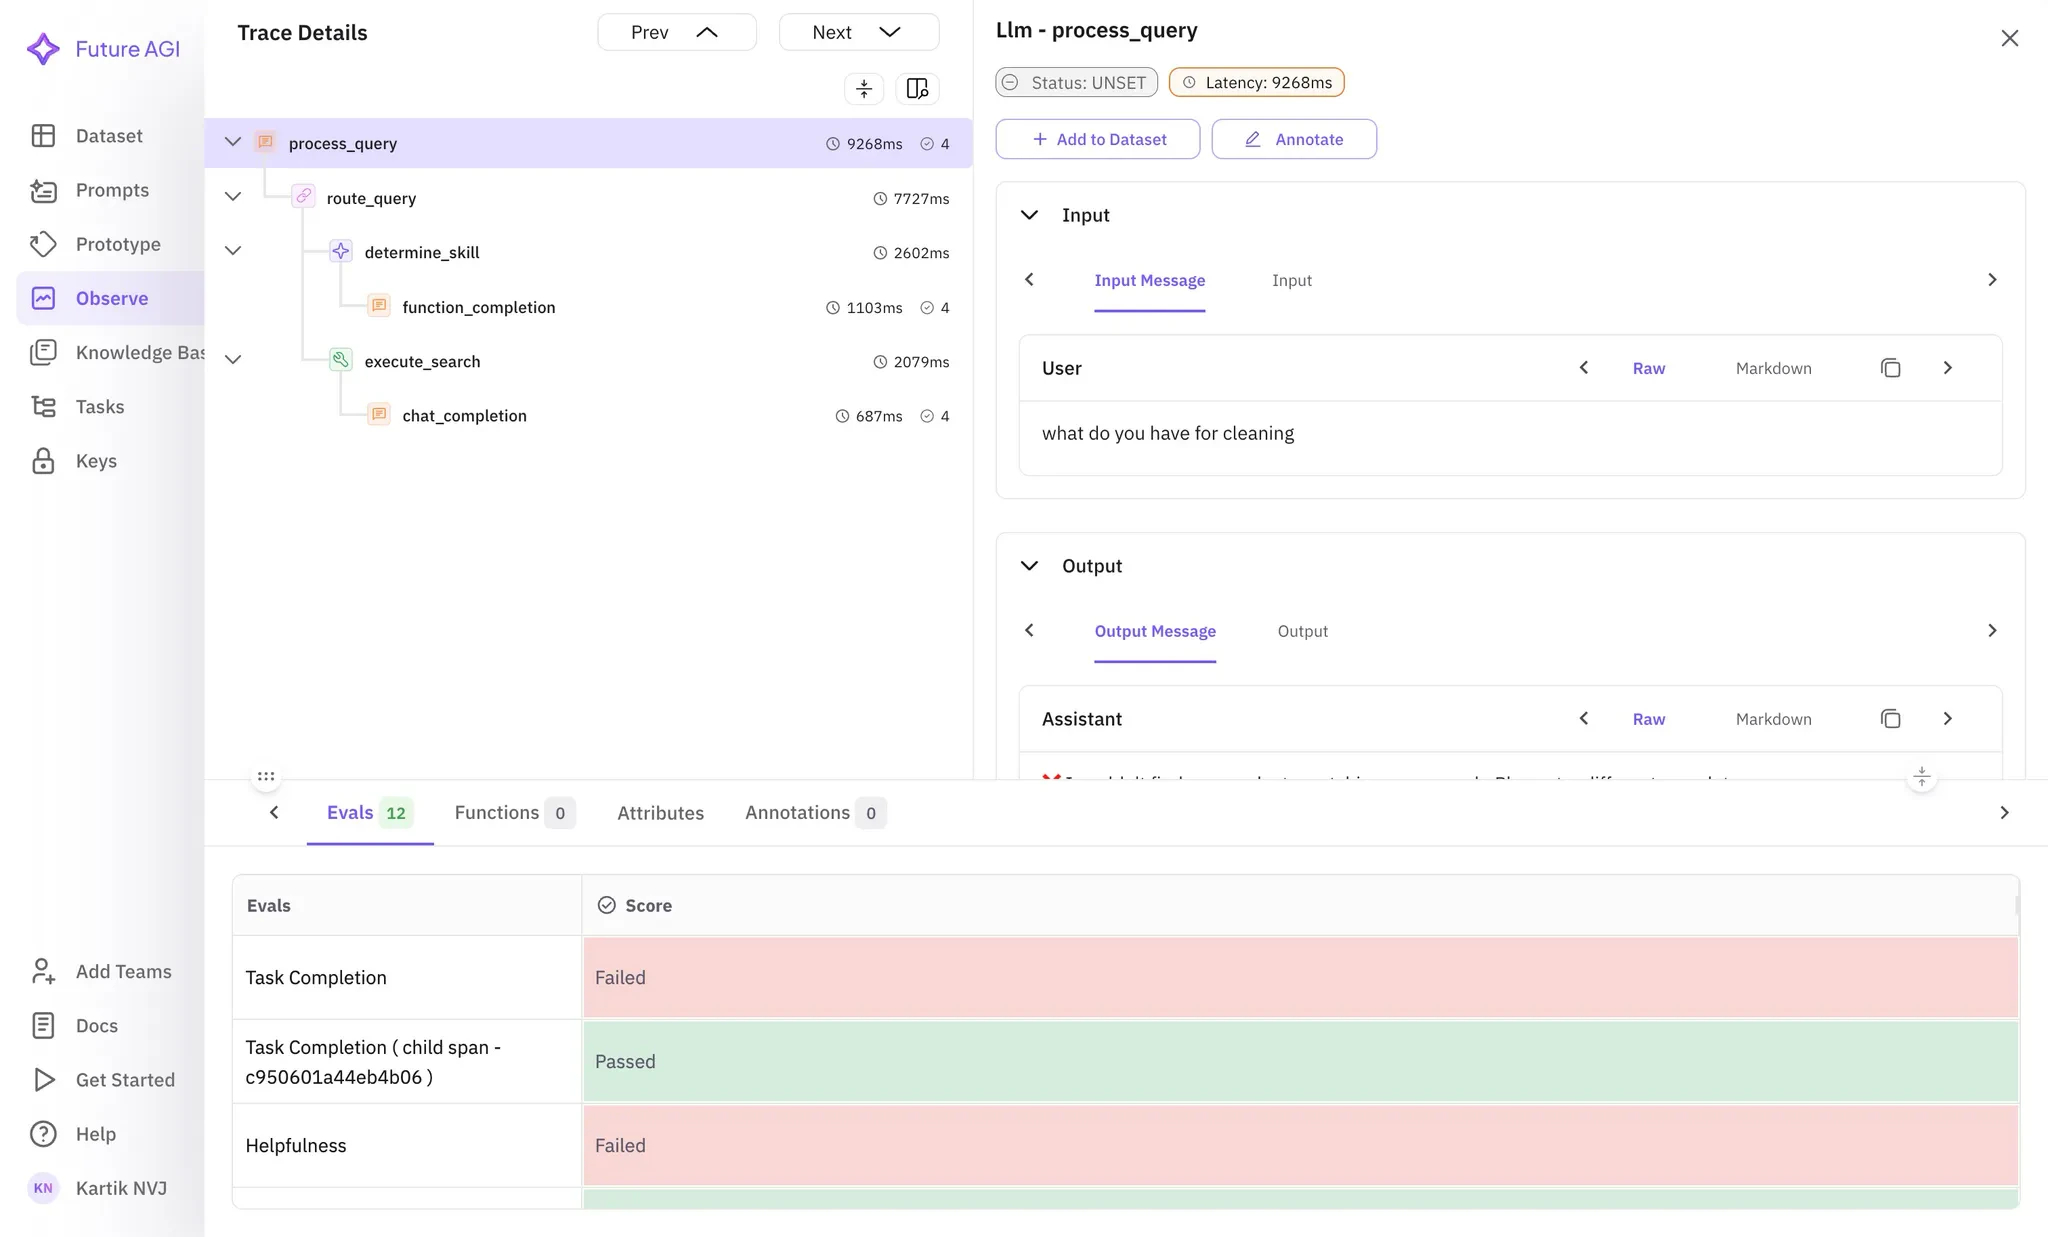
  • Automated evaluation scores for each model response
  • Detailed trace analysis with quality metrics
  • Comparison views across different models

Portkey Dashboard - Operational View

Access your Portkey dashboard to see operational metrics for all API calls:

Key metrics:

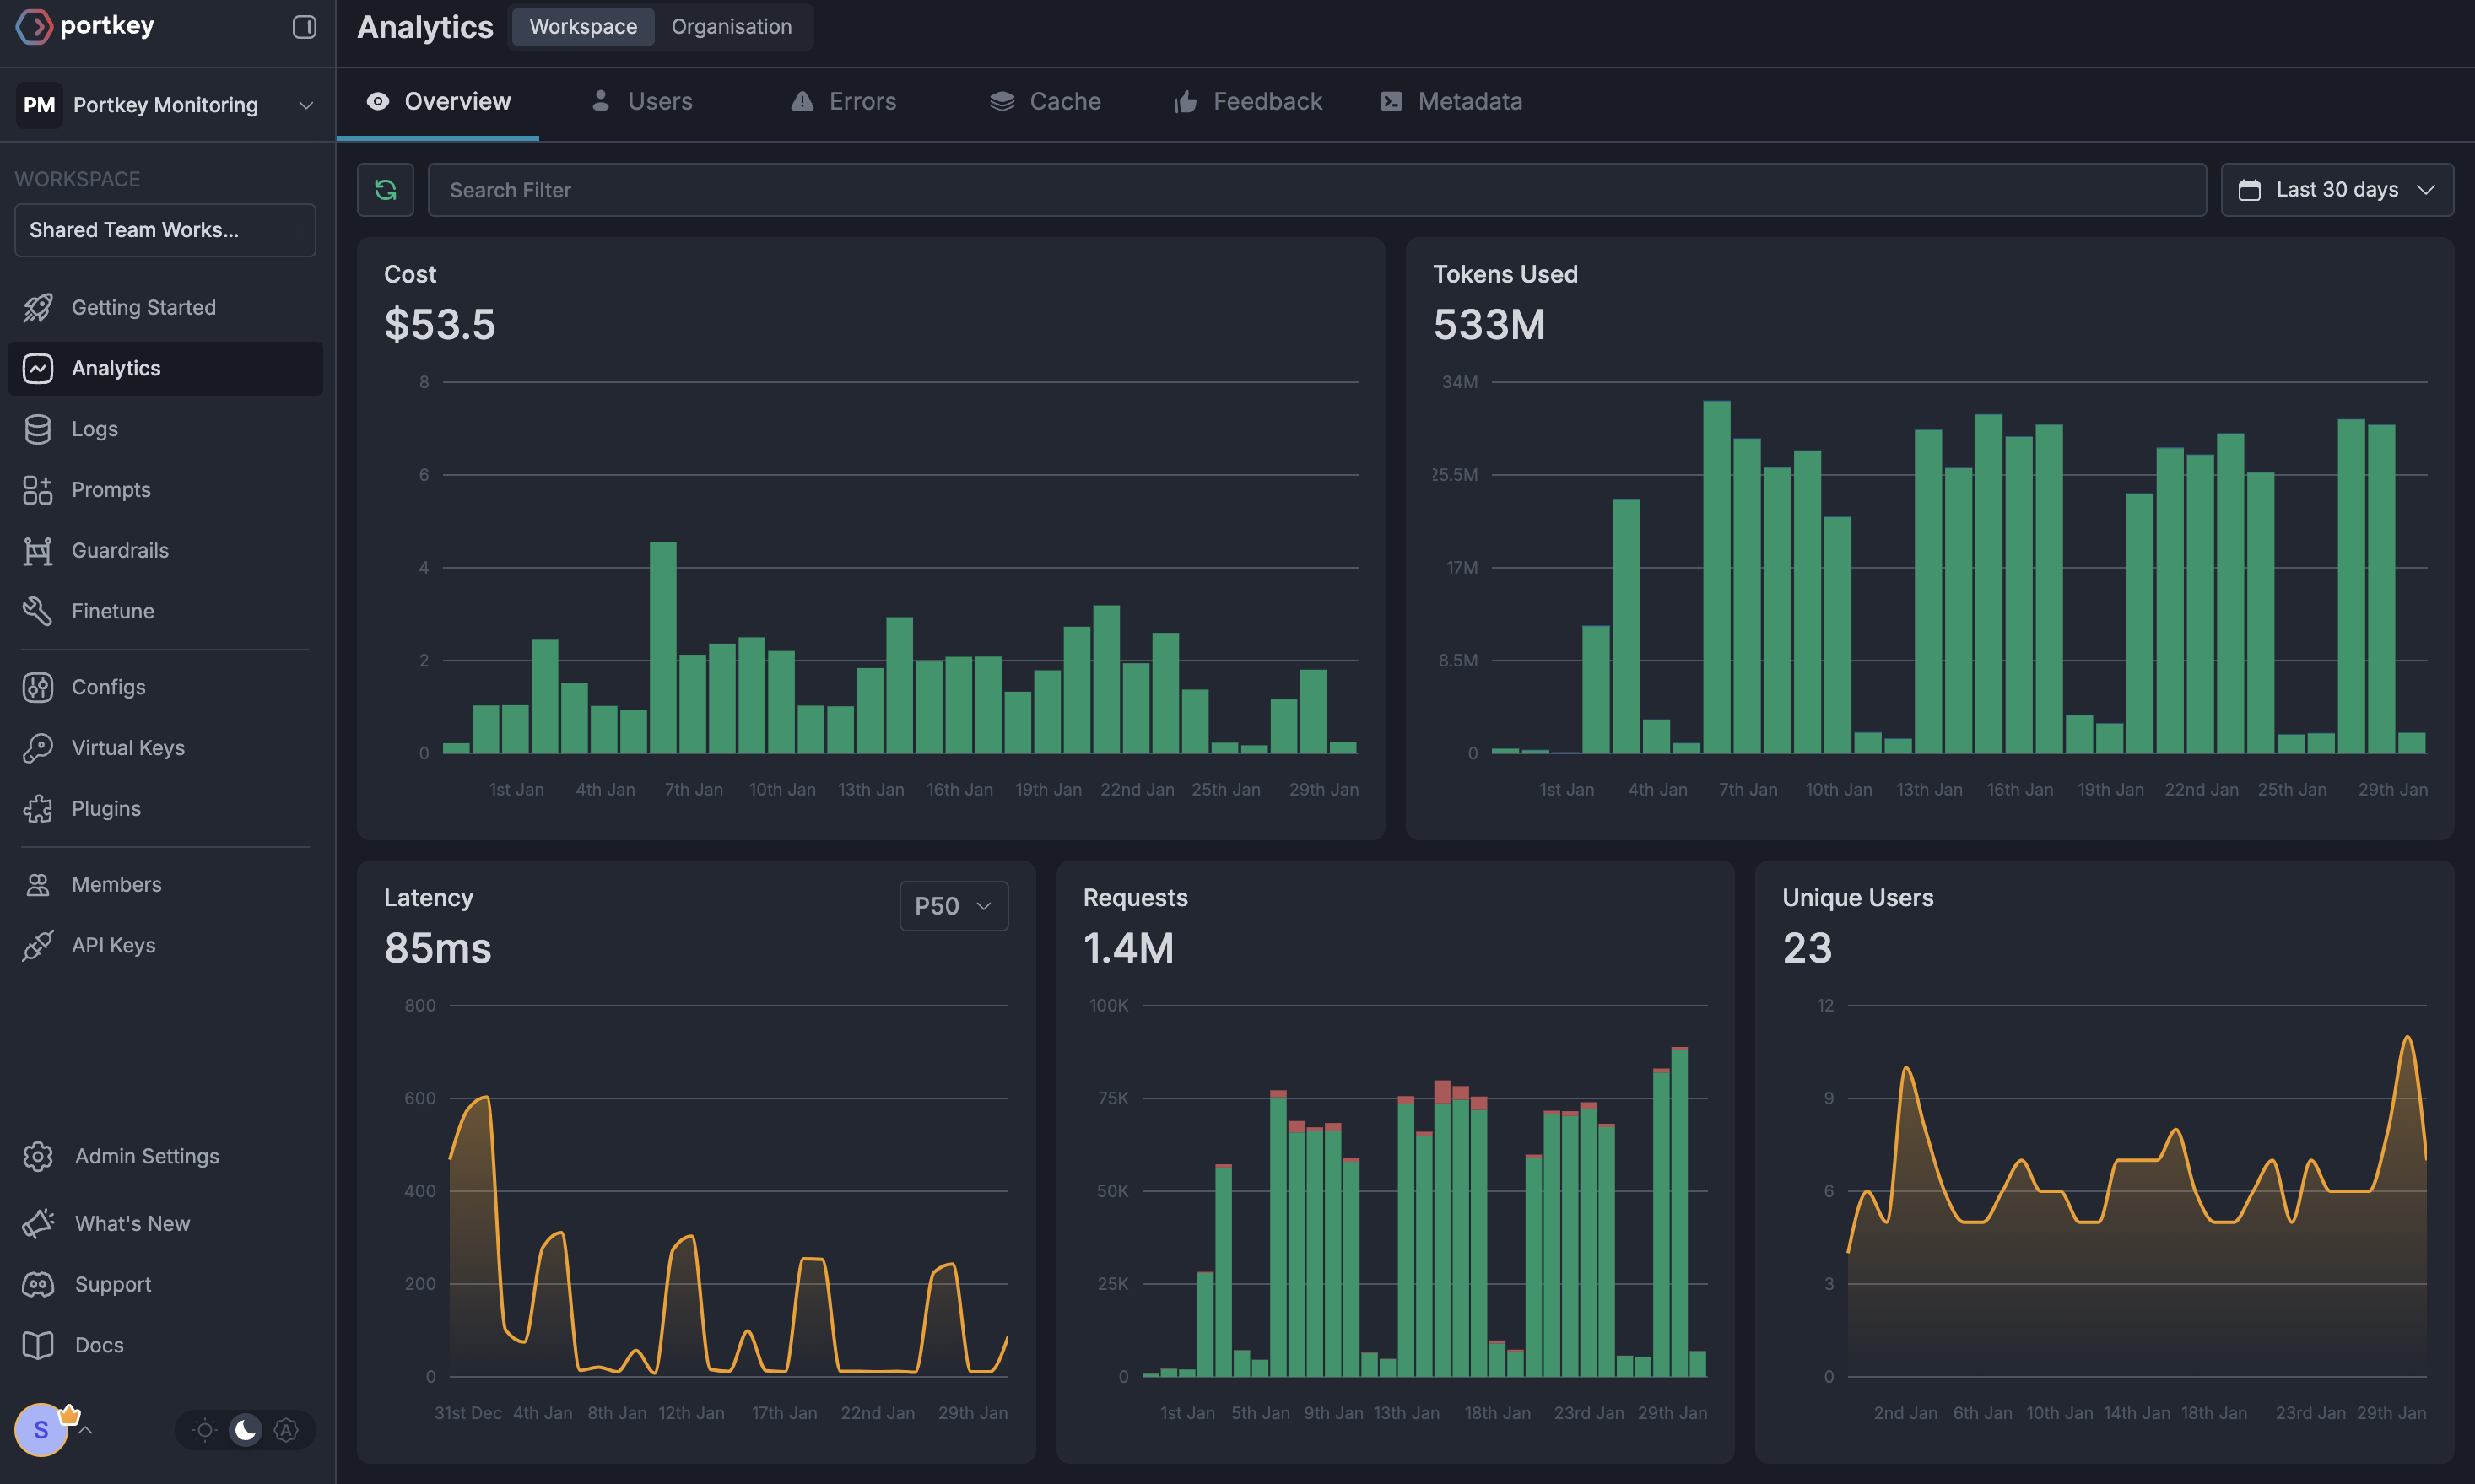
  • Unified Logs: Single view of all requests across providers
  • Cost Tracking: Automatic cost calculation for every call
  • Latency Monitoring: Response time comparisons across models
  • Token Usage: Detailed token consumption analytics

Advanced Use Cases

Complex Agentic Workflows

The integration supports tracing complex workflows where you chain multiple LLM calls:

# Example: E-commerce assistant with multiple LLM calls
async def ecommerce_assistant_workflow(user_query):
    # Step 1: Intent classification
    intent = await classify_intent(user_query)

    # Step 2: Product search
    products = await search_products(intent)

    # Step 3: Generate response
    response = await generate_response(products, user_query)

    # All steps are automatically traced and evaluated
    return response

CI/CD Integration

Leverage this integration in your CI/CD pipelines for:

  • Automated Model Testing: Run evaluation suites on new model versions
  • Quality Gates: Set thresholds for evaluation scores before deployment
  • Performance Monitoring: Track degradation in model quality over time
  • Cost Optimization: Monitor and alert on cost spikes

Benefits

Comprehensive Observability

Track both operational metrics (cost, latency) and quality metrics (accuracy, relevance) in one place

Automated Evaluation

No manual evaluation needed - FutureAGI automatically scores responses on multiple dimensions

Multi-Model Comparison

Easily compare different models side-by-side on the same tasks

Production Ready

Built-in alerting and monitoring for your production LLM applications

Example Notebooks

Interactive Colab Notebook

Try out the FutureAGI + Portkey integration with our interactive notebook

Next Steps

  1. Create your FutureAGI account
  2. Set up Virtual Keys in Portkey
  3. Run the example code to see automated evaluation in action
  4. Customize evaluation tags for your specific use cases
  5. Integrate into your CI/CD pipeline for continuous model quality monitoring

For advanced configurations and custom evaluators, check out the FutureAGI documentation and join our Discord community for support.